HubSpot Tutorial
How to Connect Google Ads to HubSpot: 1-min Interactive Guide
Here is a step by step interactive guide to help you connect Google Ads to Hubspot.
Here's a quick step-by-step guide 🔝
Here's a quick step-by-step guide 🔝
Discover how you can effortlessly merge Google Ads with HubSpot for impactful opportunities for your campaigns.
Why connect Google Ads to HubSpot?
Are you currently switching between tabs just to track your campaigns?
Before we dive into the details of using Superjoin to connect Google Ads to {HubSpot}, let’s understand why connecting them is such a powerful move for your {marketing strategy}. When you connect Google Ads to Hubspot it will allow you to:
Unify Customer Data: By integrating Google Ads click & {conversion data with HubSpot CRM}, you’ll gain a complete view of your customers’ journey. This helps you make data-driven decisions and craft more targeted campaigns that resonate with your customers.
Optimise Targeting: Leverage HubSpot’s rich audience data to create laser-focused Google Ads campaigns. By tapping into the wealth of information stored in your CRM, you can craft highly personalised ads that speak directly to your prospects’ needs and interests.
Improve ROI Tracking: Accurately attribute conversions and revenue to specific Google Ads campaigns within HubSpot. This level of granular tracking enables you to optimise your ad spend and focus on the strategies that deliver the best results for your business.
Method 1: Connecting Google Ads to Hubspot using Superjoin
Step by Step guide:
Install Superjoin on Google Sheets
Open Google Sheets, navigate to the Extensions tab, and select Add-ons > Get add-ons.
In the Google Workspace Marketplace, search for “Superjoin.” Follow the prompts to grant necessary permissions.
Launch Superjoin from Extensions > Superjoin > Launch.
Superjoin will open on the right-hand side of your spreadsheet.
Alternatively, install Superjoin on Microsoft Excel
Open this link, click on Get it now.

Once installed, click on Open in Excel or Try using it online (for Excel online).
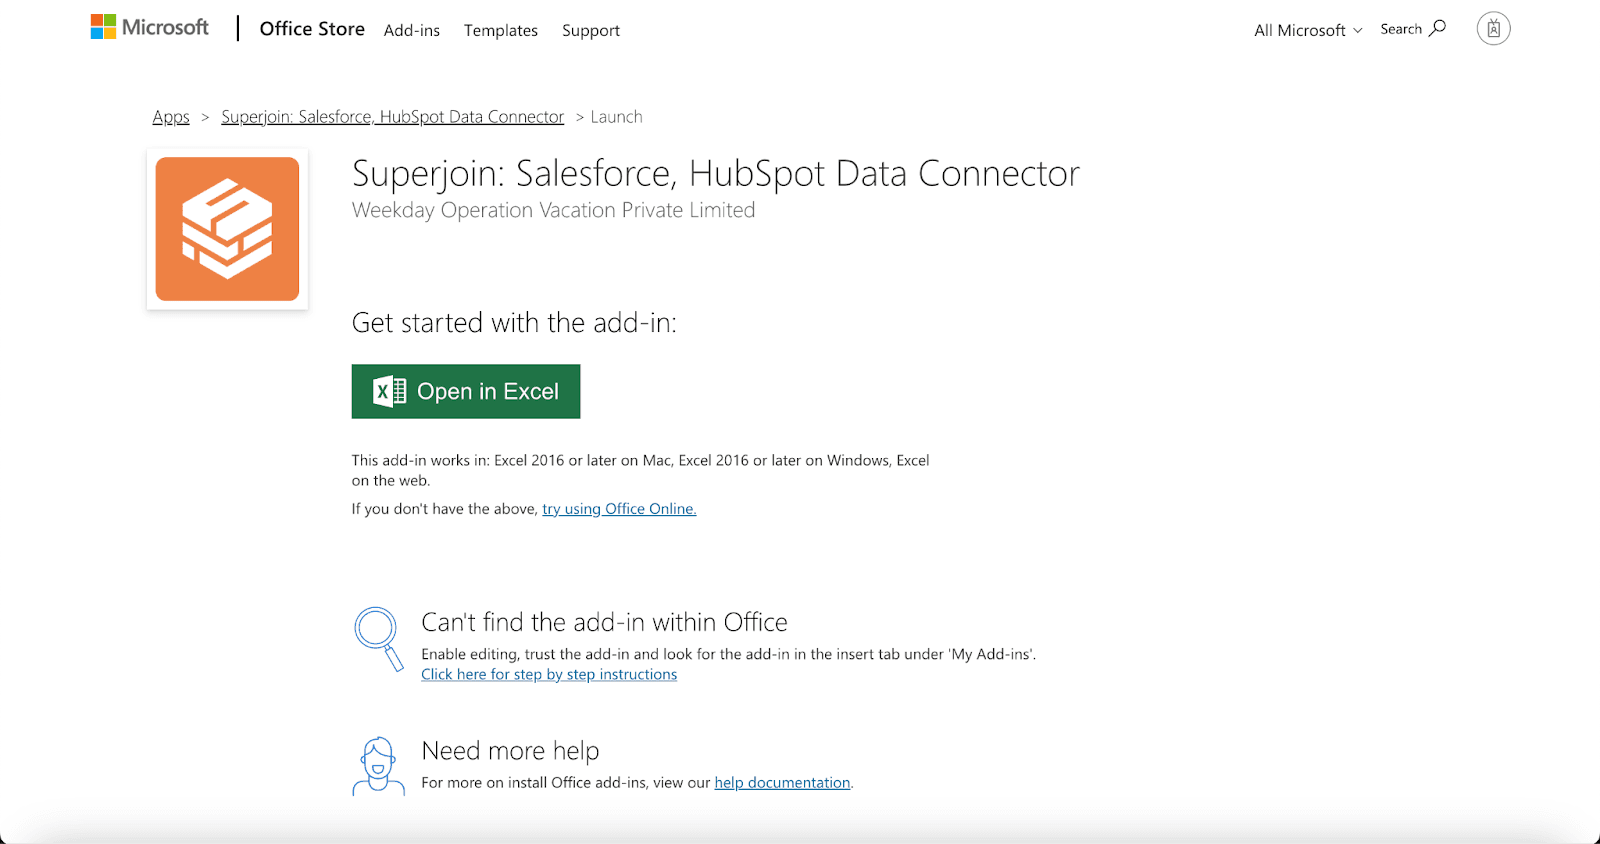
Launch Superjoin by opening the add-in and clicking on Open Sidebar. Login with your Microsoft account to start using Superjoin.

Connect and Import Data from Google Ads
Open Superjoin Sidebar: In the Superjoin sidebar, click on Sources then choose Google Ads.
Authenticate Google Ads: Follow the prompts to connect your Google Ads account to Superjoin.
Select Metrics: Choose the metrics and dimensions you need from Google Ads, such as {Campaign Performance, Clicks, Impressions, etc}. Configure any necessary filters and click Import. Your Google Ads data will populate in Google Sheets .
Export Data to HubSpot
In the Superjoin sidebar, navigate to the Export Section.
Choose the tab and header row in your sheet containing the data to export.
Select the HubSpot Object (e.g., Contacts, Deals) and the type of action: Update, Insert, Upsert, or Delete.
Map the fields from your Google Sheets data to corresponding fields in HubSpot. Superjoin will auto-map fields from HubSpot imports, or you can map them manually.
Your data is successfully migrated from Google Ads to Hubspot.
For any problem, read the in-built guide or reach us at support@superjoin.in.
Pros:
Superjoin offers several advantages for integrating Google Ads with HubSpot
Granular Control: Superjoin allows you to precisely select the metrics and dimensions you want to import from Google Ads, ensuring you have exactly the data you need.
Selecting Metrics: You can move data between Google Ads and Hubspot without any technical knowledge (or doing any coding)
Seamless Data Transfer: By using Google Sheets as an intermediary, Superjoin facilitates a smooth data transfer process from Google Ads to HubSpot, reducing manual data entry.
Flexible Mapping: You can easily map fields between Google Sheets and HubSpot, with options for auto-mapping or manual configuration.
Data Sync: Superjoin enables timely data updates, so your HubSpot CRM always reflects the latest information from your Google Ads campaigns.
Ease of Use: Superjoin’s integration is simple and easy to use, even for non-tech users.
Method 2: Connecting Google Ads Directly through HubSpot
This is the simplest and most popular method. HubSpot provides a built-in way to connect with Google Ads, enabling you to view key metrics directly in the HubSpot dashboard.
Step-by-Step Guide:
Go to your HubSpot account dashboard.
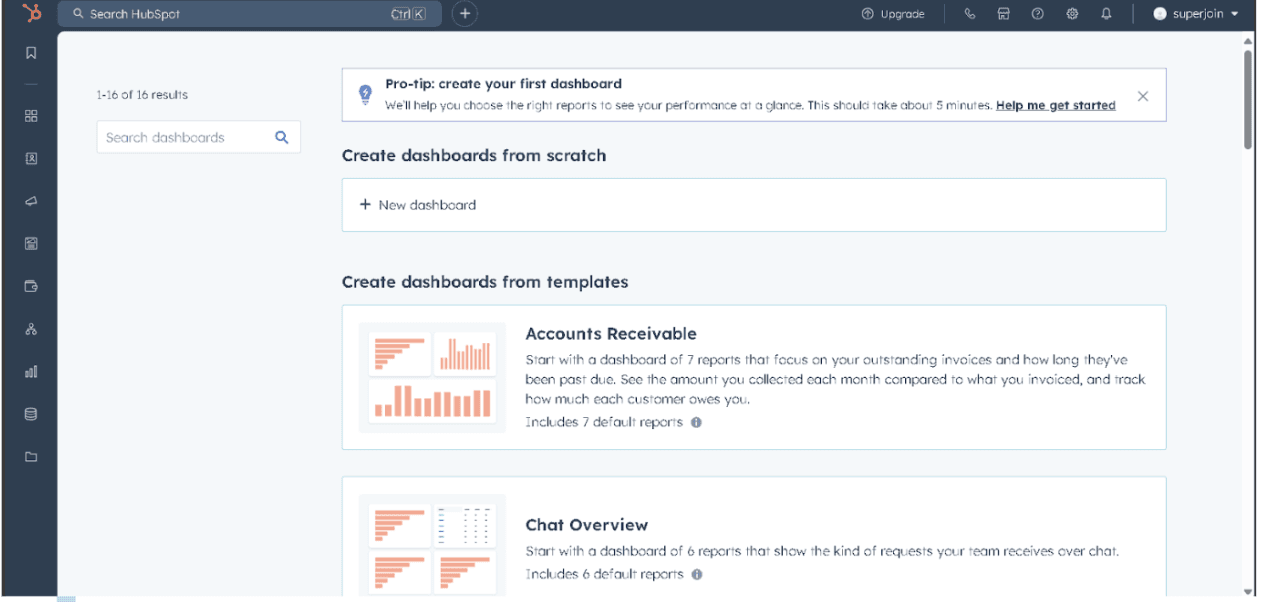
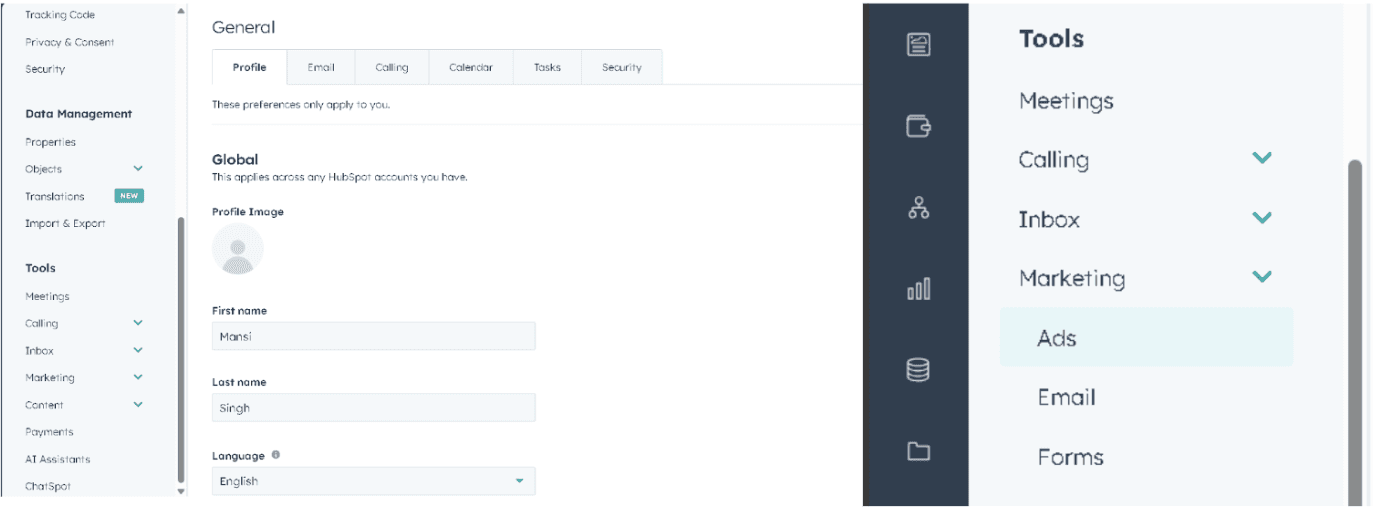
Click on the Marketing tab and select Ads.
In the Ads Dashboard, click Connect Account.
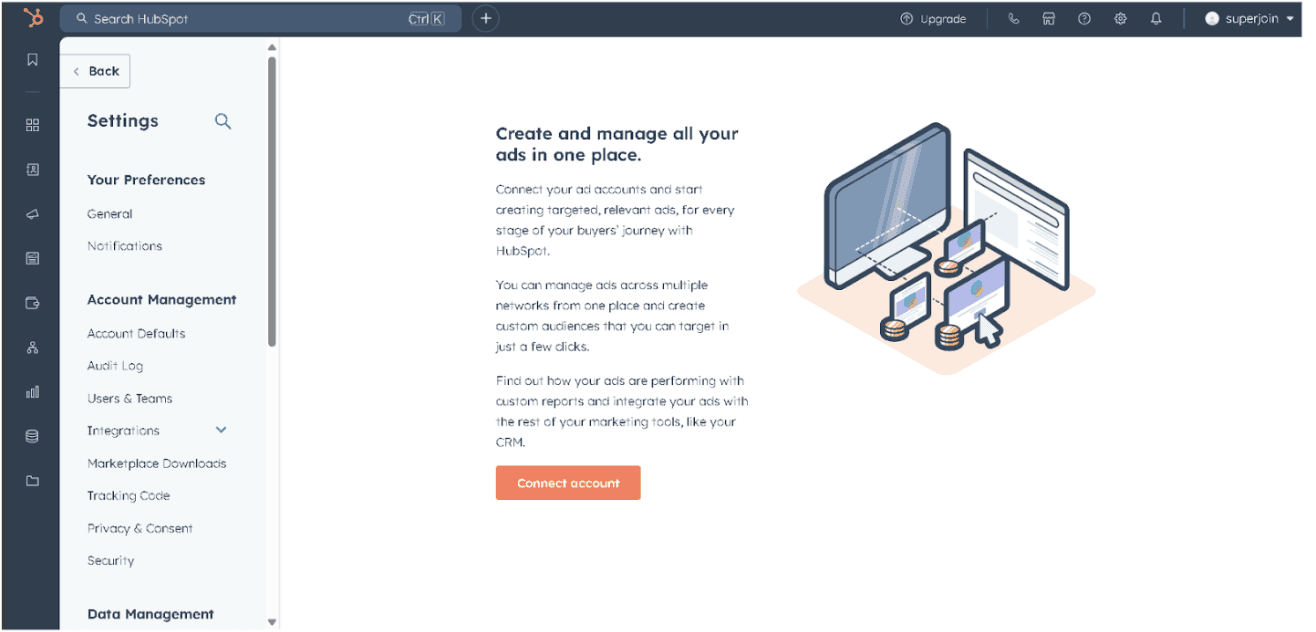
Select Google Ads and follow the prompts to sign in with your Google account.
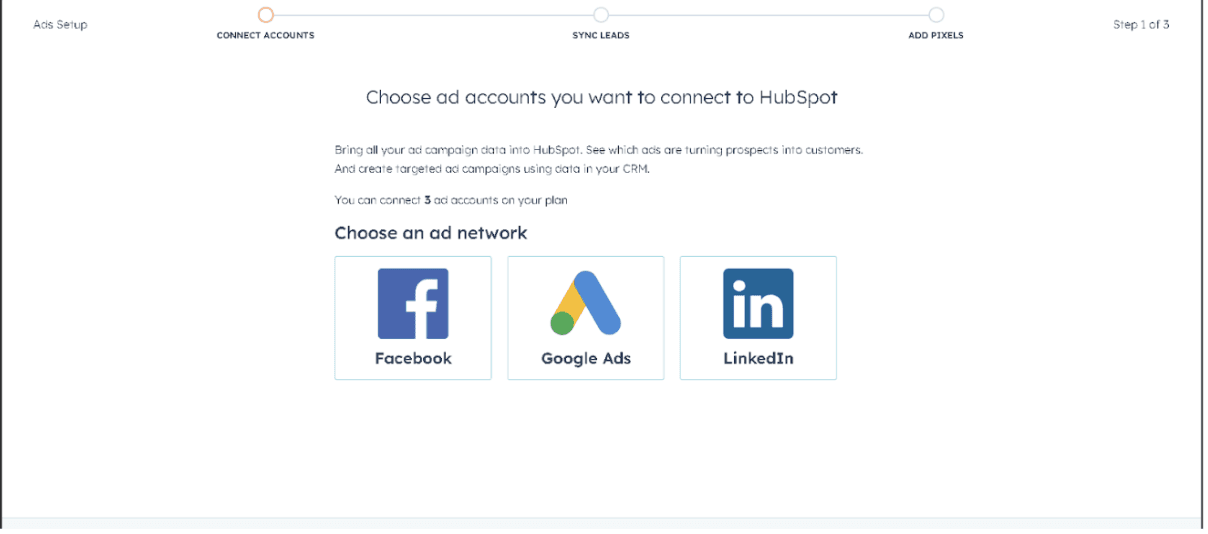
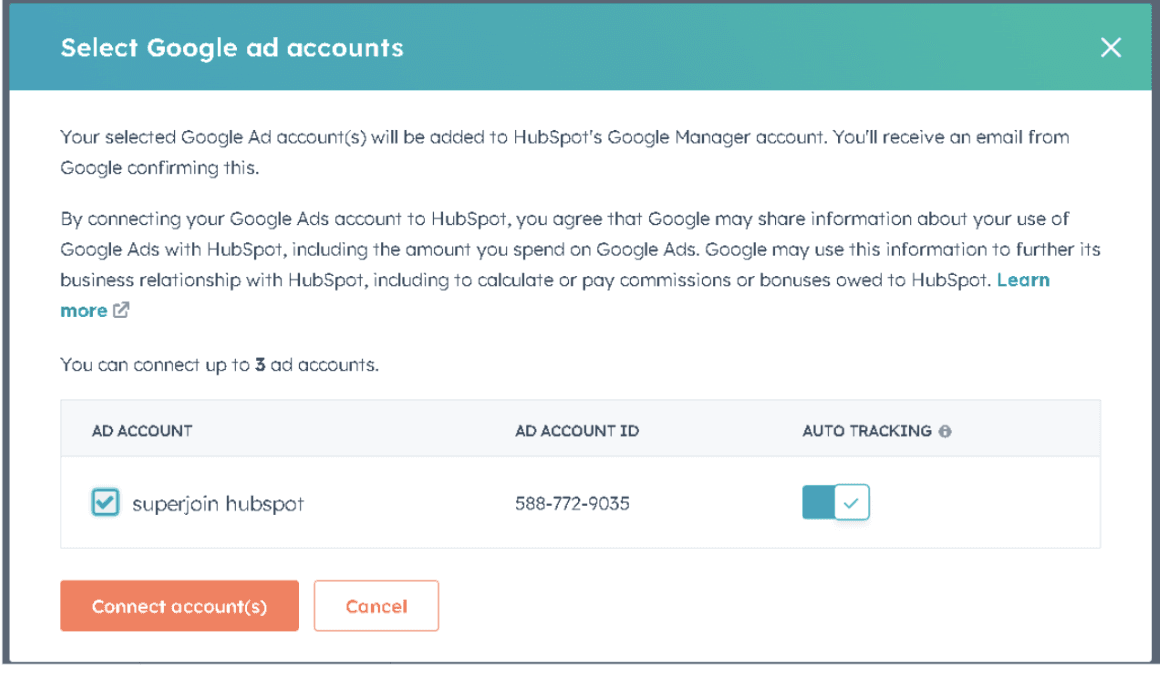
Choose the Google Ads account you want to link to HubSpot.
After connecting, HubSpot will start pulling in your Google Ads data, and you can track performance metrics.
Tip: You can create custom reports in HubSpot to view performance data specific to your Google Ads campaigns.
Pros:
Simple Setup: Easy integration with minimal tech skills required.
Centralised Data: Access Google Ads metrics directly in HubSpot.
Custom Reports: Easily generate reports tailored to your campaigns.
Cons:
Limited Customization: Fewer options for advanced configurations.
Basic Analytics: Lacks the depth of third-party analytics tools.
Cost Increase: High ad spend may lead to higher HubSpot fees.
Data Sync Delay: Performance metrics may not update in real-time.
Method 3: Using Zapier to Connect Google Ads to HubSpot
Zapier is an automation tool that lets you create "Zaps" to connect different platforms.
Step-by-Step Guide:
Create a Zapier Account:
If you don’t have one already, sign up at Zapier.com and log in to your dashboard.
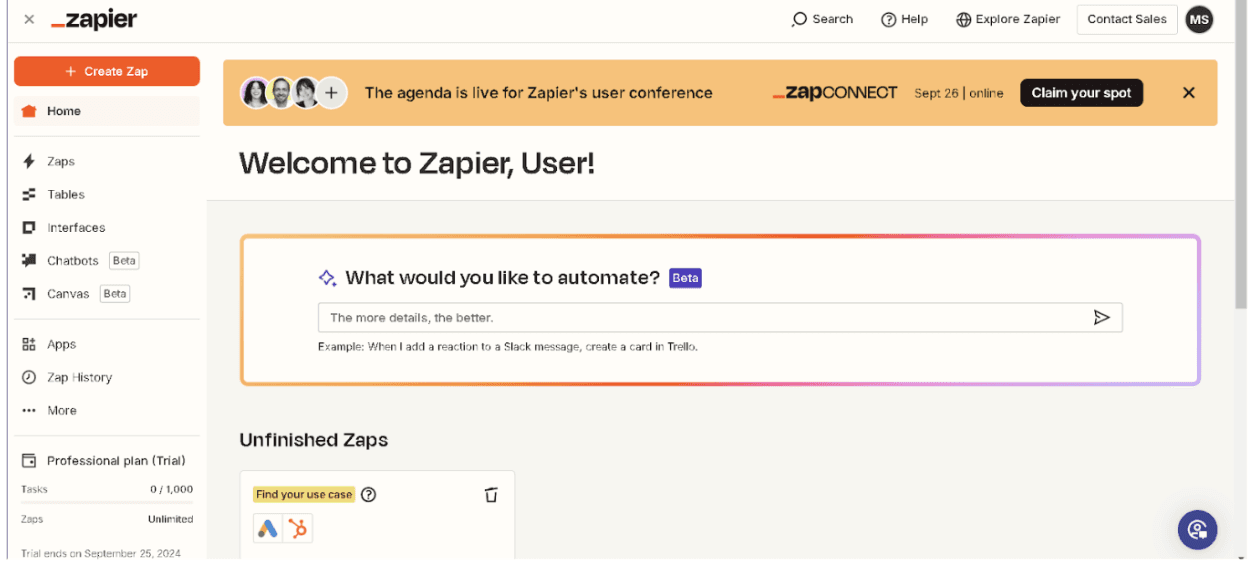
Create a New Zap:
Click Create Zap in the Zapier dashboard. For the trigger app, search for and select Google Ads.

Set the Trigger:
In the Google Ads section, select New Lead Form Entry as the trigger event. This will trigger the Zap every time someone submits a lead form on one of your Google Ads.
Connect your Google Ads account to Zapier by signing in with your credentials.
Choose the specific lead form from Google Ads that you want to use.
Set the Action in HubSpot:
For the action app, search for and select HubSpot.
Choose Create or Update Contact as the action event. This means that every time someone submits a Google Ads lead form, Zapier will create a new contact in HubSpot.
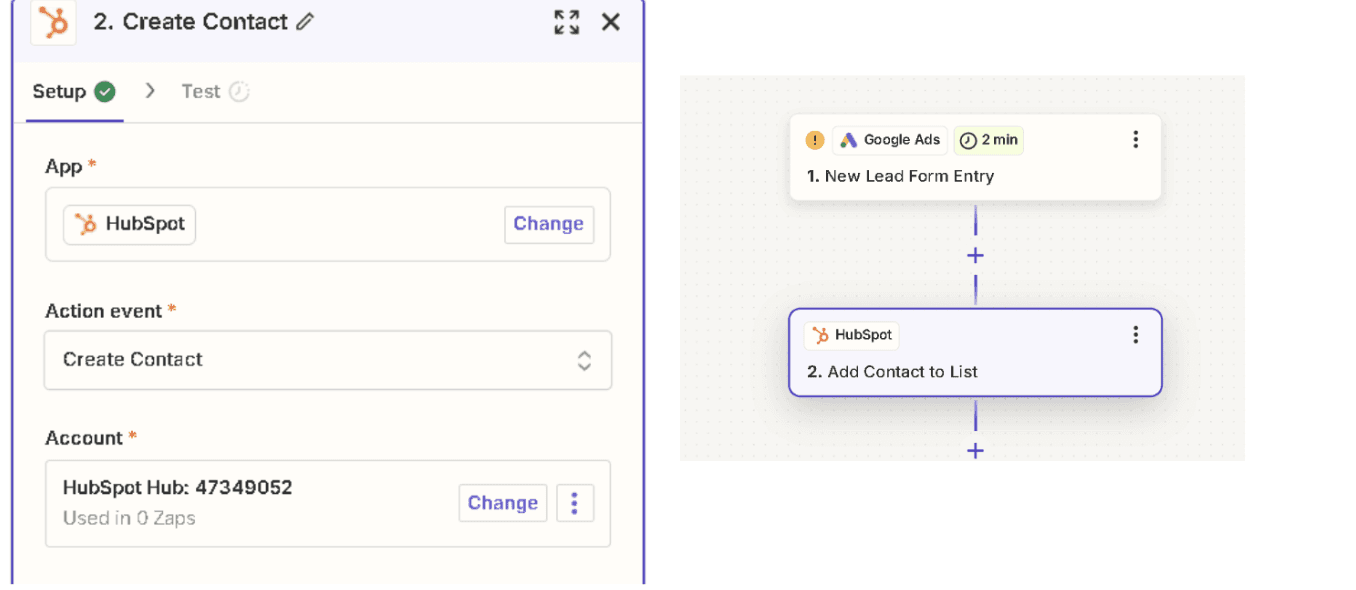
Connect your HubSpot account to Zapier.
Customise the contact details you want to send from Google Ads to HubSpot, such as email, name, or phone number.
Test and Publish the Zap:
Zapier will prompt you to test the Zap to ensure everything is working correctly.
Once the test is successful, turn on the Zap to activate it.
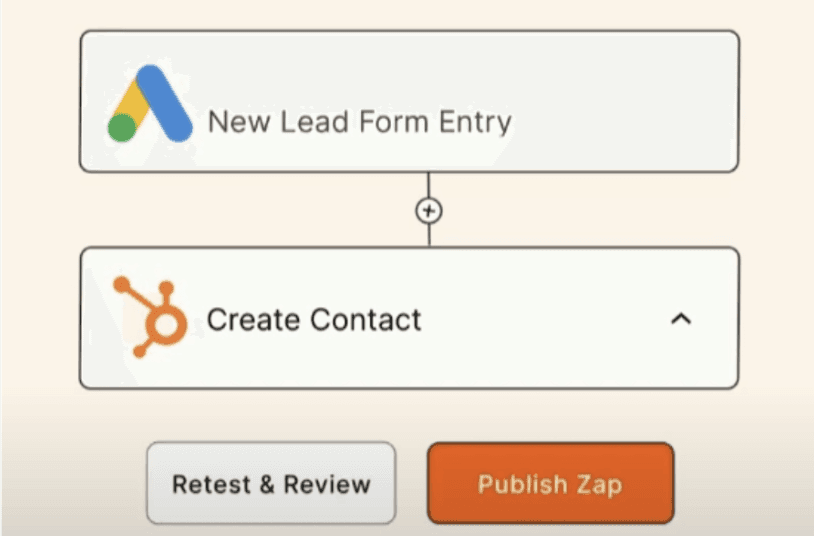
Now, whenever someone submits a lead form on your Google Ads, Zapier will automatically sync that information to HubSpot, saving you time and ensuring no leads fall through the cracks.
Pros:
Automated Workflow: Saves time by automating lead transfer from Google Ads to HubSpot.
No Coding Required: Easy setup without technical expertise.
Customizable: You can select specific lead data to sync.
Cons:
Limited Features: May not offer deep customization compared to native integrations.
Cost: Zapier’s pricing can increase with more Zaps and usage.
Delay in Syncing: Syncing between platforms may not be instant.
Dependency on Zapier: Workflow relies heavily on Zapier’s service stability.
Tip: You can add filters to the Zap so that only leads from specific campaigns or ads are sent to HubSpot, giving you more control over your data.
These benefits make Superjoin a robust tool for managing and optimising your Google Ads and HubSpot integration, enhancing your marketing data workflow.
Common Issues and How to Troubleshoot Them
Sometimes the integration between Google Ads and HubSpot may not go smoothly. Here are a few common issues and how to resolve them:
Data Mismatch: If your Google Ads data is not syncing with HubSpot, ensure that you’ve given the correct permissions during setup.
Superjoin Export Issues: If Superjoin isn’t exporting data properly, double-check that your Google Sheet is properly formatted and that the fields are mapped correctly to HubSpot.
Conclusion
Integrating Google Ads with HubSpot can transform the way you manage and optimise your marketing campaigns using Superjoin, you’ll gain valuable insights into your ad performance. Now, it’s time to get started—boost those conversion rates and get the most out of your marketing efforts!
Discover how you can effortlessly merge Google Ads with HubSpot for impactful opportunities for your campaigns.
Why connect Google Ads to HubSpot?
Are you currently switching between tabs just to track your campaigns?
Before we dive into the details of using Superjoin to connect Google Ads to {HubSpot}, let’s understand why connecting them is such a powerful move for your {marketing strategy}. When you connect Google Ads to Hubspot it will allow you to:
Unify Customer Data: By integrating Google Ads click & {conversion data with HubSpot CRM}, you’ll gain a complete view of your customers’ journey. This helps you make data-driven decisions and craft more targeted campaigns that resonate with your customers.
Optimise Targeting: Leverage HubSpot’s rich audience data to create laser-focused Google Ads campaigns. By tapping into the wealth of information stored in your CRM, you can craft highly personalised ads that speak directly to your prospects’ needs and interests.
Improve ROI Tracking: Accurately attribute conversions and revenue to specific Google Ads campaigns within HubSpot. This level of granular tracking enables you to optimise your ad spend and focus on the strategies that deliver the best results for your business.
Method 1: Connecting Google Ads to Hubspot using Superjoin
Step by Step guide:
Install Superjoin on Google Sheets
Open Google Sheets, navigate to the Extensions tab, and select Add-ons > Get add-ons.
In the Google Workspace Marketplace, search for “Superjoin.” Follow the prompts to grant necessary permissions.
Launch Superjoin from Extensions > Superjoin > Launch.
Superjoin will open on the right-hand side of your spreadsheet.
Alternatively, install Superjoin on Microsoft Excel
Open this link, click on Get it now.

Once installed, click on Open in Excel or Try using it online (for Excel online).

Launch Superjoin by opening the add-in and clicking on Open Sidebar. Login with your Microsoft account to start using Superjoin.

Connect and Import Data from Google Ads
Open Superjoin Sidebar: In the Superjoin sidebar, click on Sources then choose Google Ads.
Authenticate Google Ads: Follow the prompts to connect your Google Ads account to Superjoin.
Select Metrics: Choose the metrics and dimensions you need from Google Ads, such as {Campaign Performance, Clicks, Impressions, etc}. Configure any necessary filters and click Import. Your Google Ads data will populate in Google Sheets .
Export Data to HubSpot
In the Superjoin sidebar, navigate to the Export Section.
Choose the tab and header row in your sheet containing the data to export.
Select the HubSpot Object (e.g., Contacts, Deals) and the type of action: Update, Insert, Upsert, or Delete.
Map the fields from your Google Sheets data to corresponding fields in HubSpot. Superjoin will auto-map fields from HubSpot imports, or you can map them manually.
Your data is successfully migrated from Google Ads to Hubspot.
For any problem, read the in-built guide or reach us at support@superjoin.in.
Pros:
Superjoin offers several advantages for integrating Google Ads with HubSpot
Granular Control: Superjoin allows you to precisely select the metrics and dimensions you want to import from Google Ads, ensuring you have exactly the data you need.
Selecting Metrics: You can move data between Google Ads and Hubspot without any technical knowledge (or doing any coding)
Seamless Data Transfer: By using Google Sheets as an intermediary, Superjoin facilitates a smooth data transfer process from Google Ads to HubSpot, reducing manual data entry.
Flexible Mapping: You can easily map fields between Google Sheets and HubSpot, with options for auto-mapping or manual configuration.
Data Sync: Superjoin enables timely data updates, so your HubSpot CRM always reflects the latest information from your Google Ads campaigns.
Ease of Use: Superjoin’s integration is simple and easy to use, even for non-tech users.
Method 2: Connecting Google Ads Directly through HubSpot
This is the simplest and most popular method. HubSpot provides a built-in way to connect with Google Ads, enabling you to view key metrics directly in the HubSpot dashboard.
Step-by-Step Guide:
Go to your HubSpot account dashboard.

Click on the Marketing tab and select Ads.

In the Ads Dashboard, click Connect Account.

Select Google Ads and follow the prompts to sign in with your Google account.

Choose the Google Ads account you want to link to HubSpot.
After connecting, HubSpot will start pulling in your Google Ads data, and you can track performance metrics.

Tip: You can create custom reports in HubSpot to view performance data specific to your Google Ads campaigns.
Pros:
Simple Setup: Easy integration with minimal tech skills required.
Centralised Data: Access Google Ads metrics directly in HubSpot.
Custom Reports: Easily generate reports tailored to your campaigns.
Cons:
Limited Customization: Fewer options for advanced configurations.
Basic Analytics: Lacks the depth of third-party analytics tools.
Cost Increase: High ad spend may lead to higher HubSpot fees.
Data Sync Delay: Performance metrics may not update in real-time.
Method 3: Using Zapier to Connect Google Ads to HubSpot
Zapier is an automation tool that lets you create "Zaps" to connect different platforms.
Step-by-Step Guide:
Create a Zapier Account:
If you don’t have one already, sign up at Zapier.com and log in to your dashboard.

Create a New Zap:
Click Create Zap in the Zapier dashboard. For the trigger app, search for and select Google Ads.

Set the Trigger:
In the Google Ads section, select New Lead Form Entry as the trigger event. This will trigger the Zap every time someone submits a lead form on one of your Google Ads.
Connect your Google Ads account to Zapier by signing in with your credentials.
Choose the specific lead form from Google Ads that you want to use.
Set the Action in HubSpot:
For the action app, search for and select HubSpot.
Choose Create or Update Contact as the action event. This means that every time someone submits a Google Ads lead form, Zapier will create a new contact in HubSpot.

Connect your HubSpot account to Zapier.
Customise the contact details you want to send from Google Ads to HubSpot, such as email, name, or phone number.
Test and Publish the Zap:
Zapier will prompt you to test the Zap to ensure everything is working correctly.
Once the test is successful, turn on the Zap to activate it.

Now, whenever someone submits a lead form on your Google Ads, Zapier will automatically sync that information to HubSpot, saving you time and ensuring no leads fall through the cracks.
Pros:
Automated Workflow: Saves time by automating lead transfer from Google Ads to HubSpot.
No Coding Required: Easy setup without technical expertise.
Customizable: You can select specific lead data to sync.
Cons:
Limited Features: May not offer deep customization compared to native integrations.
Cost: Zapier’s pricing can increase with more Zaps and usage.
Delay in Syncing: Syncing between platforms may not be instant.
Dependency on Zapier: Workflow relies heavily on Zapier’s service stability.
Tip: You can add filters to the Zap so that only leads from specific campaigns or ads are sent to HubSpot, giving you more control over your data.
These benefits make Superjoin a robust tool for managing and optimising your Google Ads and HubSpot integration, enhancing your marketing data workflow.
Common Issues and How to Troubleshoot Them
Sometimes the integration between Google Ads and HubSpot may not go smoothly. Here are a few common issues and how to resolve them:
Data Mismatch: If your Google Ads data is not syncing with HubSpot, ensure that you’ve given the correct permissions during setup.
Superjoin Export Issues: If Superjoin isn’t exporting data properly, double-check that your Google Sheet is properly formatted and that the fields are mapped correctly to HubSpot.
Conclusion
Integrating Google Ads with HubSpot can transform the way you manage and optimise your marketing campaigns using Superjoin, you’ll gain valuable insights into your ad performance. Now, it’s time to get started—boost those conversion rates and get the most out of your marketing efforts!
FAQs
Why connect Google Ads to HubSpot?
Why connect Google Ads to HubSpot?
How do I connect Google Ads to HubSpot?
How do I connect Google Ads to HubSpot?
What ad types can HubSpot track?
What ad types can HubSpot track?
Automatic Data Pulls
Visual Data Preview
Set Alerts
Try it now
