Product
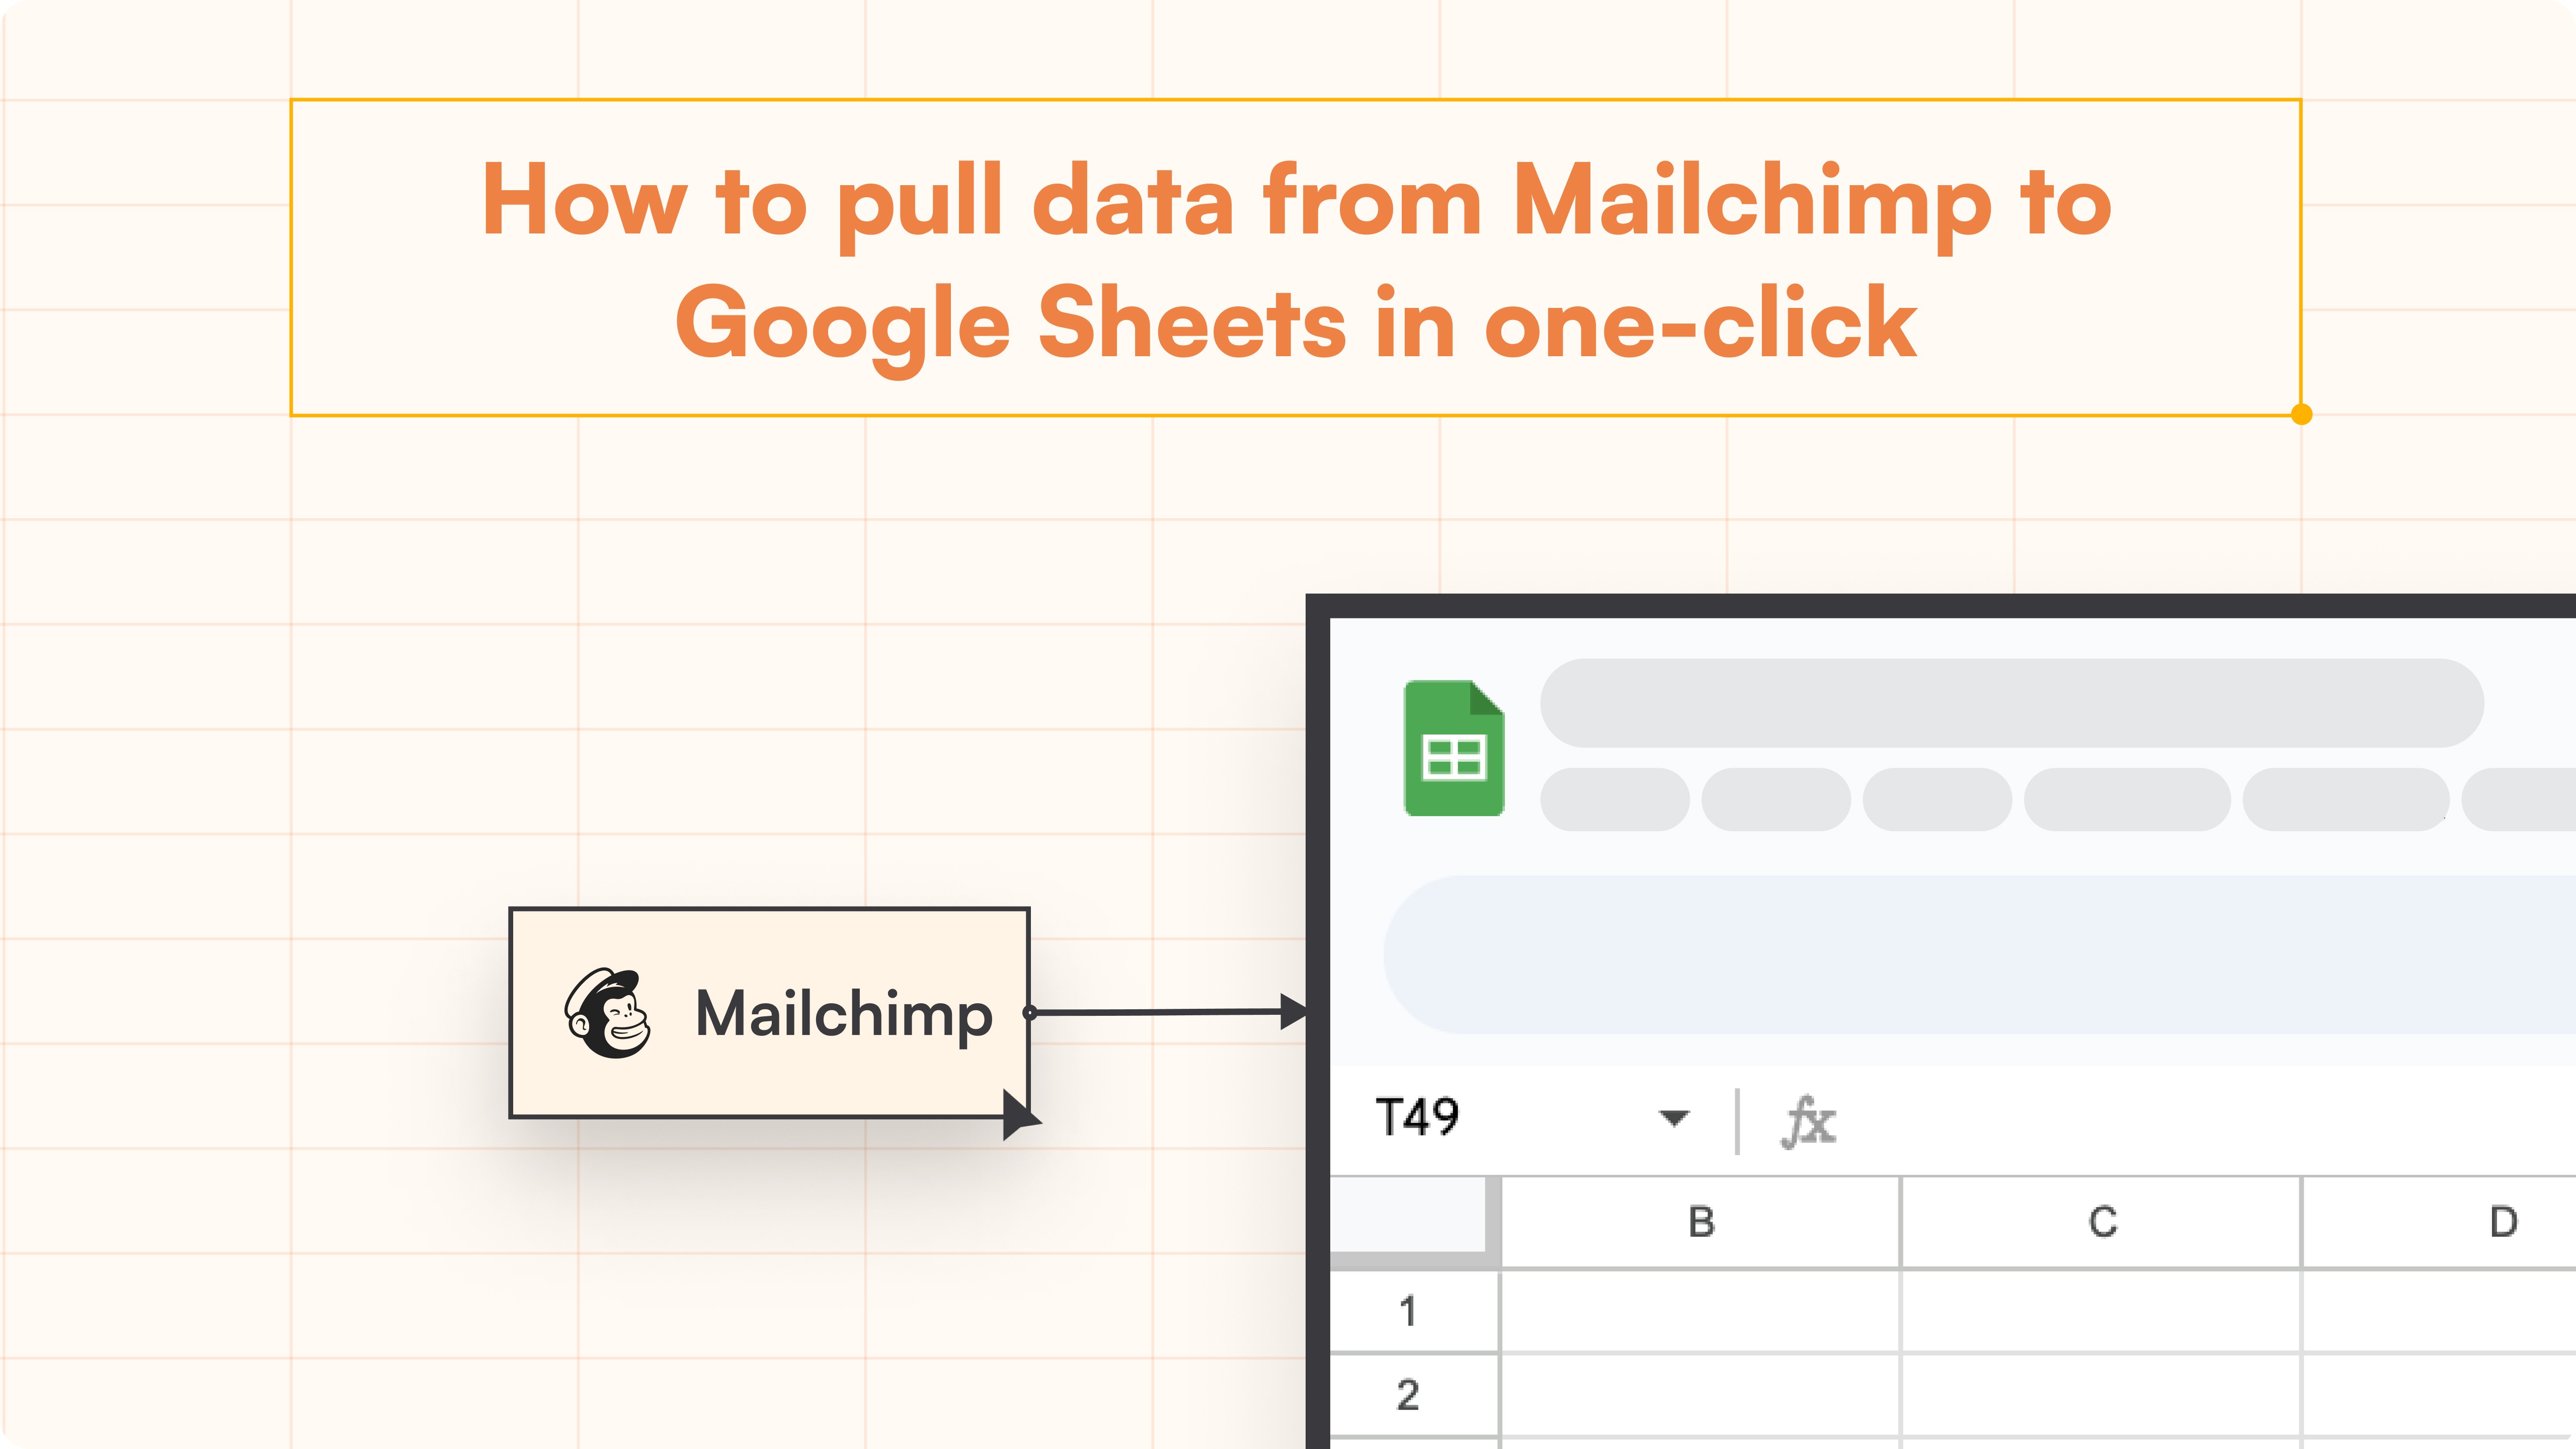
How to Connect Mailchimp to Google Sheets
Integrate Mailchimp with Google Sheets. Learn how to connect, automate, and streamline your data workflow effortlessly.
Table of Contents
Here's a quick step-by-step guide 🔝
Here's a quick step-by-step guide 🔝
Mailchimp is a widely-used email marketing platform that helps businesses manage campaigns, track audience growth, and measure engagement rates. It provides crucial data on campaign performance, subscriber demographics, and overall marketing effectiveness, enabling companies to refine their email marketing strategies and boost customer engagement.
Connecting Mailchimp to Google Sheets brings this valuable data into a familiar spreadsheet format, facilitating easier trend visualization and custom reporting. Similarly, integrating Zendesk Support to Google Sheets can provide valuable insights into customer support metrics, helping you track ticket volumes, response times, and customer satisfaction. Tools like Superjoin streamline this integration, eliminating technical complexities and allowing marketers to focus on data analysis. This connection ensures that key metrics such as open rates, click-through rates, and subscriber growth are readily available and up-to-date in Google Sheets.
This blog will compare different connection methods, highlighting why Superjoin is often the best choice for many users.
Best Ways to Connect Mailchimp to Google Sheets
Method 1: Using Superjoin
Superjoin provides the fastest and easiest way to connect Mailchimp to Google Sheets without any technical know-how or complex setup processes. Here’s how it works:
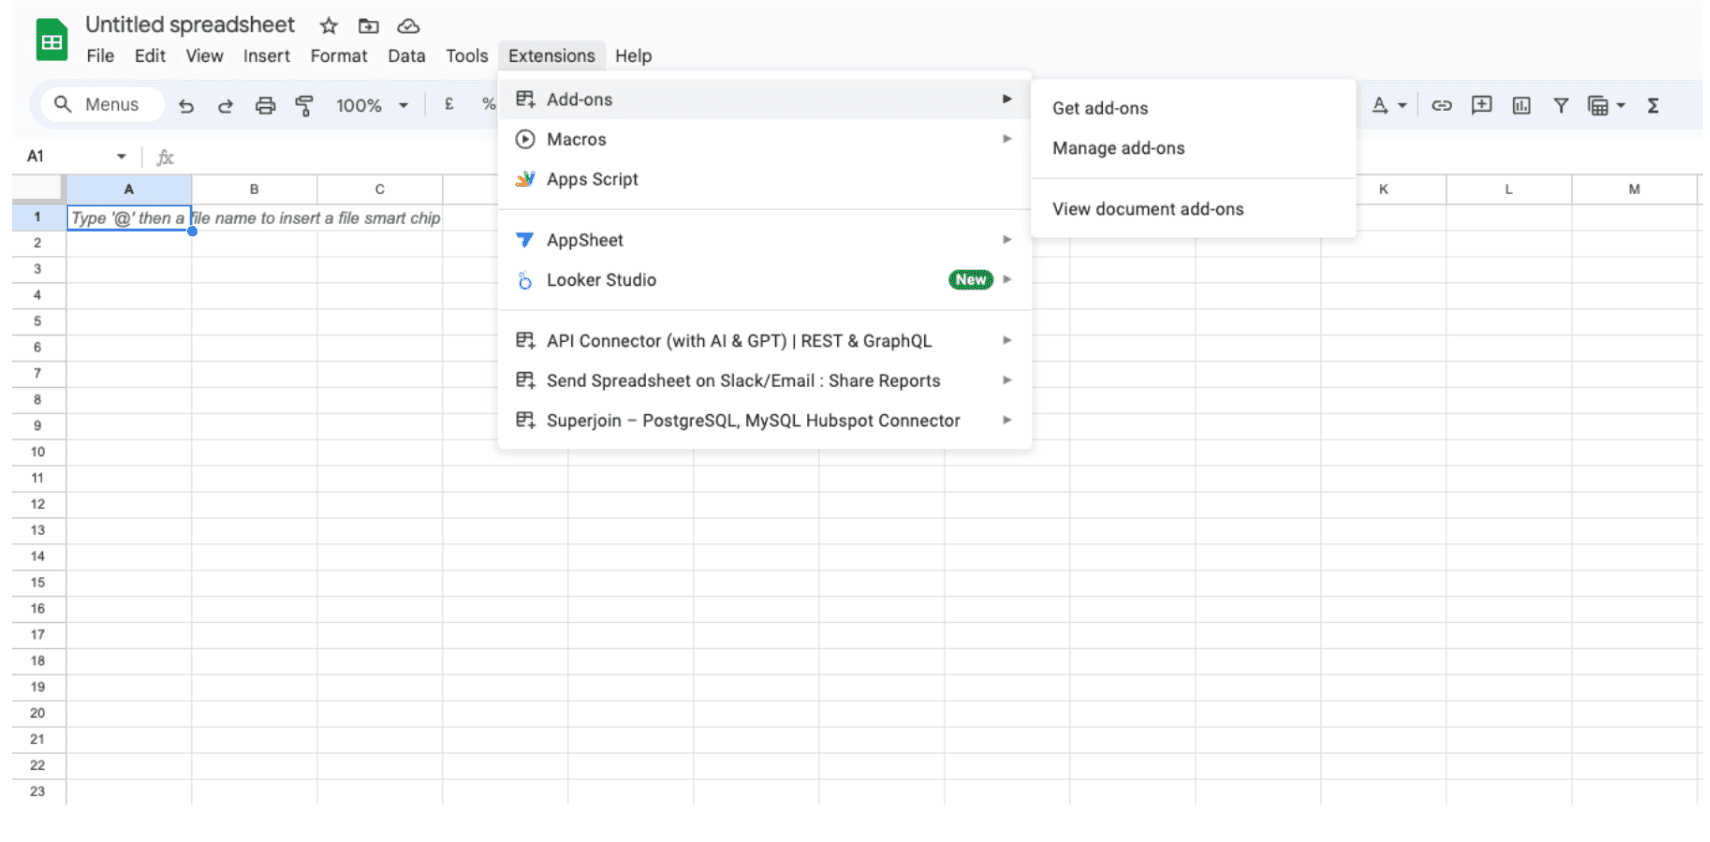
Step 1: Click Extensions from the Google Sheets menu. Select Add-ons and choose to Get Add-ons. This will bring you to the Google Workspace Marketplace.
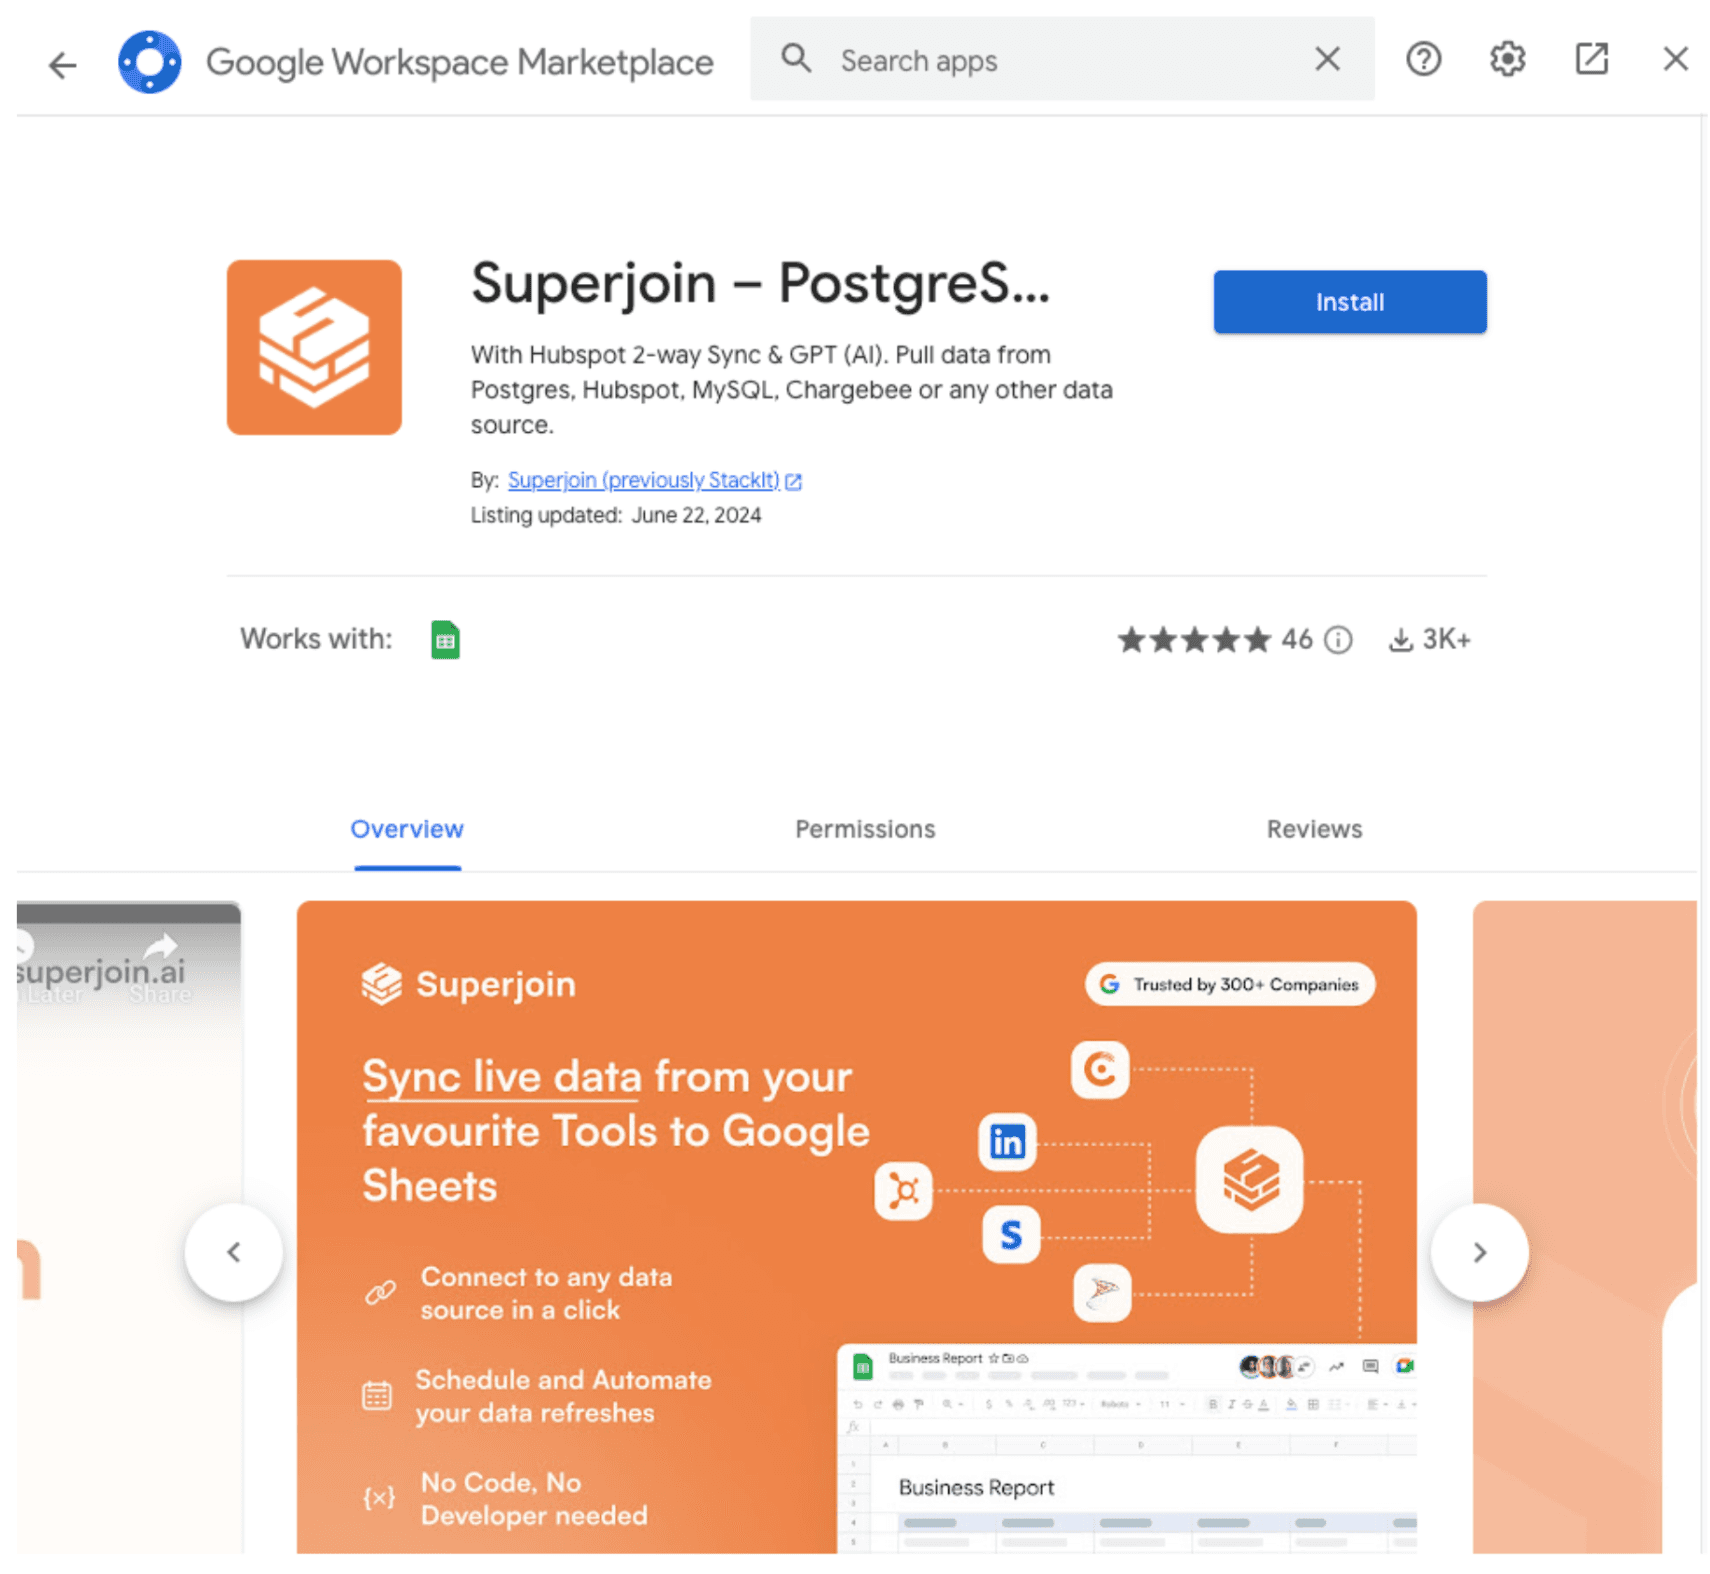
Step 2: Look for Superjoin in the Google Marketplace pop-up window and install the app by following the prompts.
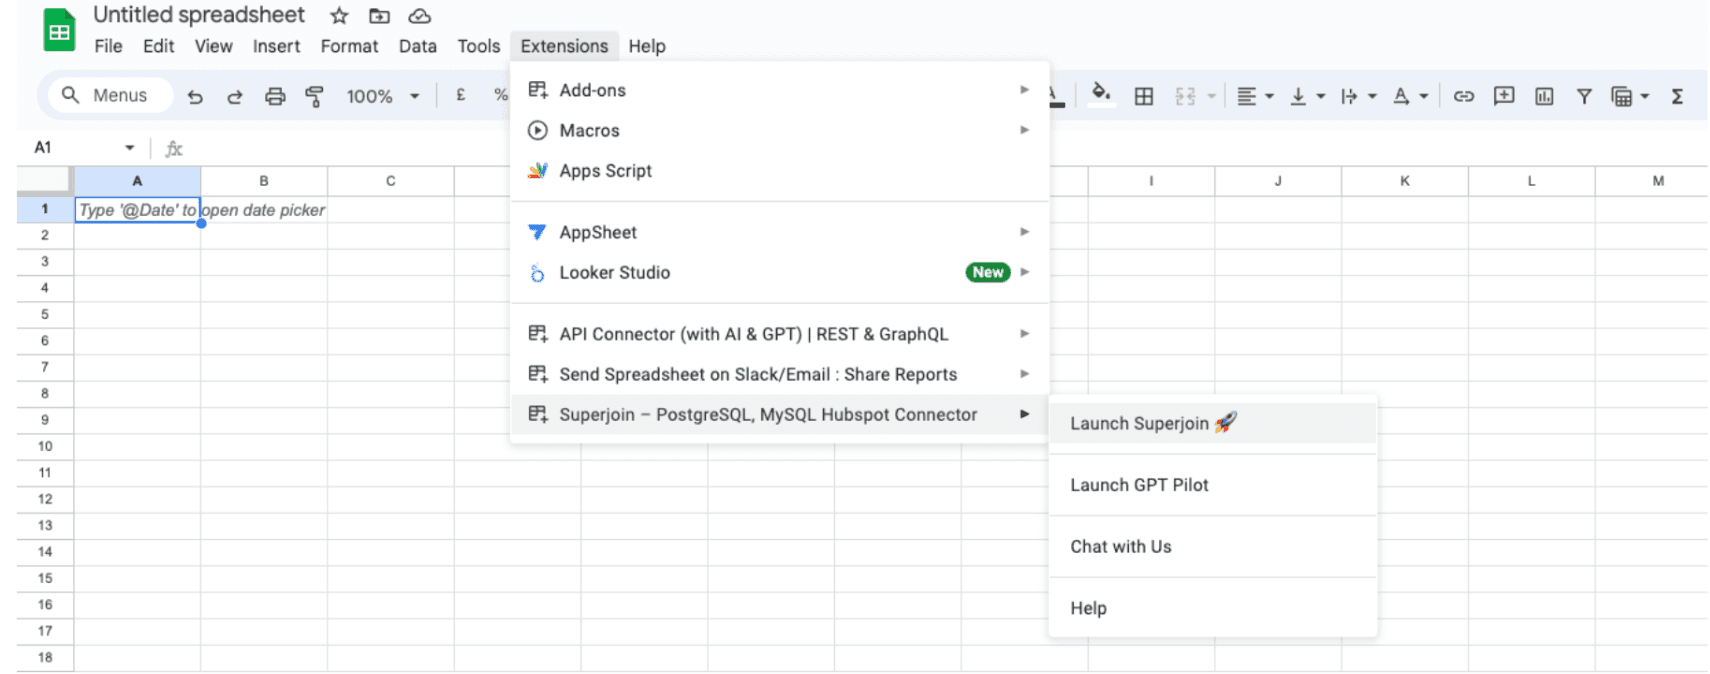
Step 3: Navigate back to the Extensions menu tab and launch Superjoin from there. You should see Superjoin running as a Google Sheets side panel on the right side of your screen.
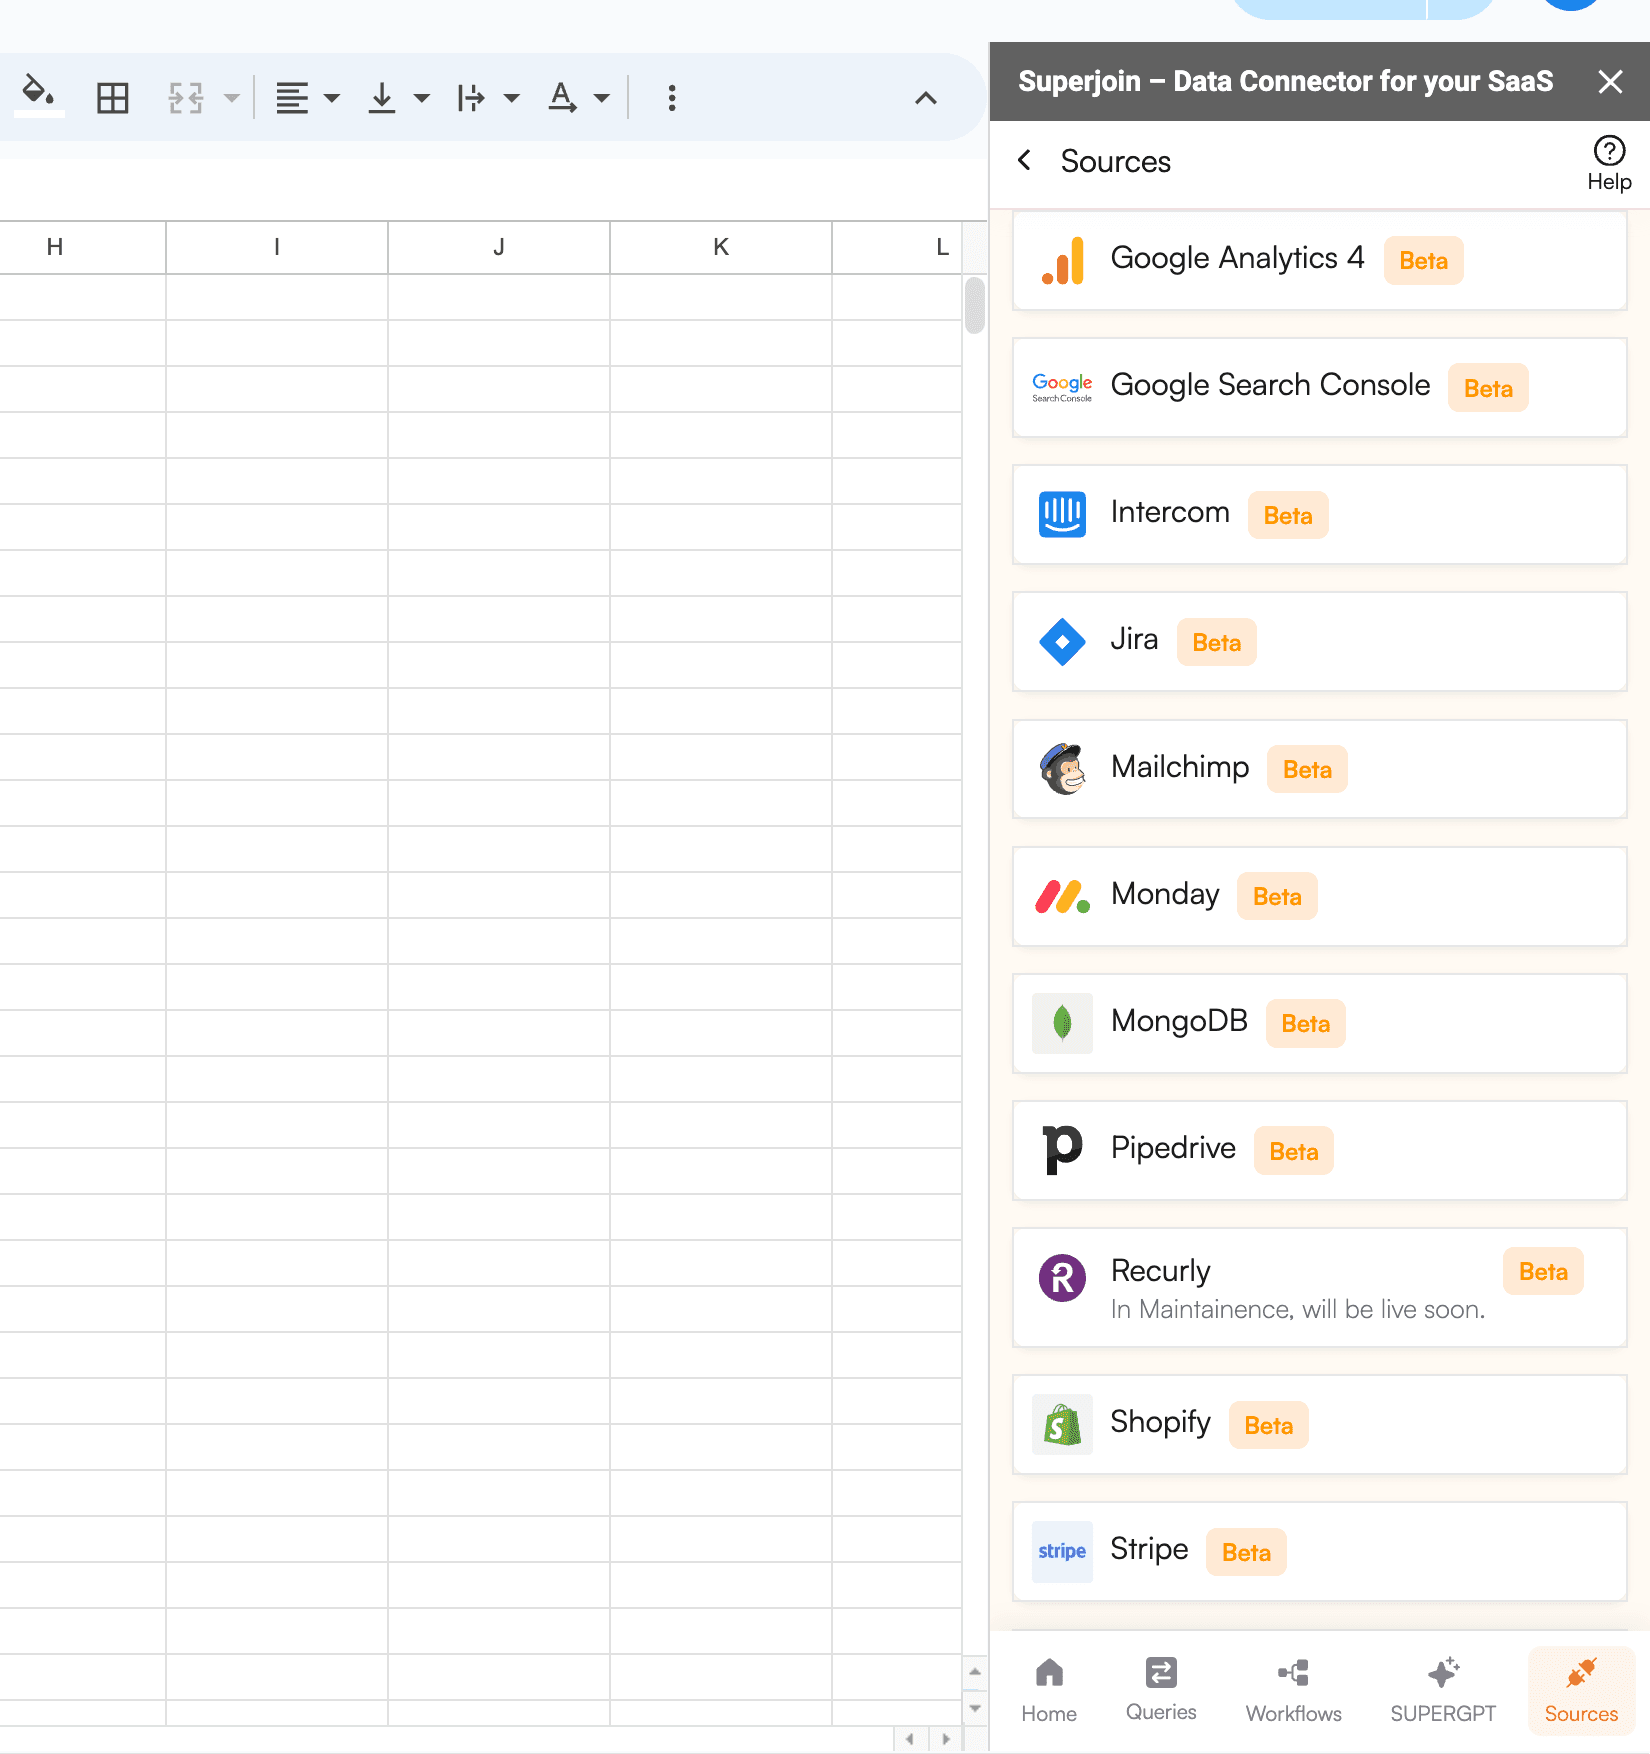
Step 4: From Sources, select Mailchimp from the list.
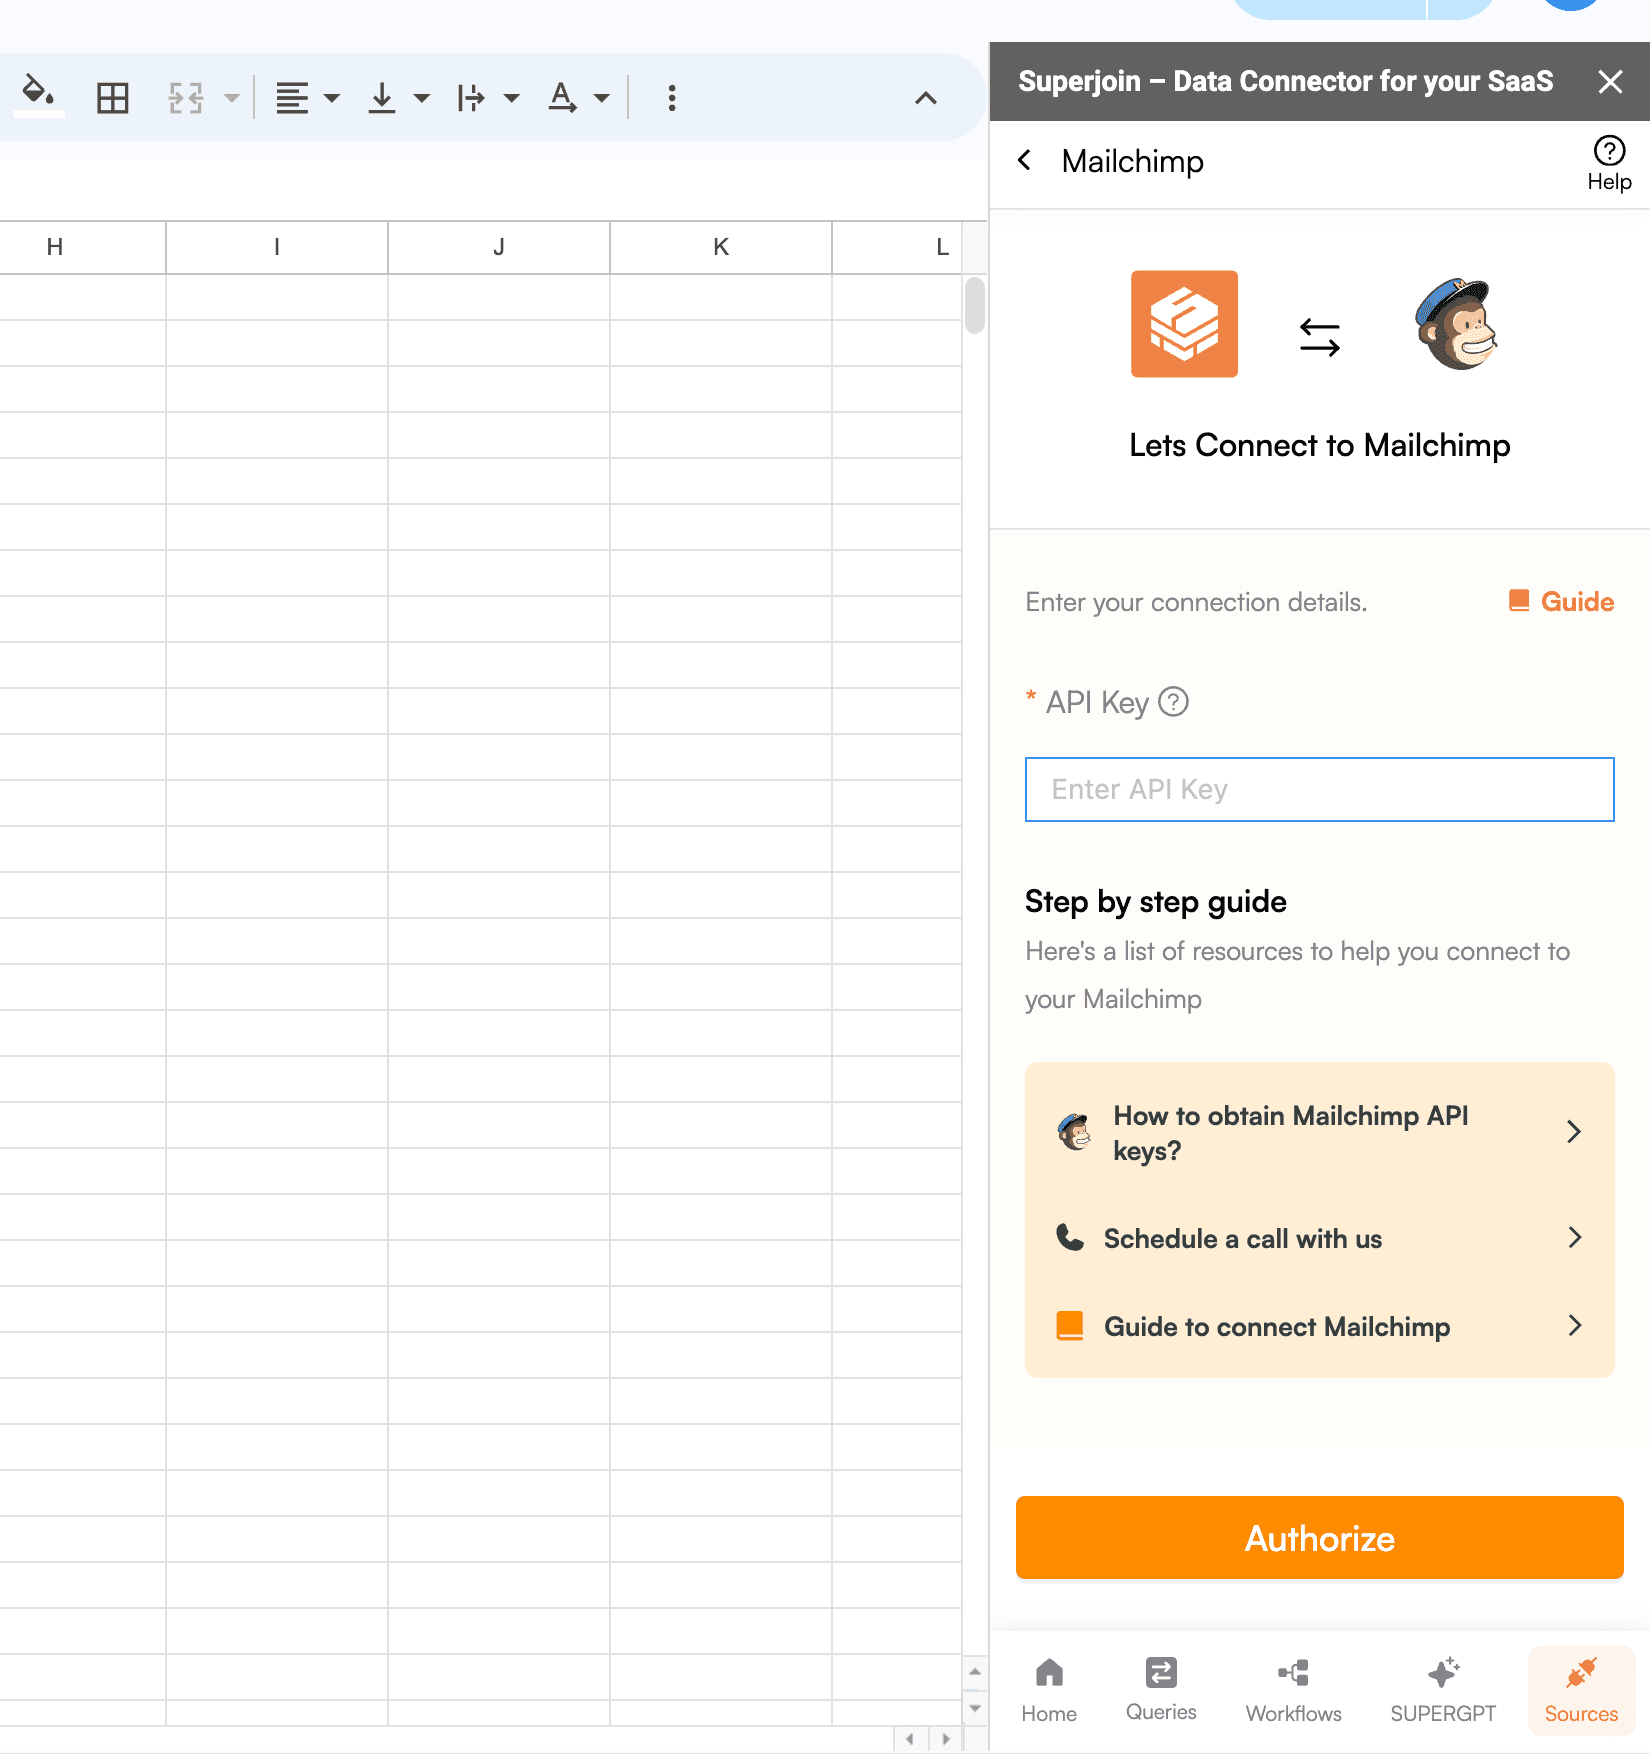
Step 5: After selecting Mailchimp, authorize Superjoin to access your account by entering your API Key.
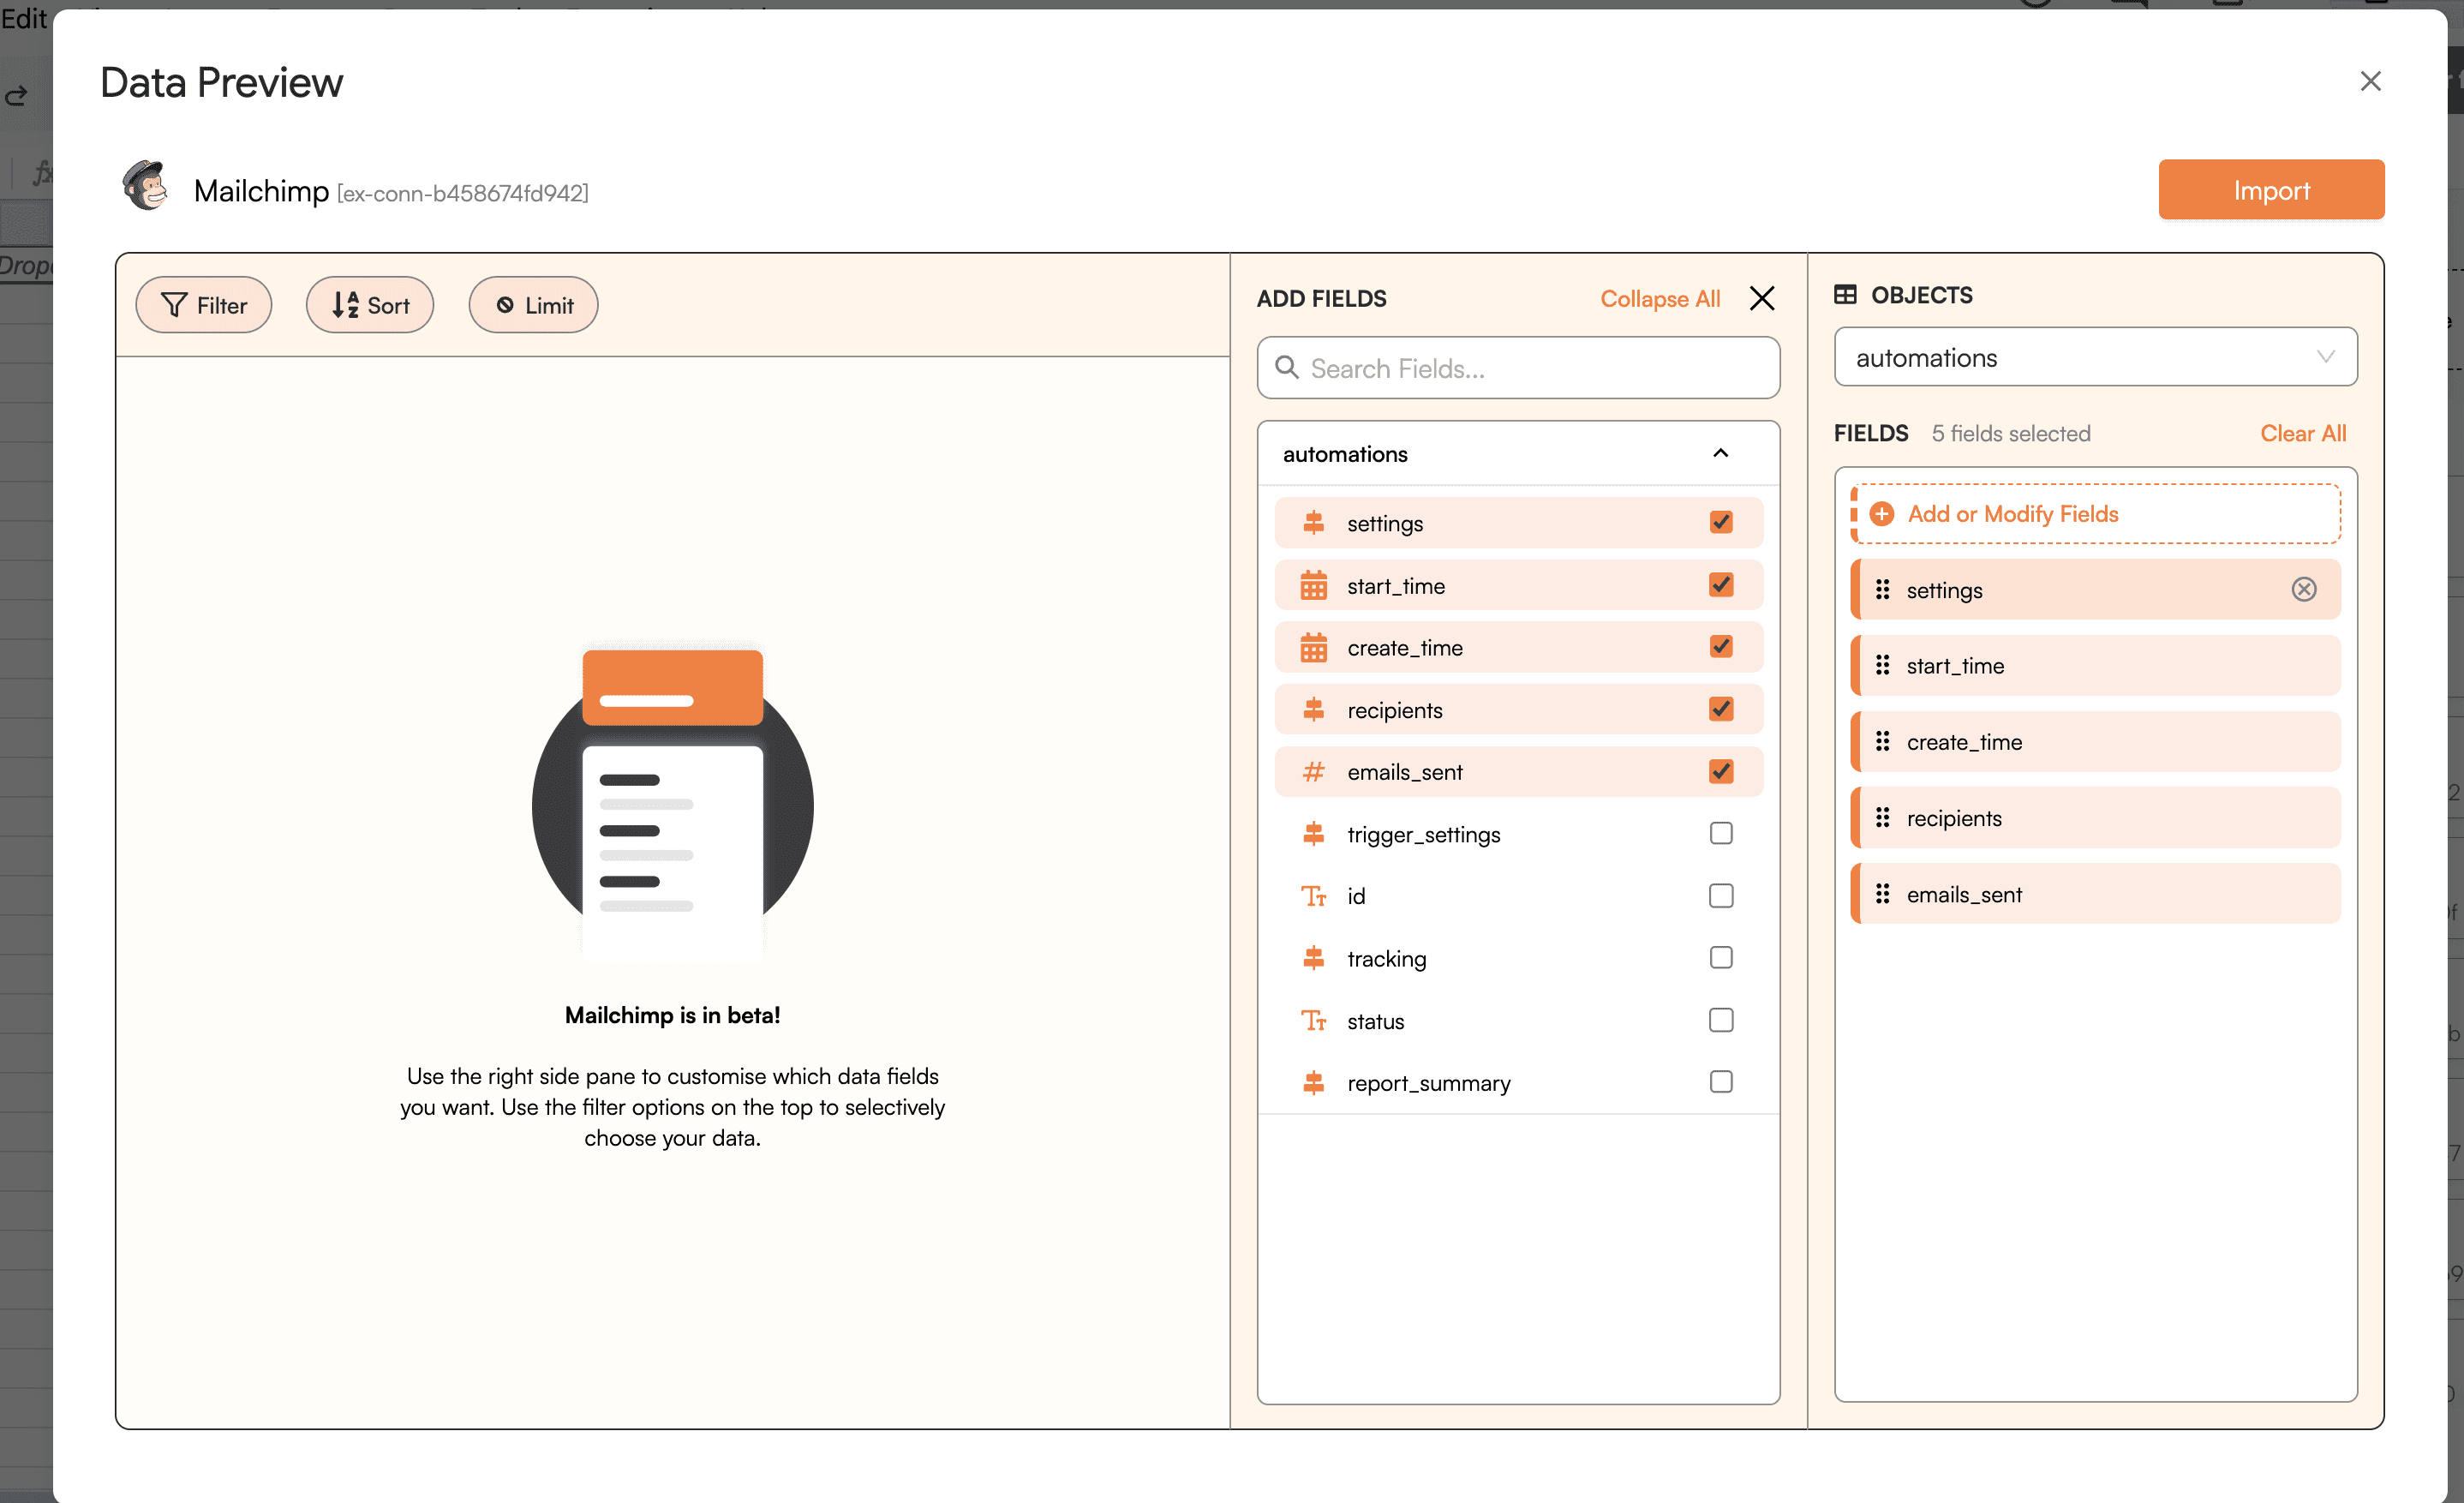
Step 6: After authorization, you'll see a list of your Mailchimp properties in the Data Preview Window.
Choose your property and view, then click "Import" to bring the data into Google Sheets.
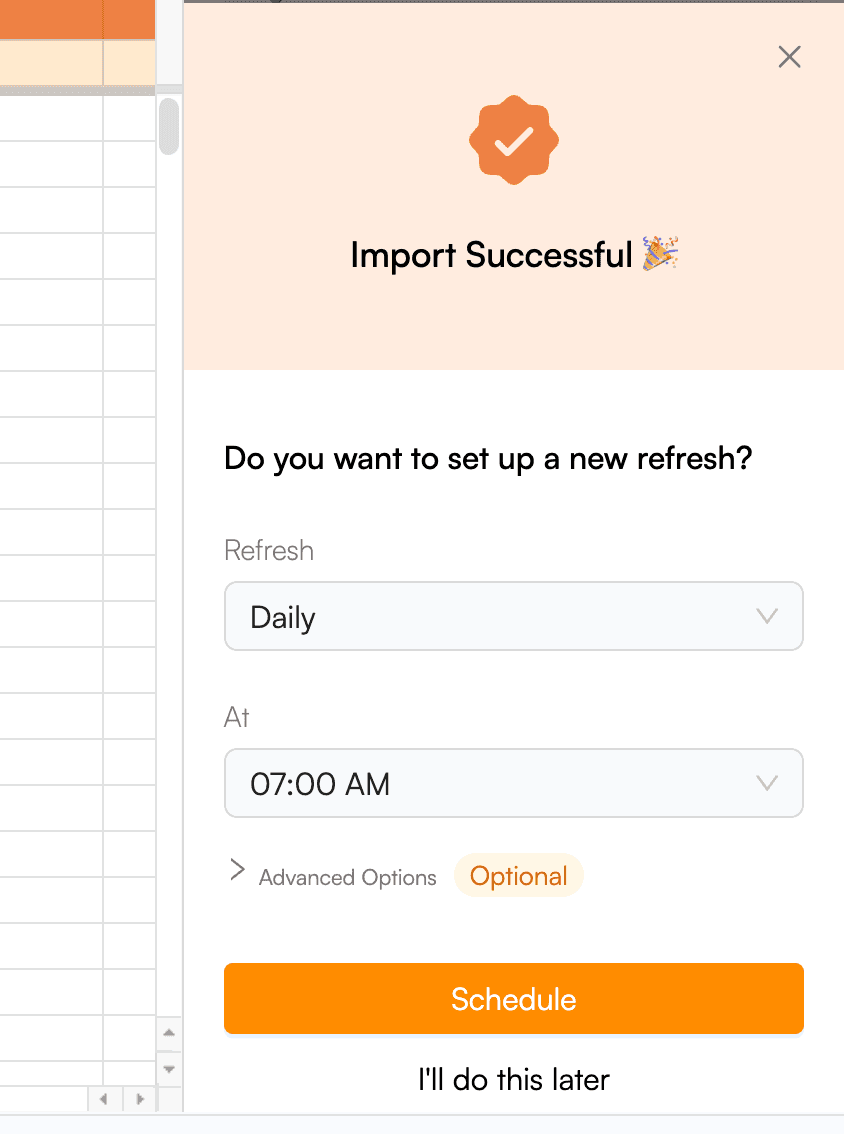
Step 7: Superjoin lets you refresh your imported data instantly with one click or set it to auto-refresh on a pre-set schedule. This way, you won't need to manually update your Mailchimp data in Google Sheets to reflect changes from the source.
Voila, you've successfully imported your Mailchimp data to Google Sheets using Superjoin!
It is particularly suitable for users looking for a Mailchimp to Google Sheets free tool, as Superjoin offers a free tier.
Method 2: Using Zapier
Third-party automation tools like Zapier can also be used to sync Mailchimp with Google Sheets. Zapier allows you to create Zaps (automated workflows) that can transfer data between the two services.
Steps:
Sign up for a Zapier account and create a new Zap.
Select Mailchimp as the trigger app and set up the trigger (e.g., new subscriber in Mailchimp).
Choose Google Sheets as the action app and configure the action (e.g., create new row in Google Sheets).
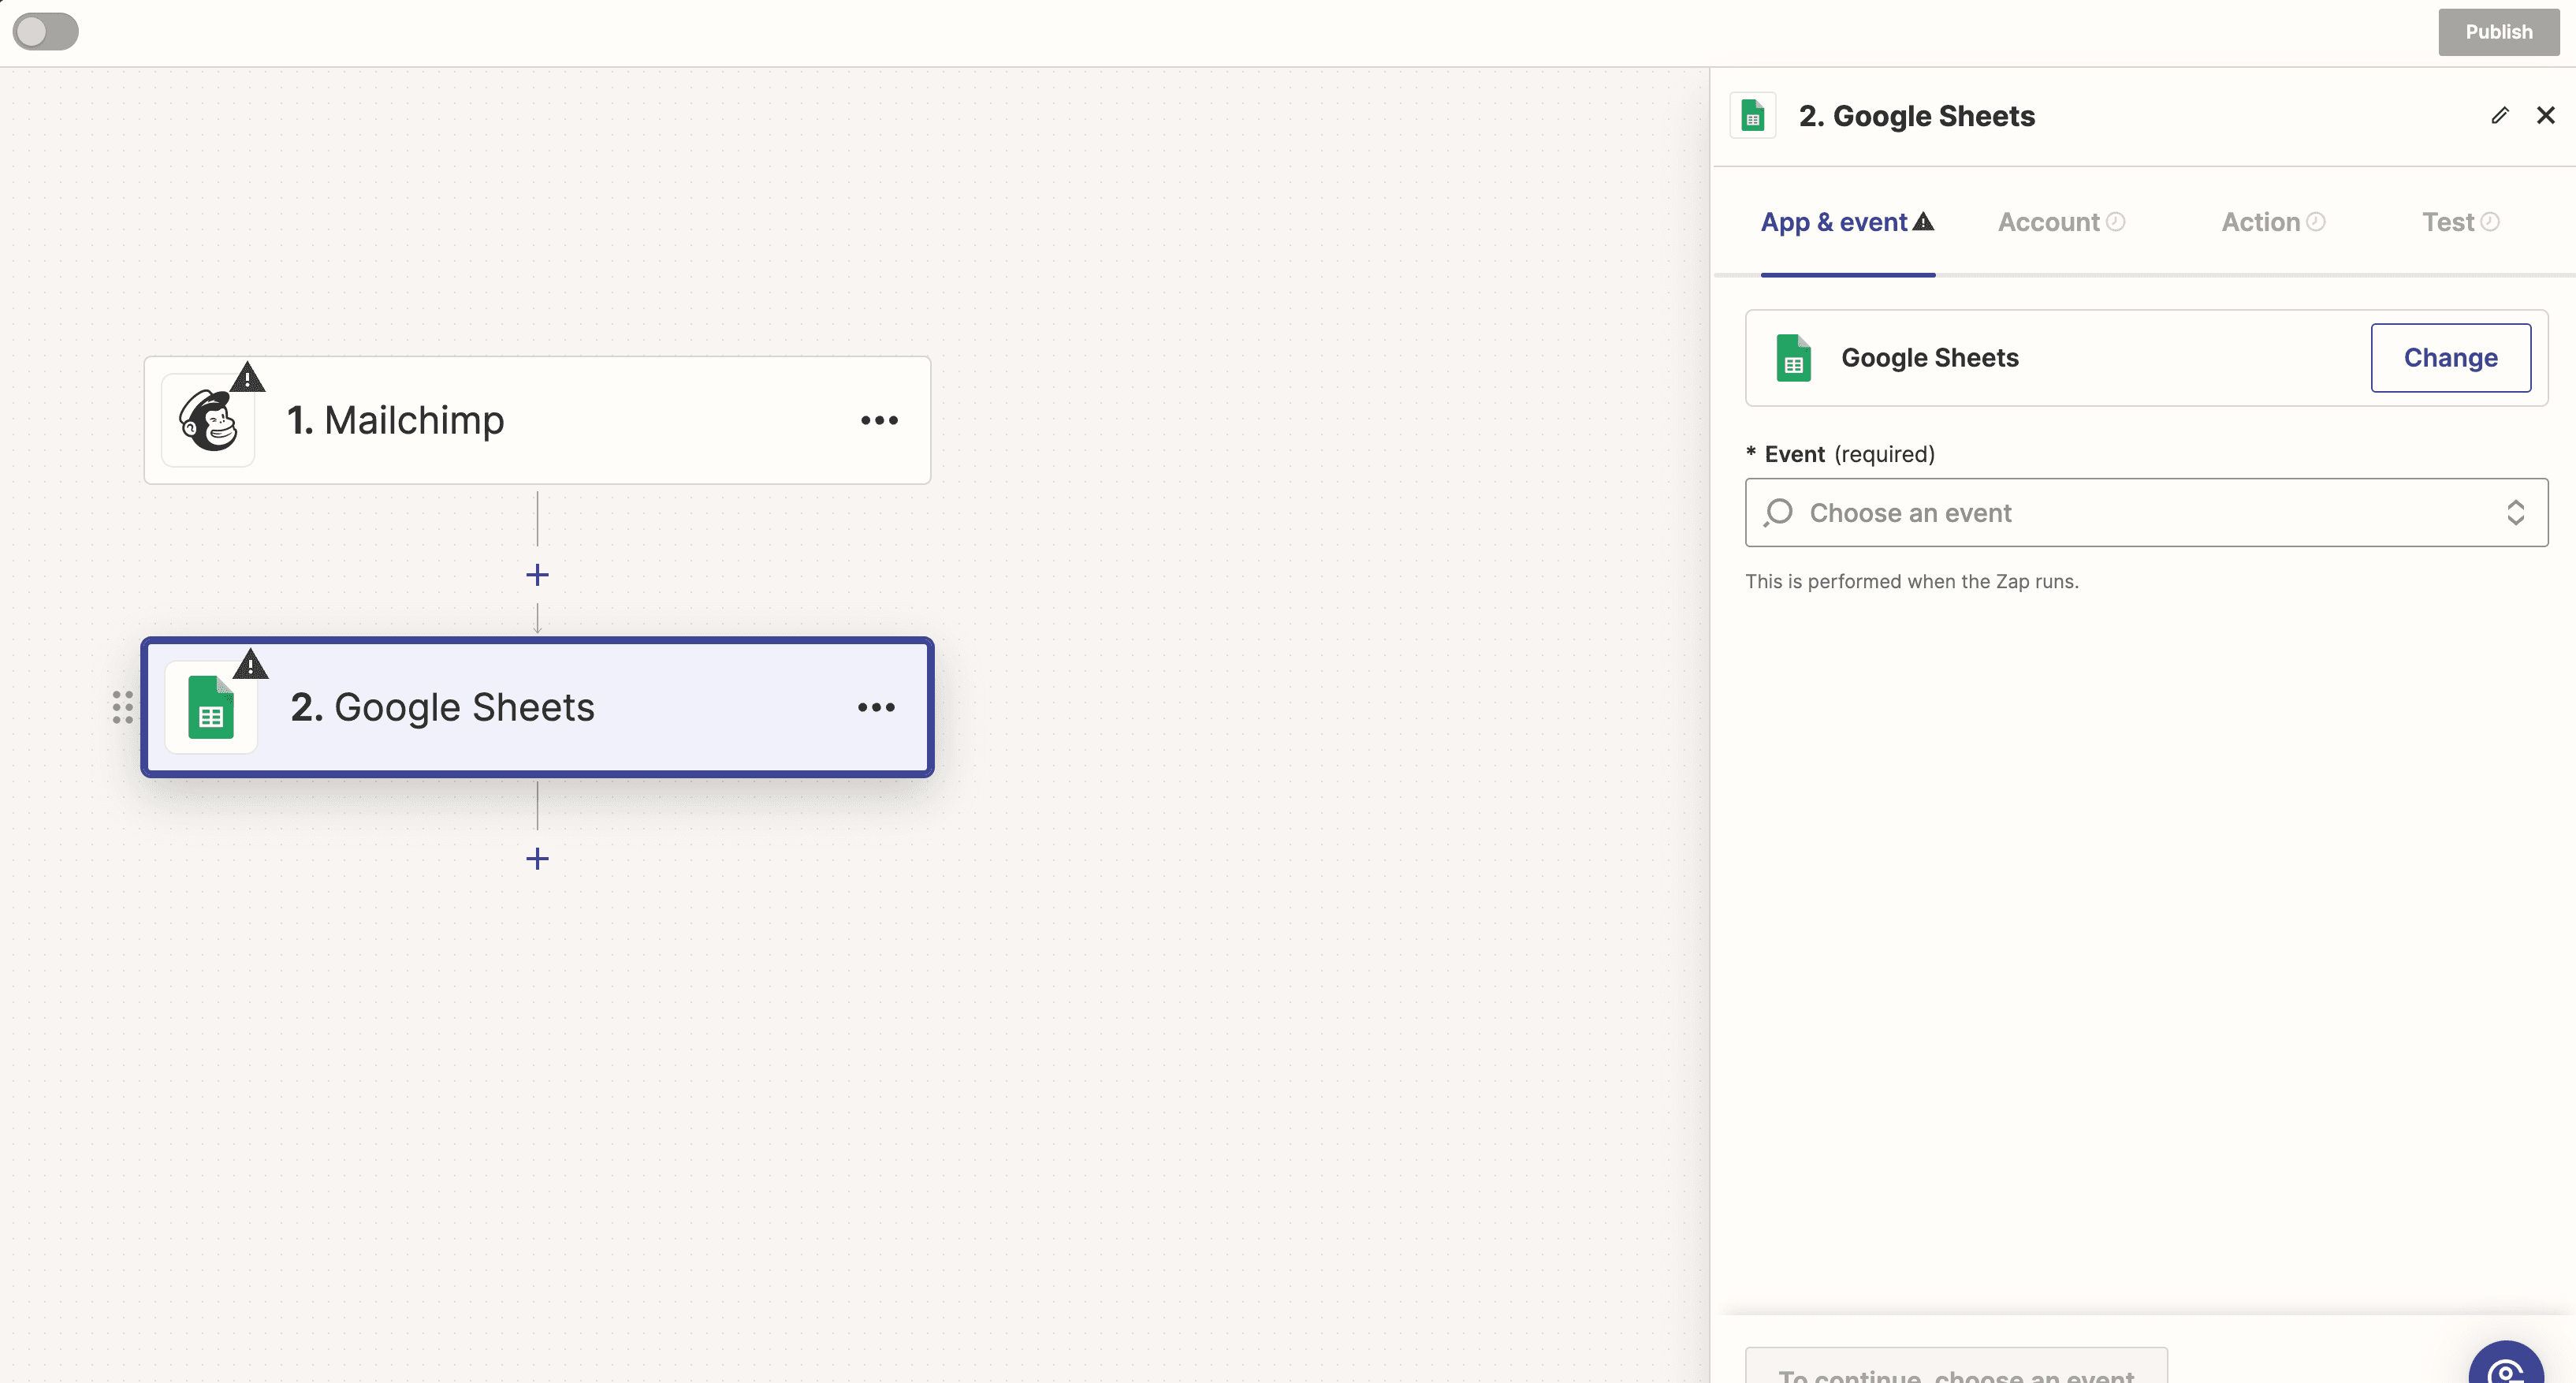
Test and turn on the Zap.
Why Choose Superjoin?
In comparison to other methods, Superjoin stands out for several reasons:
User-Friendly Interface: Designed for non-technical teams, making it accessible for marketing, sales, and business analysts.
Time Efficiency: Quick data import without the need for complex query writing.
Automated Updates: Ensures data is always up-to-date with automatic refresh capabilities.
Integrated Experience: Operates within Google Sheets, providing a seamless workflow.
For users looking for a simple, efficient, and integrated solution to connect Mailchimp with Google Sheets, Superjoin is a superior choice. It minimizes the need for technical expertise and automates the data import process, allowing you to focus on deriving insights rather than managing data imports.
Mailchimp is a widely-used email marketing platform that helps businesses manage campaigns, track audience growth, and measure engagement rates. It provides crucial data on campaign performance, subscriber demographics, and overall marketing effectiveness, enabling companies to refine their email marketing strategies and boost customer engagement.
Connecting Mailchimp to Google Sheets brings this valuable data into a familiar spreadsheet format, facilitating easier trend visualization and custom reporting. Similarly, integrating Zendesk Support to Google Sheets can provide valuable insights into customer support metrics, helping you track ticket volumes, response times, and customer satisfaction. Tools like Superjoin streamline this integration, eliminating technical complexities and allowing marketers to focus on data analysis. This connection ensures that key metrics such as open rates, click-through rates, and subscriber growth are readily available and up-to-date in Google Sheets.
This blog will compare different connection methods, highlighting why Superjoin is often the best choice for many users.
Best Ways to Connect Mailchimp to Google Sheets
Method 1: Using Superjoin
Superjoin provides the fastest and easiest way to connect Mailchimp to Google Sheets without any technical know-how or complex setup processes. Here’s how it works:
Step 1: Click Extensions from the Google Sheets menu. Select Add-ons and choose to Get Add-ons. This will bring you to the Google Workspace Marketplace.
Step 2: Look for Superjoin in the Google Marketplace pop-up window and install the app by following the prompts.
Step 3: Navigate back to the Extensions menu tab and launch Superjoin from there. You should see Superjoin running as a Google Sheets side panel on the right side of your screen.
Step 4: From Sources, select Mailchimp from the list.
Step 5: After selecting Mailchimp, authorize Superjoin to access your account by entering your API Key.
Step 6: After authorization, you'll see a list of your Mailchimp properties in the Data Preview Window.
Choose your property and view, then click "Import" to bring the data into Google Sheets.
Step 7: Superjoin lets you refresh your imported data instantly with one click or set it to auto-refresh on a pre-set schedule. This way, you won't need to manually update your Mailchimp data in Google Sheets to reflect changes from the source.
Voila, you've successfully imported your Mailchimp data to Google Sheets using Superjoin!
It is particularly suitable for users looking for a Mailchimp to Google Sheets free tool, as Superjoin offers a free tier.
Method 2: Using Zapier
Third-party automation tools like Zapier can also be used to sync Mailchimp with Google Sheets. Zapier allows you to create Zaps (automated workflows) that can transfer data between the two services.
Steps:
Sign up for a Zapier account and create a new Zap.
Select Mailchimp as the trigger app and set up the trigger (e.g., new subscriber in Mailchimp).
Choose Google Sheets as the action app and configure the action (e.g., create new row in Google Sheets).
Test and turn on the Zap.
Why Choose Superjoin?
In comparison to other methods, Superjoin stands out for several reasons:
User-Friendly Interface: Designed for non-technical teams, making it accessible for marketing, sales, and business analysts.
Time Efficiency: Quick data import without the need for complex query writing.
Automated Updates: Ensures data is always up-to-date with automatic refresh capabilities.
Integrated Experience: Operates within Google Sheets, providing a seamless workflow.
For users looking for a simple, efficient, and integrated solution to connect Mailchimp with Google Sheets, Superjoin is a superior choice. It minimizes the need for technical expertise and automates the data import process, allowing you to focus on deriving insights rather than managing data imports.
FAQs
How secure is the integration between Mailchimp and Google Sheets using Superjoin?
How secure is the integration between Mailchimp and Google Sheets using Superjoin?
Can I customize the data I import from Mailchimp to Google Sheets using Superjoin?
Can I customize the data I import from Mailchimp to Google Sheets using Superjoin?
Is it possible to automate the data refresh process with Superjoin?
Is it possible to automate the data refresh process with Superjoin?
Automatic Data Pulls
Visual Data Preview
Set Alerts
other related blogs


Try it now