Table of Contents
Google Sheets has become a day-to-day workspace for us. We use Google Sheets for so many reasons - for logging, storing, living, dumping and filtering data. Google Sheets have become a major part of our lives, right? Imagine having a dump of data put together. The first thing you would want to do is make sure you format it and filter it.
In this article, get to know all the information about cell splitting in Google Sheets, why it is effective, all the basic techniques, tips for effective cell splitting, and so much more.
As the word says, splitting cells is nothing but dividing the content from a single cell to multiple cells. This way one can easily have a better way to organize, analyze and present the data.
Why is cell splitting significant and effective?
Google Sheets itself has many pros. Imagine adding more and more shortcuts and effective solutions to it, making it more feasible and easy to work. Data, when accessible in a split cell, is more organized. Some of the major benefits of using split cells in Google Sheets are:
Time-saving
Data Accuracy
Data organization
Flexibility
There are so many benefits of cell splitting in Google Sheets that make your data analysis quick and easy. For instance, when importing customer data from Zendesk Support to Google Sheets, you may find that names are stored in a single column. By using cell splitting, you can separate first and last names into different columns, making it easier to sort, filter, and analyze customer information. This not only enhances data clarity but also enables more detailed analysis, such as categorizing customers by last name or performing targeted searches. You will find a lot of different methods to split cells in Google Sheets. Based on your requirements and choice, the methods may vary.
There are so many benefits of cell splitting in Google Sheets that make your data analysis quick and easy. You will find a lot of different methods to split cells in Google Sheets. Based on your requirements and choice, the methods may vary.
Method 1 - Using the Split text to columns option
Another quick solution to split text in Google Sheets is using the columns option. You will find this option in the Data menu. Follow the list of instructions given below to achieve the same:
Create a new column with the data you want
Click on the range of cells that has the data.
Click on the Data menu. You will find a Split text-to-columns option in the dropdown list.

To split the text, you need to choose a separator first. The separator can be either the default one from Google Sheets or even a customized one that you can choose. To customize, click on the Custom option.

After choosing the separator, choose Split. You will find the cell being split into different separate cells.
In the above example, a comma is used as the separator.
Method 2 - Using SPLIT() function
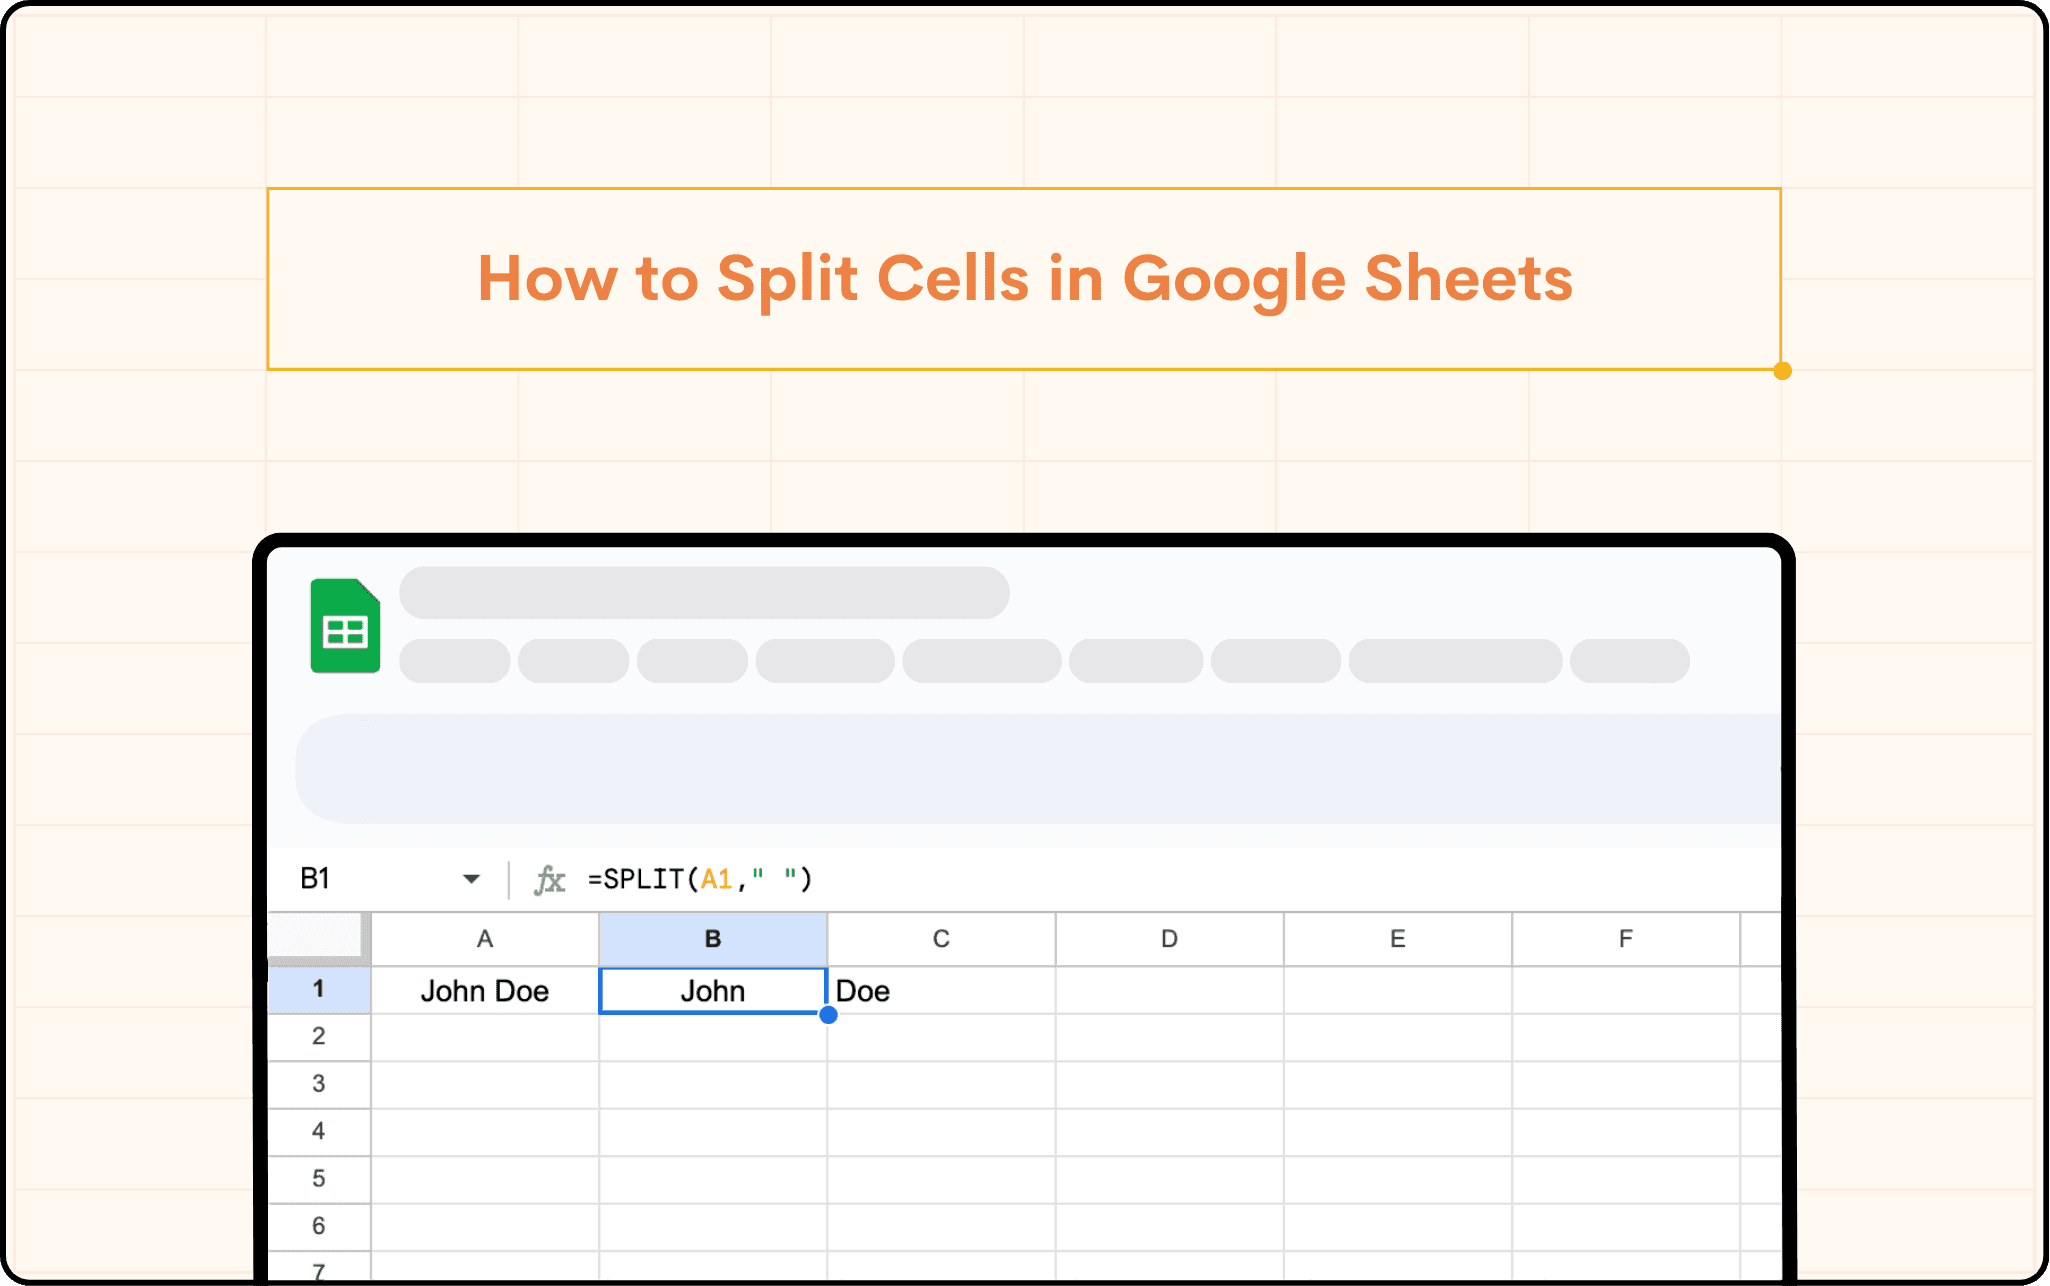
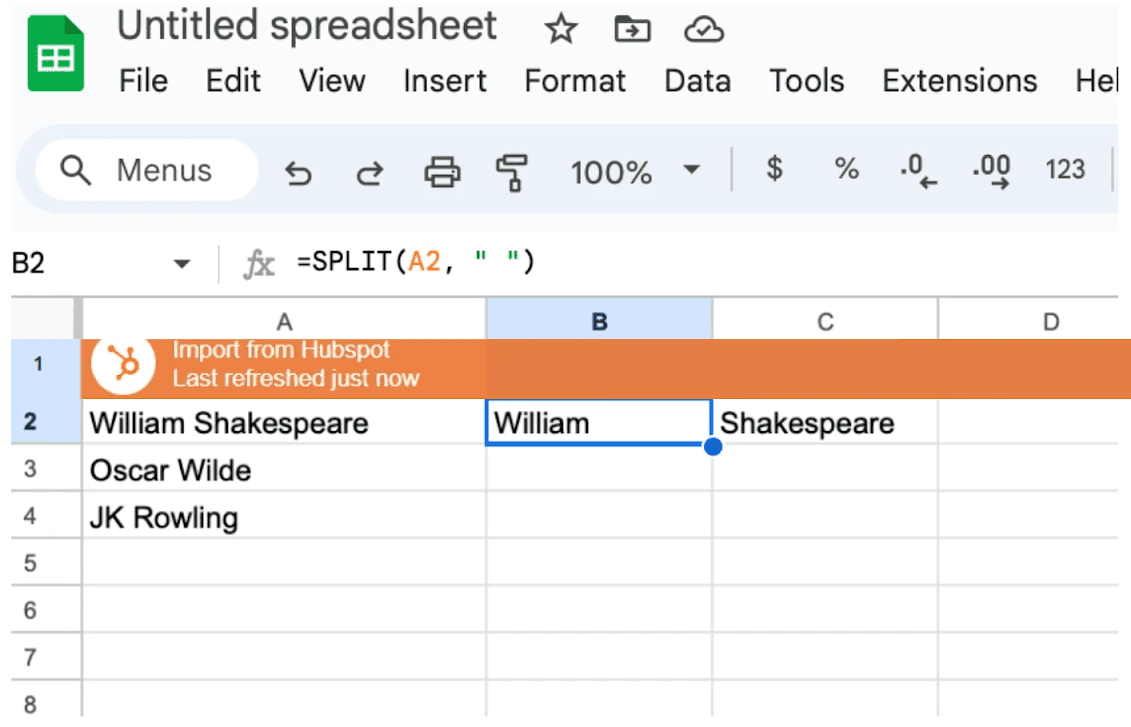
One of the common methods of cell splitting is using the SPLIT() function in Google Sheets. Here, the text strings will be split into multiple cells with a set delimiter. A delimiter is nothing but a string that needs to be placed between each concatenated value. In cases where you need to split data from a single cell into different separate cells using a common separator, you can use the SPLIT() function. The common separator may be a comma, a space, or any customer character.
The syntax for the SPLIT() function is:
=SPLIT(text, delimiter, [split_by_each], [remove_empty_text])For example, =SPLIT(A1, " ")
This formula splits the words from A1 and puts them in separate cells.
SPLIT - Function
text - The text that needs to be split
delimiter - It refers to the character that is used to split the text or string. In simple words, a delimiter just splits the word.
split_by_each - It is an argument that is treated as optional. You can either set it to TRUE or FALSE. If you set it to YES, it will split the text around every character in the string with the help of the delimiter. If set to NO, the vice versa.
remove_empty_text - It is another optional argument that also follows the same process of setting it to TRUE or FALSE. If set to TRUE, it removes empty test segments from the string. If set to NO, it will not remove the empty segments.
When should you use this method?
CSV data: The SPLIT() function can be used when data is stored in CSV format. This way, you can split data into different separate cells for easy analysis and organization.
Data cleanup: While cleaning up the data by putting them into different columns using the concatenated values, the SPLIT() function can be used.
List processing: A common delimiter separates the data and when you need to extract the data into further separate cells, this function is the best option to do so.
Method 3 - Functions
Do you know that you can use functions to split cells in Google Sheets? While these functions don’t directly split a cell, they still can help you extract characters from a cell. These methods can be used in a few similar use cases to that of split cells. All you have to do is choose the right function based on your requirements. There is a list of functions that need to be handy for you to use. Some of them are:
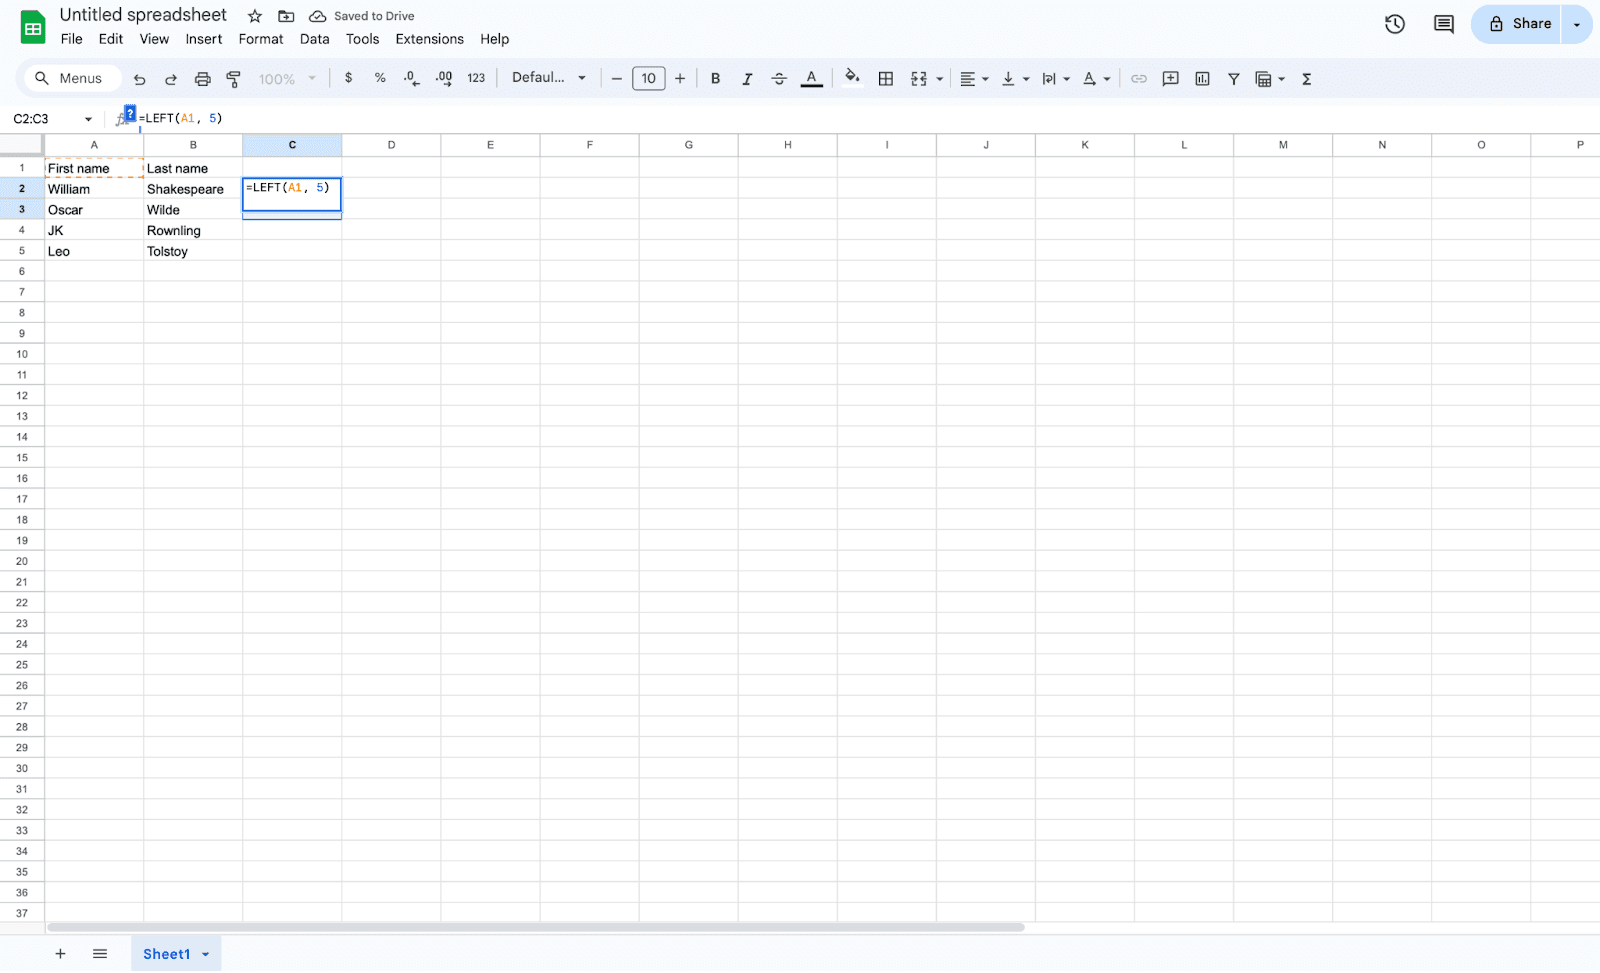
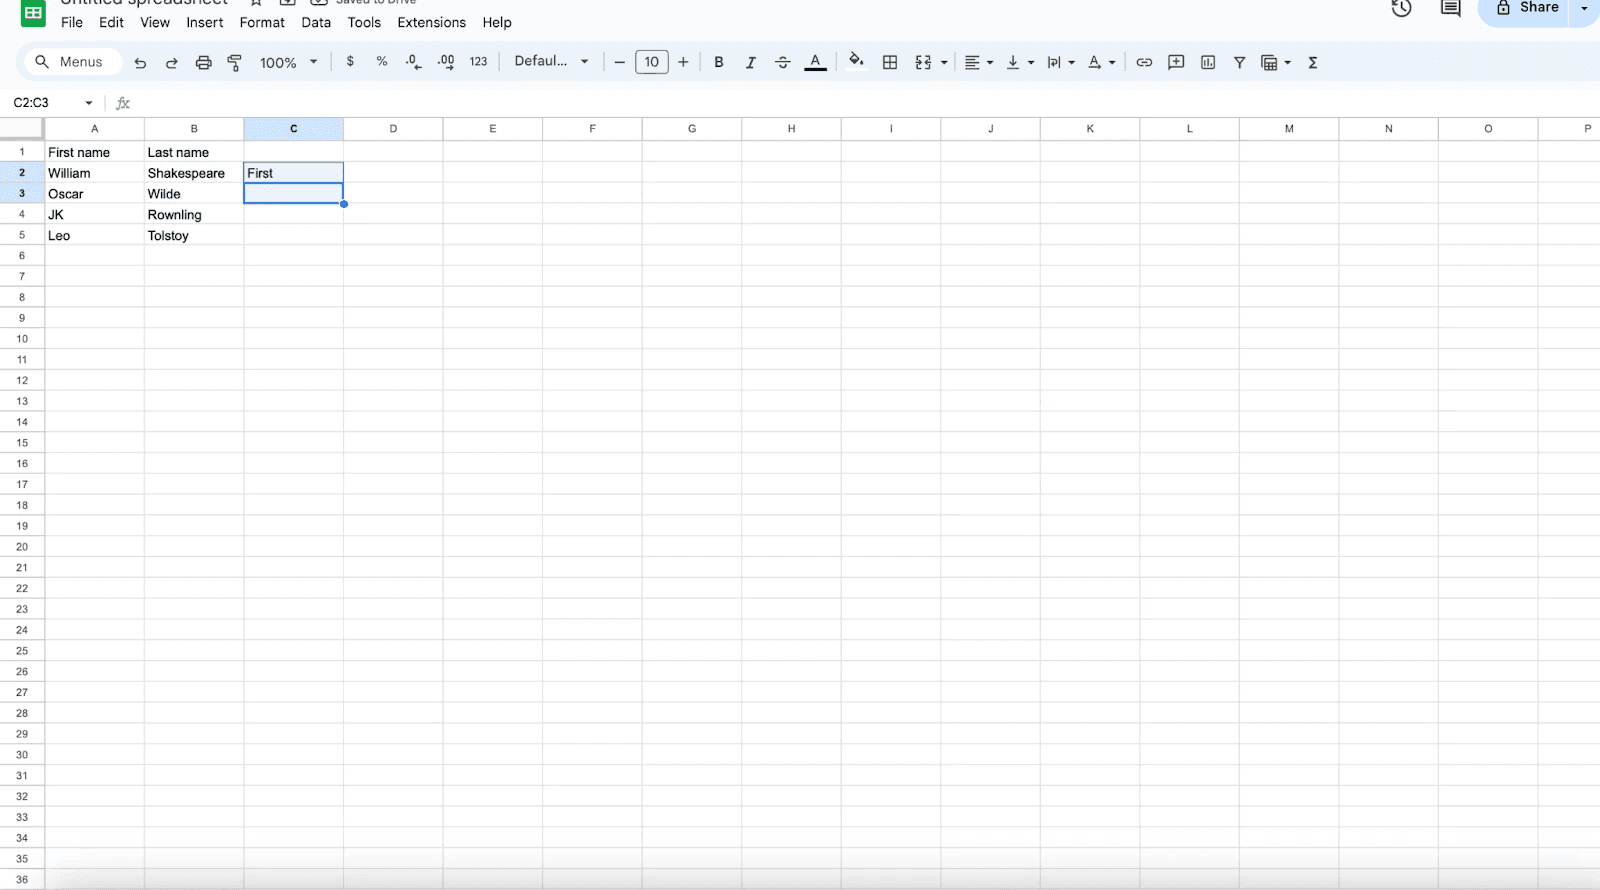
LEFT(), RIGHT(), MID(): These functions are used to extract characters on the left, right and middle respectively.
For example: =LEFT(A1, 5)
This formula will extract the first 5 characters from cell A1.
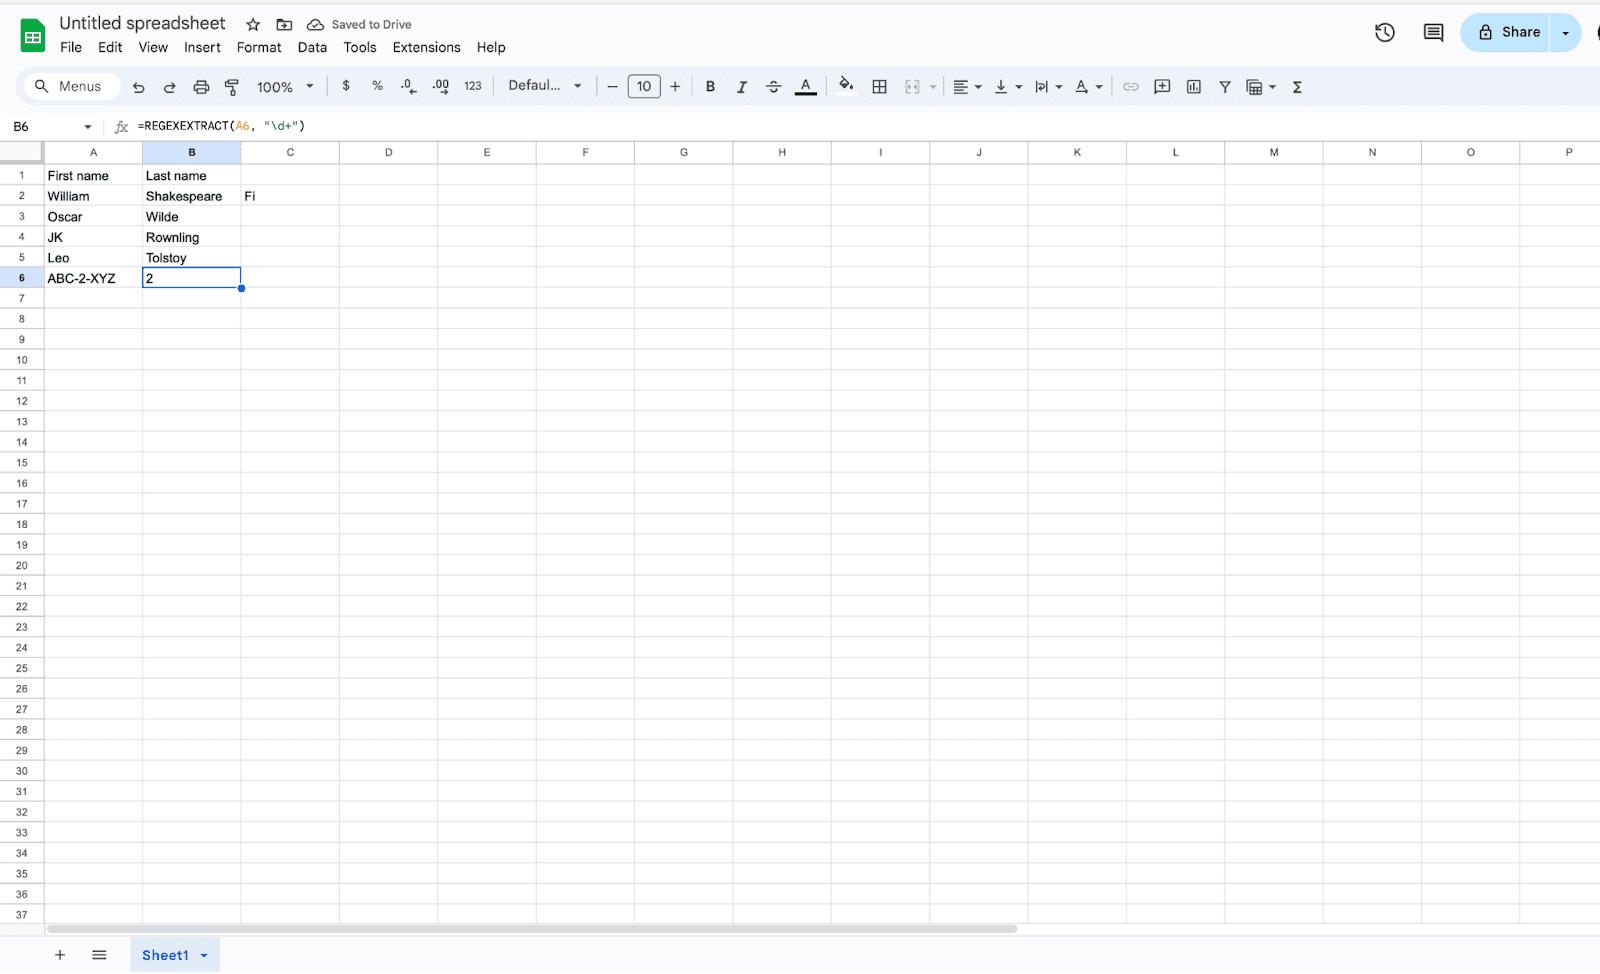
REGEXEXTRACT(): This function is used to extract a text or a string to match the exact text using a regular expression pattern. REGEXEXTRACT stops searching after finding the first match to the pattern.
For example: =REGEXEXTRACT(A1, "\d+")
This extracts the numeric part alone.
Method 4 - Combination of SPLIT function + QUERY function
In this method, the SPLIT function in Google Sheets splits a text string into an array of substrings based on a specified delimiter. The QUERY function is used to perform SQL-like queries on data in Google Sheets. Let us see an example of combining both of these functions in Google Sheets.
Example:
Column A has first and last names together, in column B, we will apply the formula, to have separate columns for first and second names.
=ArrayFormula(IFERROR(SPLIT(A:A, " ")))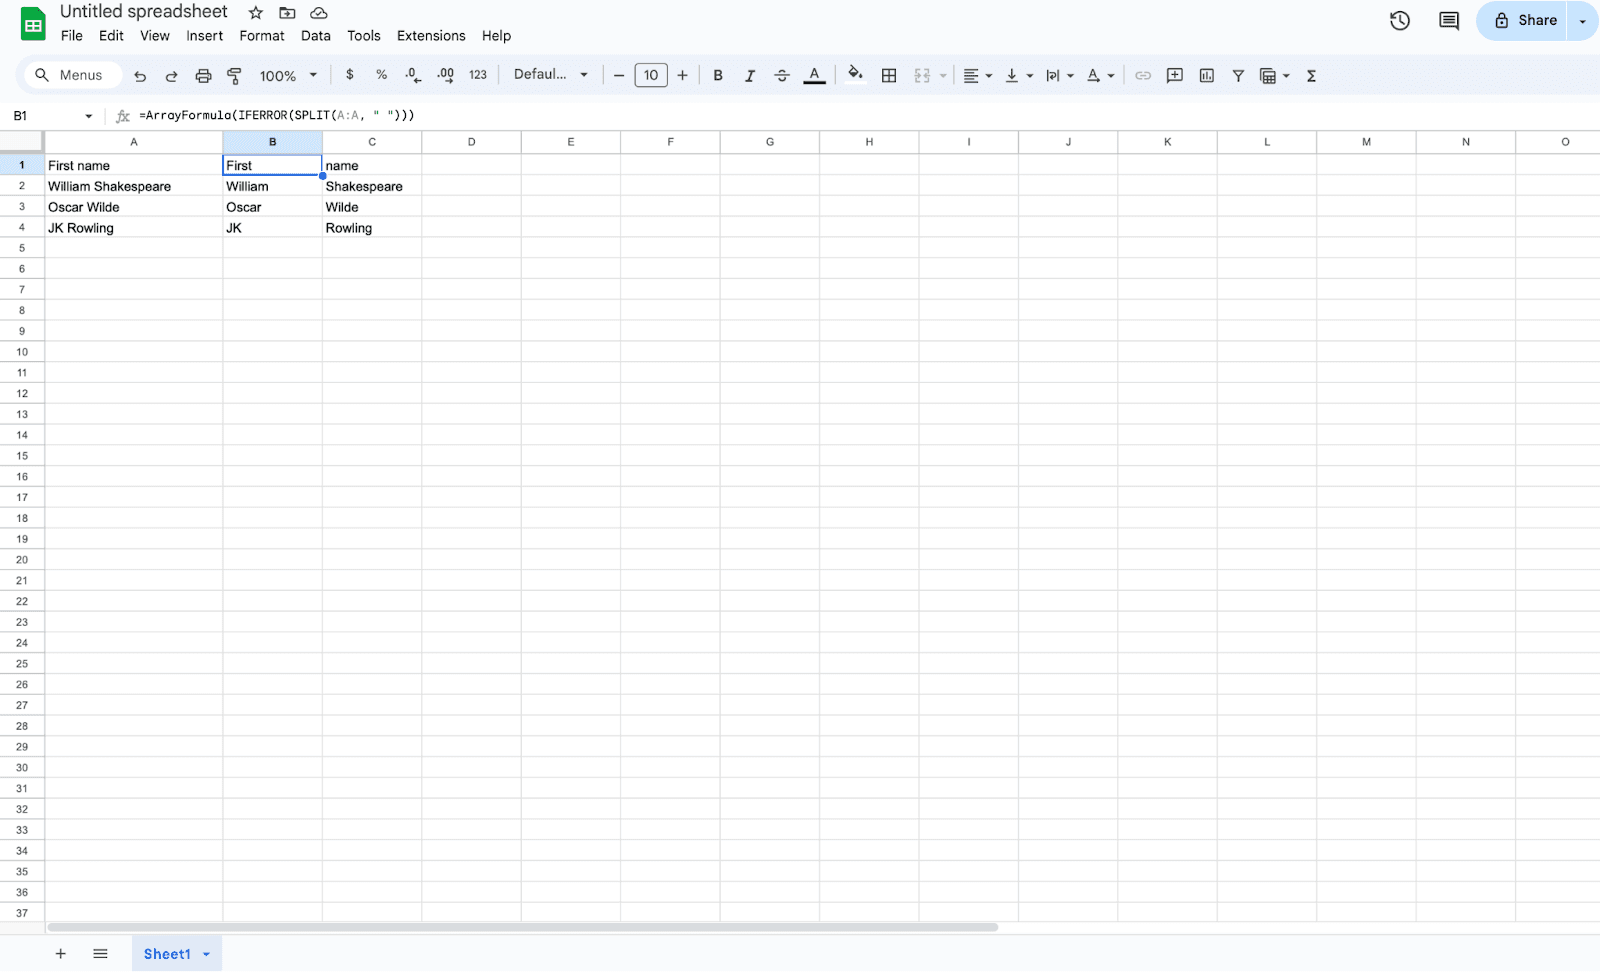
Method 5 - Combination of SPLIT function + ARRAYFORMULA function
In this method, the SPLIT function in Google Sheets is used to split a text string into separate values based on a delimiter. The ARRAYFORMULA function is used to apply a function to a range of cells and return the results as an array. Let's see how you can combine these two functions for various tasks:
Syntax:
=ARRAYFORMULA(SPLIT(text, delimiter, [split_by_each], [remove_empty_text]))Example:
Here, the date and time of the same rows are split into two different cells for date and time respectively using
=ARRAYFORMULA(SPLIT(B1:B2, " "))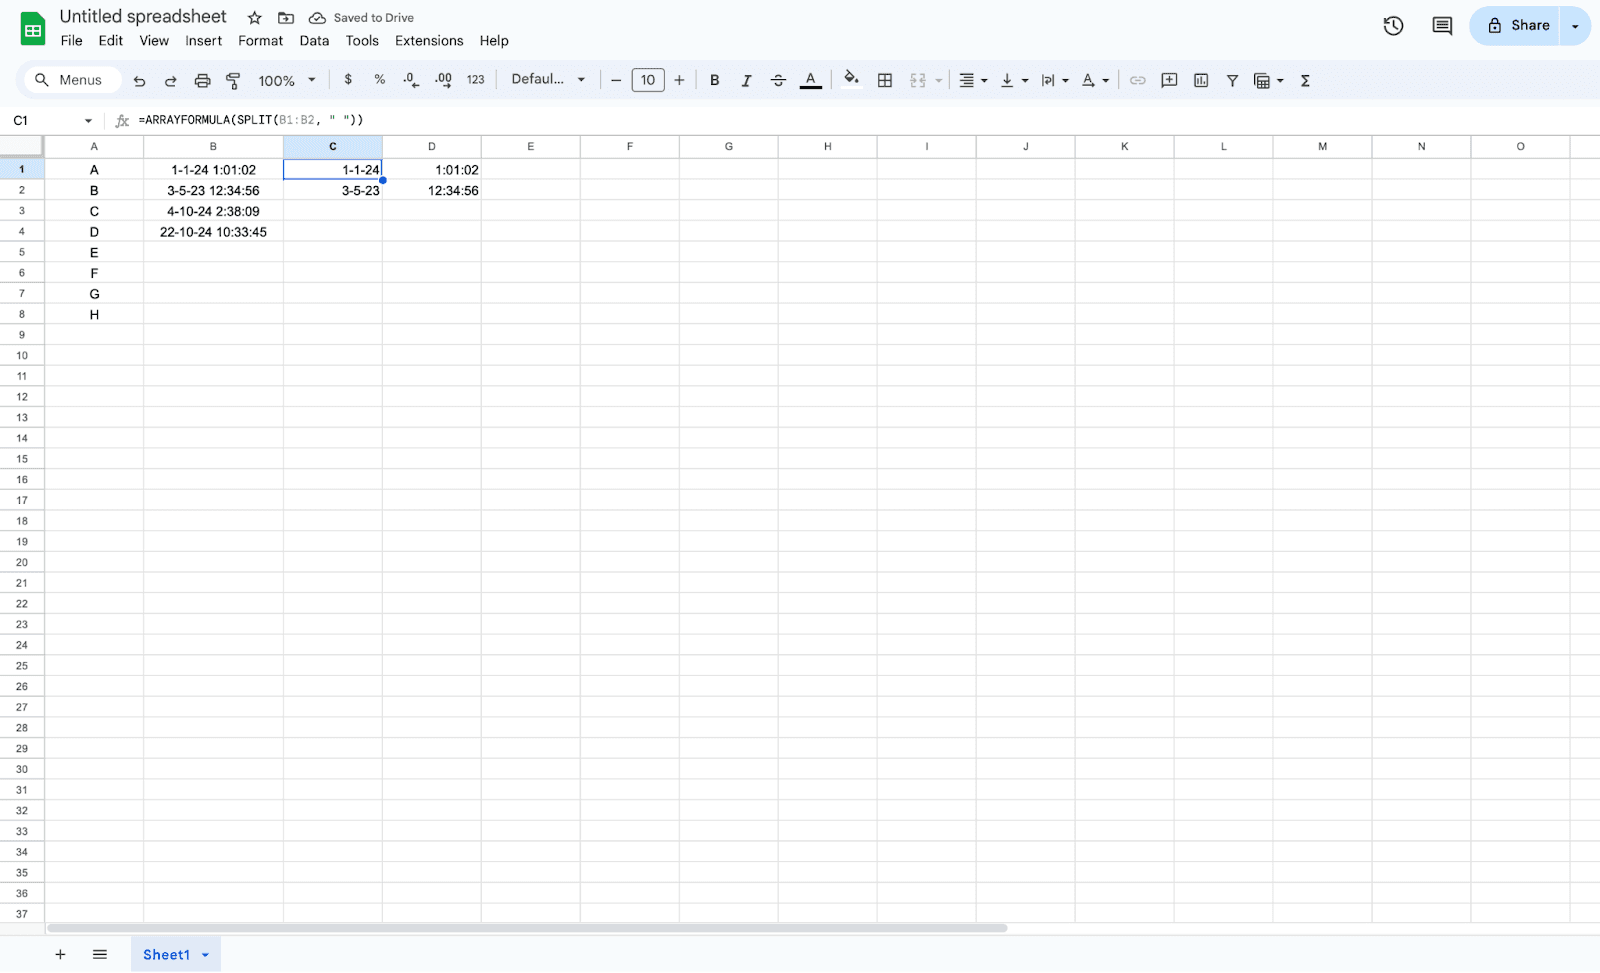
Method 6 - Using Add-ons
The add-on functionality is one of the most common features used in Google Sheets. You will find a list of Add-on functionalities for splitting cells.
Advanced Find and Replace: The Advanced Find and Replace add-on is used to search for a more specific pattern in the data or content, and split it according to those patterns.
Power Tools: The Power Tools add-on is mainly used for data manipulation which includes cell splitting.
Tips for efficient cell splitting in Google Sheets
Cell splitting in Google Sheets can be done in so many efficient ways. Here are some of the tips and tricks for you, to have an organized and more clear datasheet.
Use built-in functions
Use the combined functions
Make use of the formulas to have effective work done
Validate the data
Use named ranges
Common mistakes to avoid while splitting cells in Google Sheets
When splitting cells in Google Sheets, most of us might make some common mistakes. In the end, the results might be unexpected with errors. Here are some important notes on what are the common mistakes we might tend to make and how to avoid them:
Delimiter check: Incorrect splitting is a cause of using an incorrect delimiter. Always double-check the delimiter you are using.
Data validation: If you ignore the step where you need to validate data, you might end up having incorrect inputs. Some data validation techniques can be done before splitting, which results in a more effective result.
Formula check: Never forget to check the formula that you are using. Make sure to have the relative formulas.
Empty cells: If you have empty cells, without any content, make sure you apply the right formula and logic with these. Skip them or treat these cells as valid data while using the formula to avoid any error in the results.
These mistakes are very common, but very often. By avoiding these mistakes and making sure you use the right logic and formula, you can have effective and expected results.
Say Goodbye To Tedious Data Exports! 🚀
Are you tired of spending hours manually exporting CSVs from different tools and importing them into Google Sheets?
Superjoin is a data connector for Google Sheets that connects your favorite SaaS tools to Google Sheets automatically. You can get data from these platforms into Google Sheets automatically to build reports that update automatically.
Bid farewell to tedious exports and repetitive tasks. With Superjoin, you can add one additional day to your week. Try Superjoin out for free or schedule a demo.
FAQs
Is it possible to split cells vertically in Google Sheets?
Can I split cells based on a specific character or string?
What if I need to split cells into multiple columns or rows?
Automatic Data Pulls
Visual Data Preview
Set Alerts
other related blogs