Microsoft Excel Tutorial
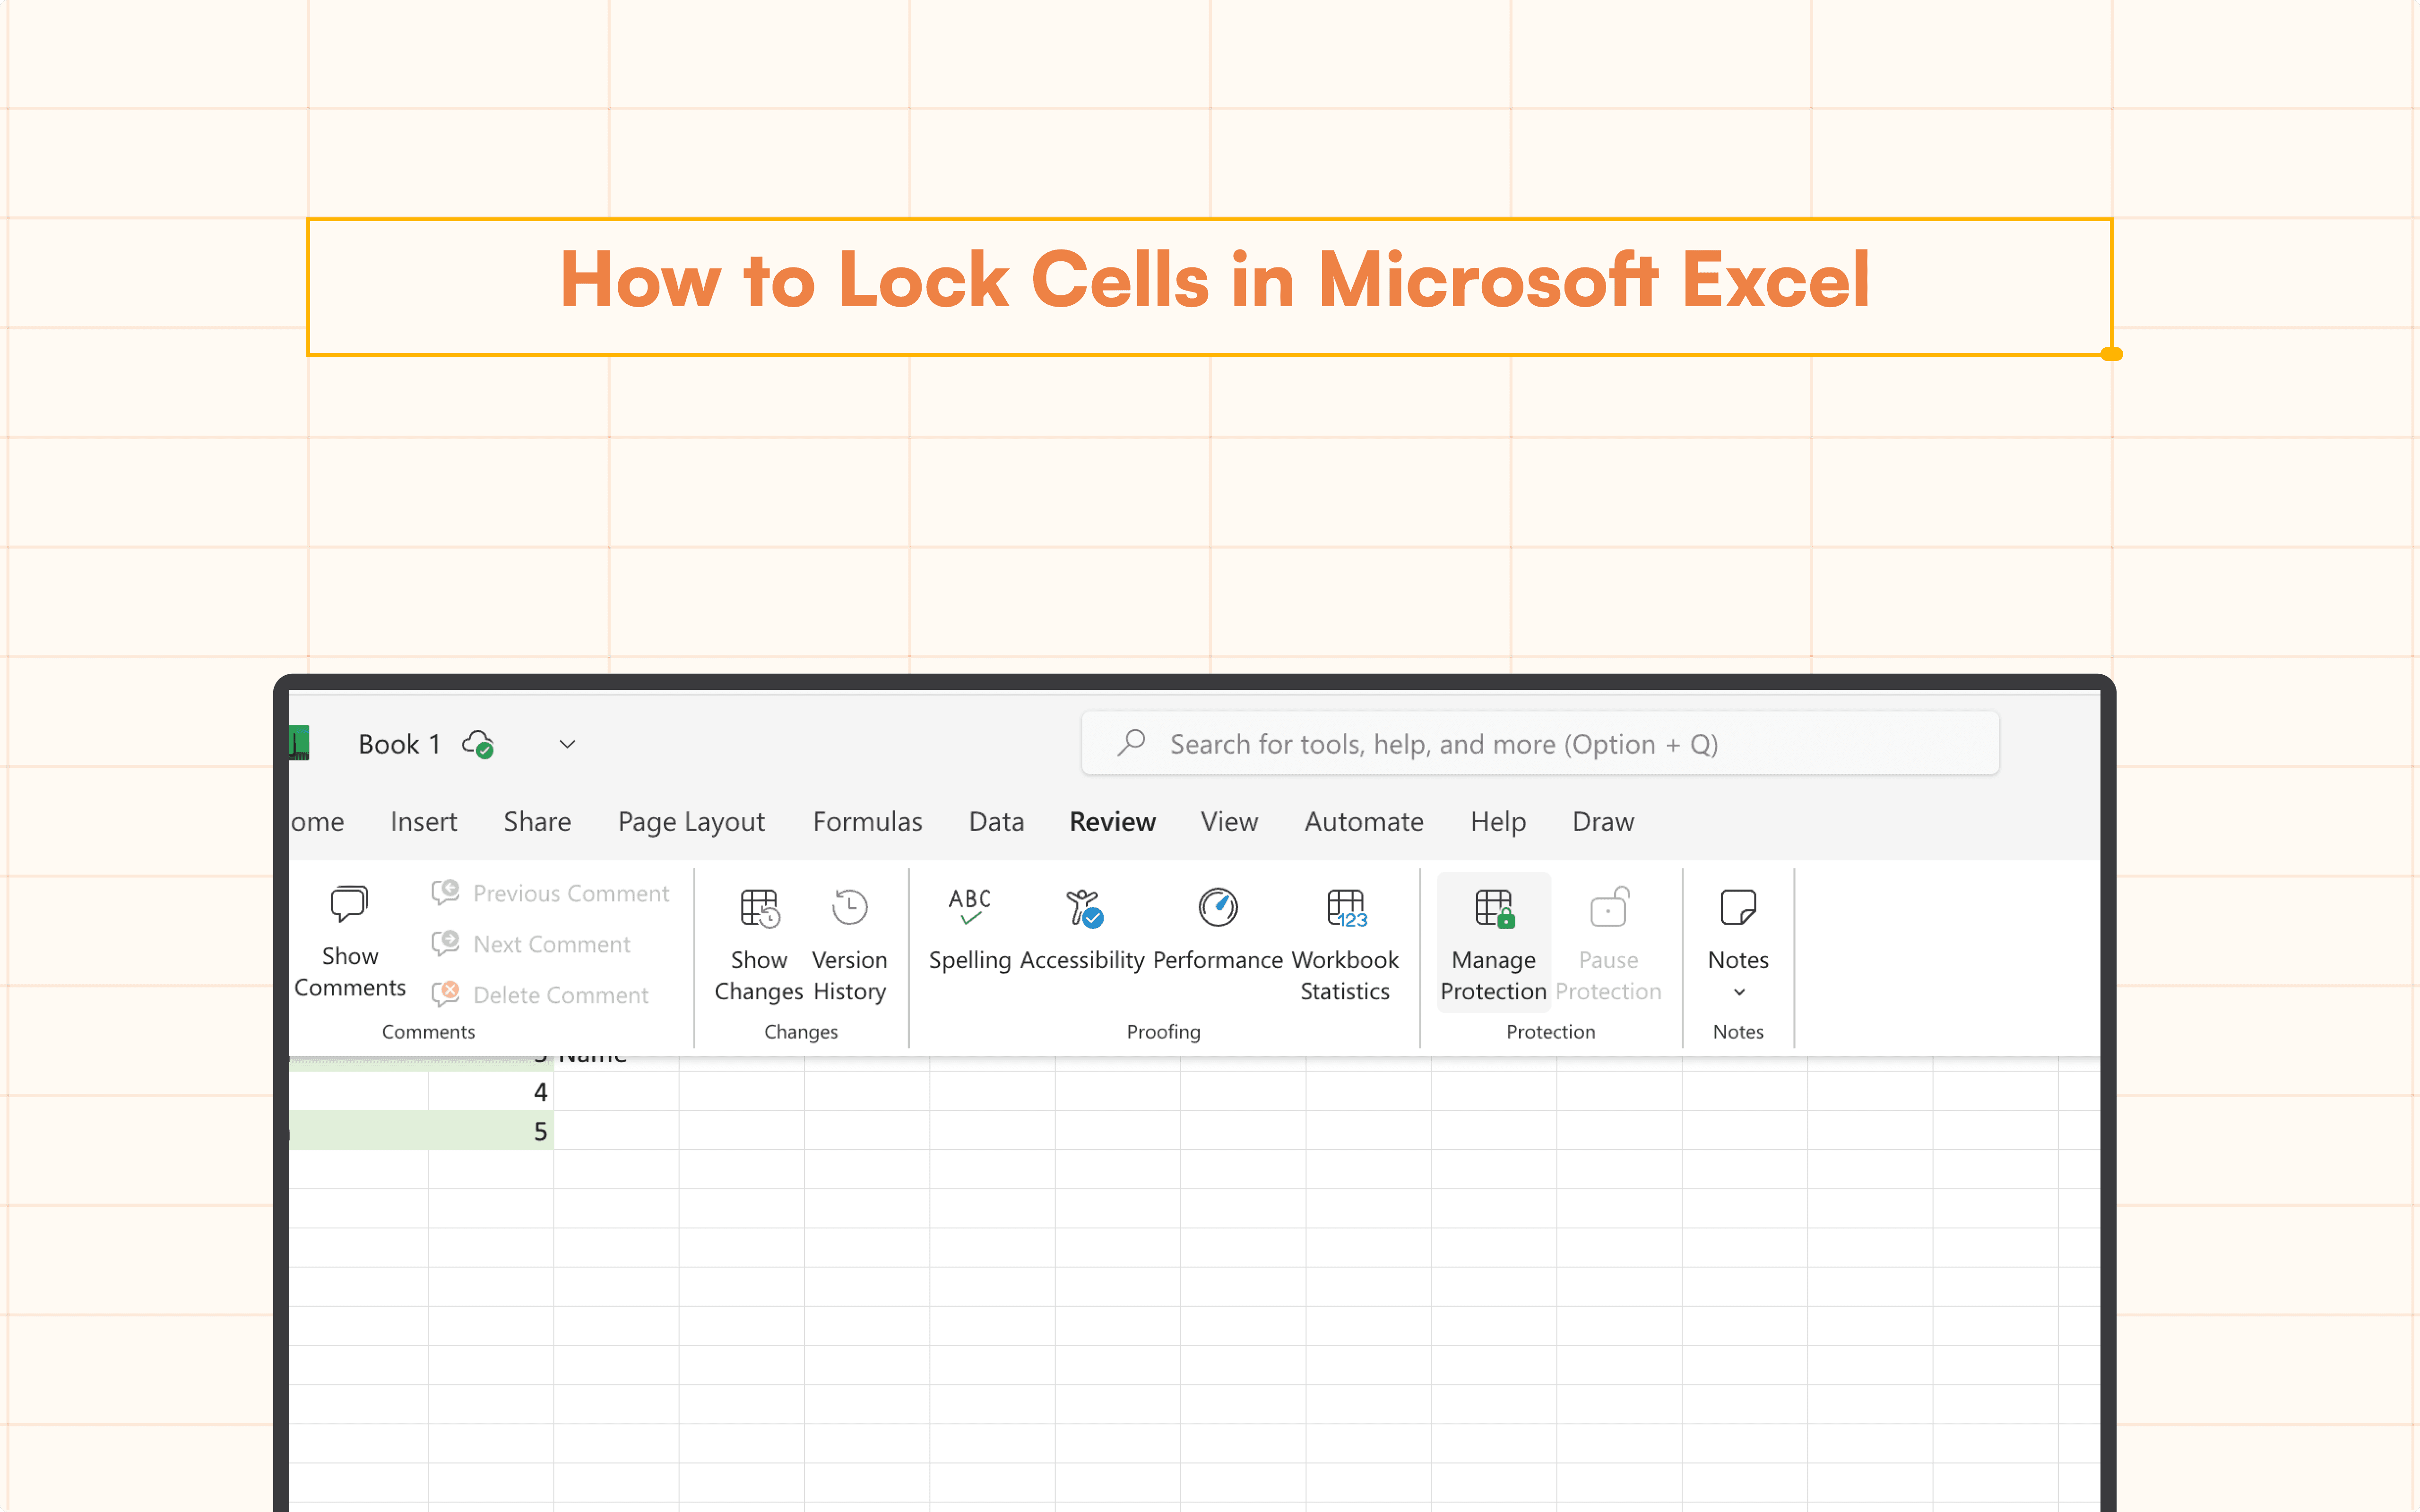
How to Lock Cells in Microsoft Excel
Learn how to lock cells in Microsoft Excel effectively. Protect your data and prevent unwanted edits with ease.
Table of Contents
Maintaining the integrity of your data is essential in the collaborative world of Excel. To avoid unintentional or unauthorized alterations, formulas, computations, and important data must be protected. Locking cells are useful in this situation. With the help of this thorough tutorial, you will be able to lock cells in Excel efficiently, protecting your spreadsheet and expediting teamwork.
Understanding Cell Locking
Excel cells are not entirely hidden when they are locked. It keeps colleagues with editing rights from inadvertently changing them. A little lock icon in the corner of locked cells indicates that they are protected.
Here's what gets restricted when you lock cells:
Direct editing: The cell content cannot be directly changed by anyone with editing access unless the cell is unlocked.
Formula deletion: Existing formulas within locked cells cannot be deleted.
Formatting changes: Formatting applied to locked cells, such as font styles or cell borders, cannot be modified.
Important to note:
When you lock cells in Excel, it only restricts editing, not viewing. Anyone with access to the spreadsheet can still see the content of locked cells.
Data validation rules and conditional formatting can still be applied to locked cells.
Step-by-Step Guide to Locking Cells in Microsoft Excel
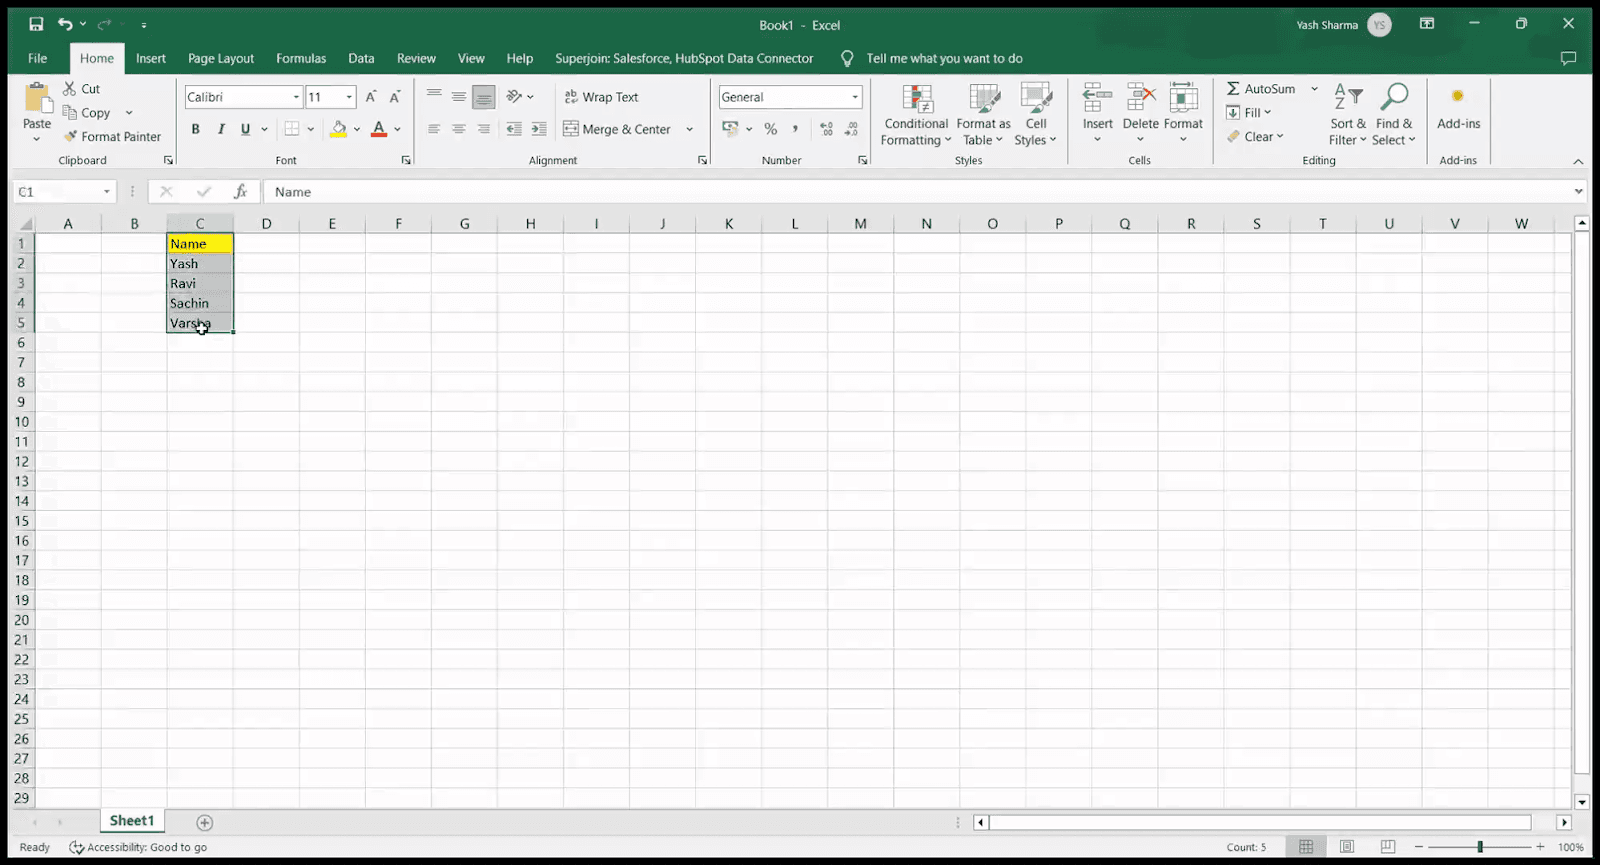
First, select the columns that you wish to lock.
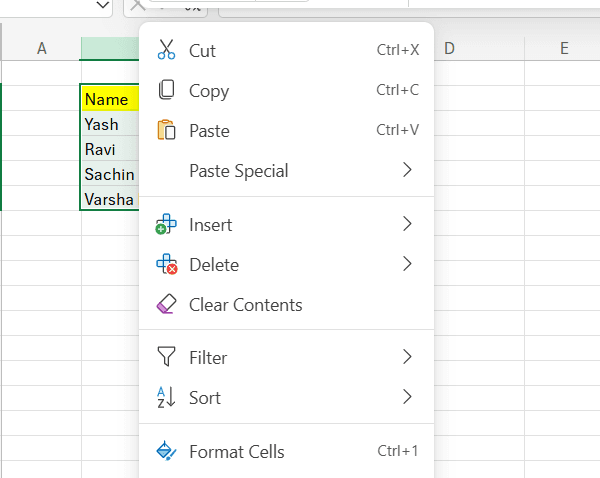
Then, right-click to open the context menu and navigate to Format Cells.
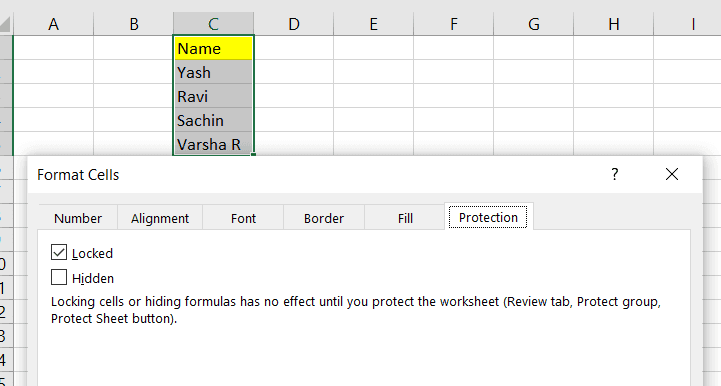
Once there, select the Protection tab and check the box labeled Locked. Finally, click OK to save your changes.
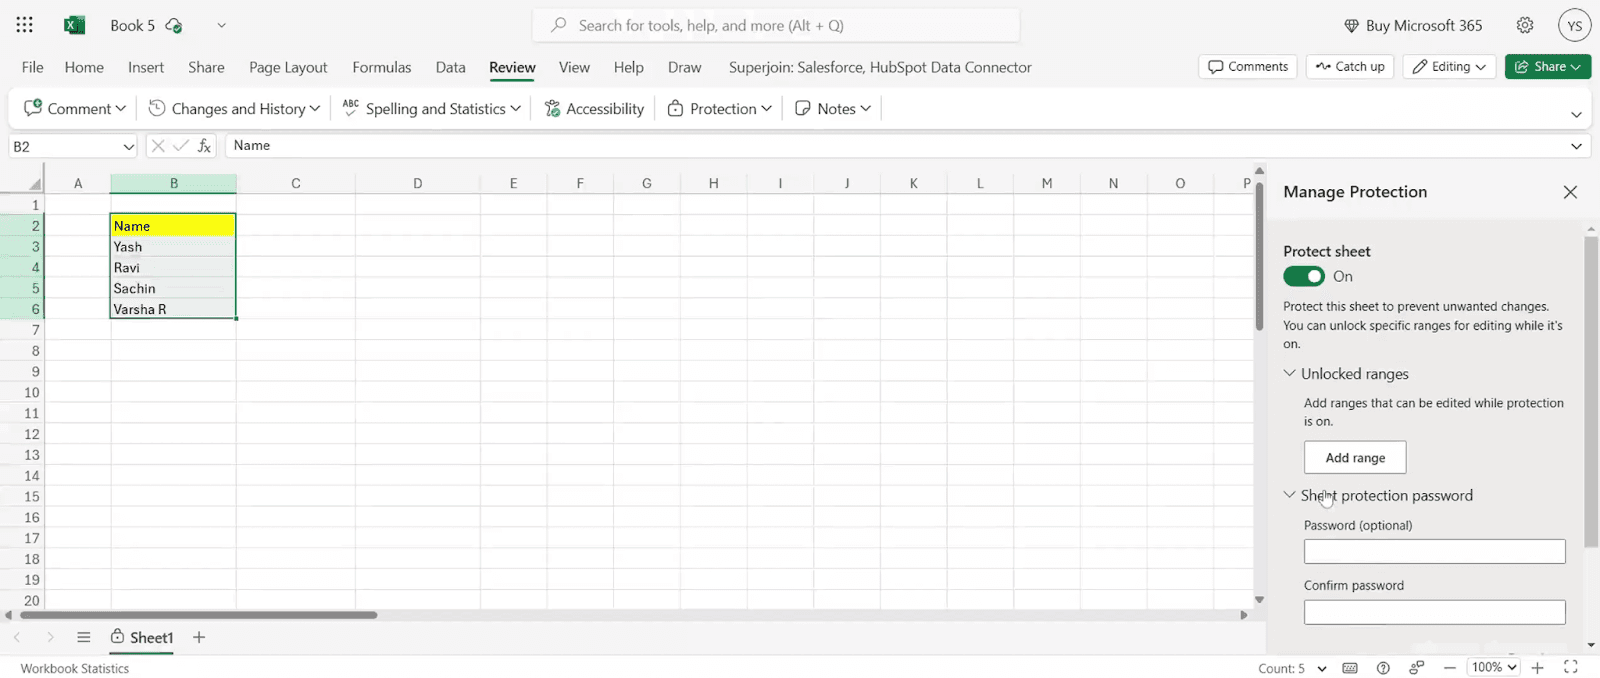
Next, go to the Review tab and select Protect Sheet. Make sure to check the option for Select locked cells, then click OK. You will be prompted to enter a password to protect the sheet.
Enter your desired Password to protect the sheet. This password will safeguard the sheet from unauthorized edits.
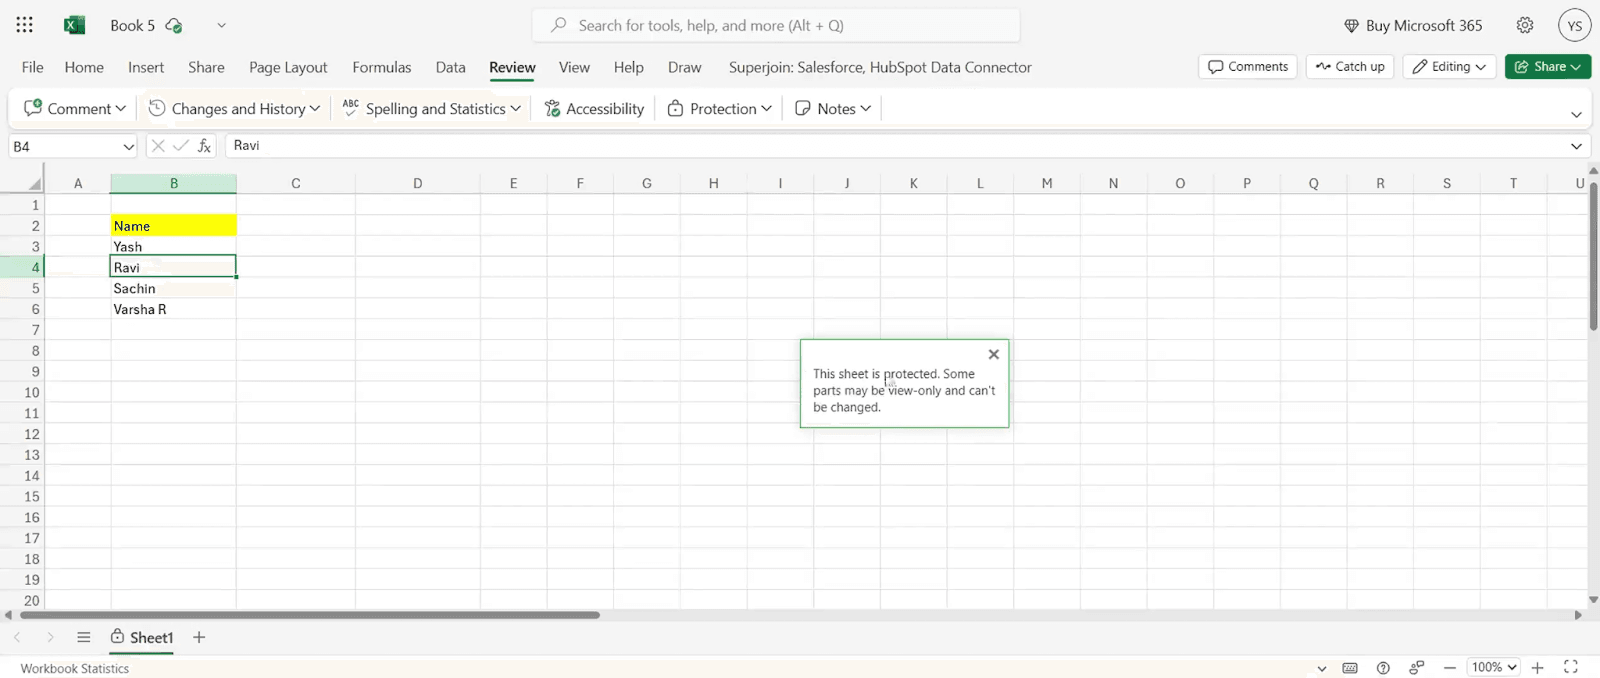
Once the sheet is protected, you will notice that the locked cells cannot be edited, and an error message will prompt you to enter the password if you attempt to do so.
Considerations When Locking Cells in Microsoft Excel
Granular Locking: Although entire sheets can be locked, it's frequently more effective to lock particular cell ranges that contain formulas or important information.
Collaboration in Balance: Data integrity is guaranteed by locking cells, but it's crucial to find a balance. Collaboration may be hampered by overlocking.
Communicate Changes: Let your partners know when you lock cells, particularly if it will interfere with their ability to edit.
Regularly Review Permissions: Make sure the permissions you've set on locked cells are still suitable as your team or project develops.
Advanced Techniques for Locking Cells in Microsoft Excel
Formula Locking: Although locking cells prevents the formula from being deleted, it does not stop someone from altering the formula's cell references. Consider combining formula locking and hiding (available via the Format menu) to stop unintentional formula alteration.
Locking by Sheet: You can lock the entire sheet if it contains formulas or really sensitive data that you want to keep completely private. It's advisable to use this sparingly, though, as it fully limits editing on the sheet.
Using Named Ranges: You may make locking ranges easier by giving them names that you use often. Rather than manually highlighting cells, you can lock a named range by referring to its name in the "Protected sheets and ranges" panel.
Locking with Scripts: For more experienced users, Excel lets you write your own scripts that can automatically lock cells according to certain parameters. For elaborate spreadsheets with extensive protection requirements, this can be useful.
Guidelines for securing cells effectively in Microsoft Excel
Although it's crucial to understand the technical facets of cell locking, following best practices guarantees that your data is safe and available. The following advice will help you use cell locking in Excel:
Give Access Permissions a Clear Definition:
Prior to implementing cell locking, clearly define who is allowed to see, edit, and comment on the spreadsheet. To prevent misunderstandings and facilitate cooperation, let partners know about these permissions.
Employ Named Ranges:
Consider using designated ranges for particular data sets or spreadsheet sections rather than locking individual cells. Named range protection makes management simpler and makes it simpler to alter protection settings.
Review and update permissions on a regular basis:
Review and update your Excel's access and protection settings on a regular basis when project requirements or team makeup change. Make sure that access is still suitable and in line with present requirements.
Instruct Colleagues:
Educate collaborators on the value of data security and the correct ways to work with locked cells in Excel by offering training or documentation. To preserve data integrity, promote adherence to established processes.
Advantages of Cell Locking
Prevents Accidental updates: By locking cells, collaborators are less likely to inadvertently change formulas or important data when making updates.
Preserves Data Integrity: You may guarantee the precision and dependability of your spreadsheet by safeguarding formulas and important data.
Improves Collaboration: Controlled locking makes it easier to work together in a collaborative setting where some users can make changes to particular regions while others can examine the data without worrying about unintentional modifications.
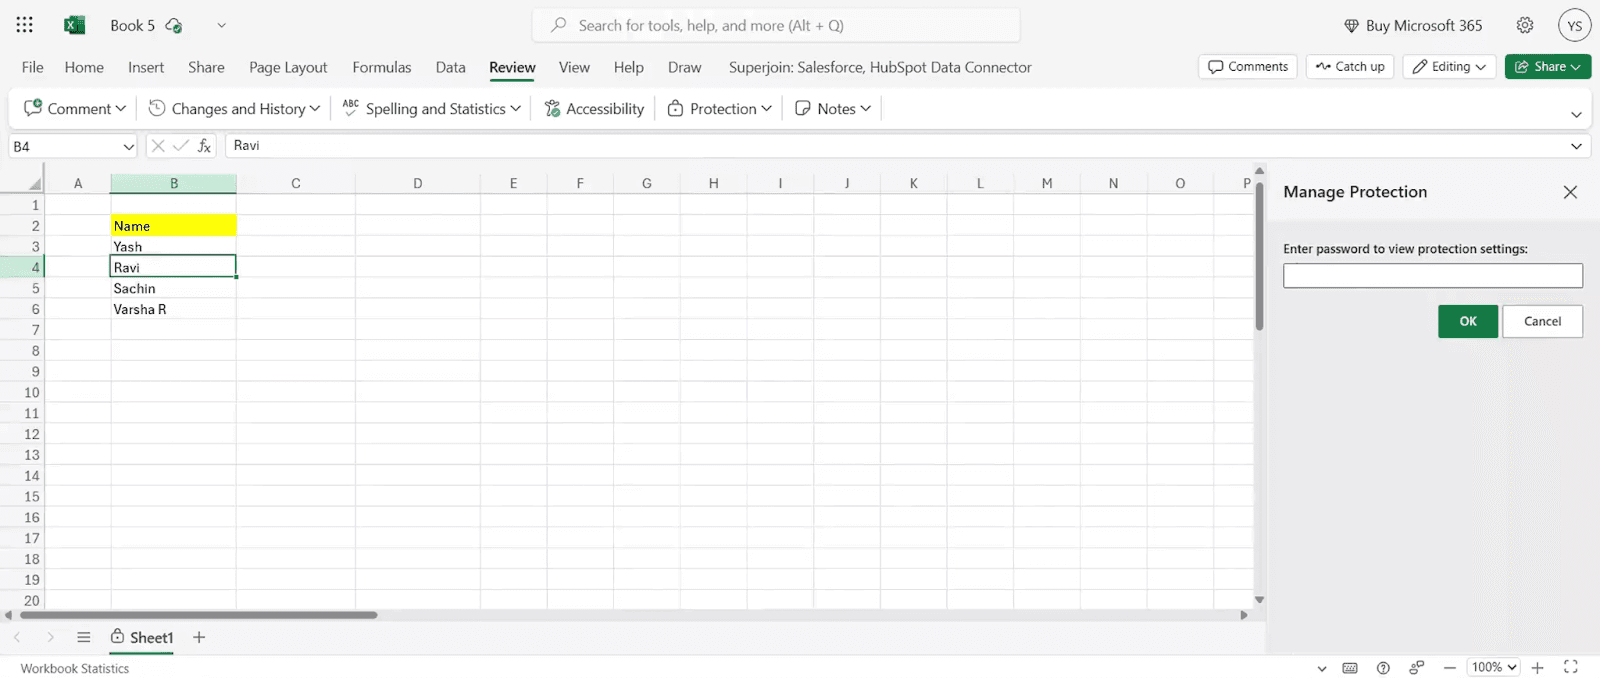
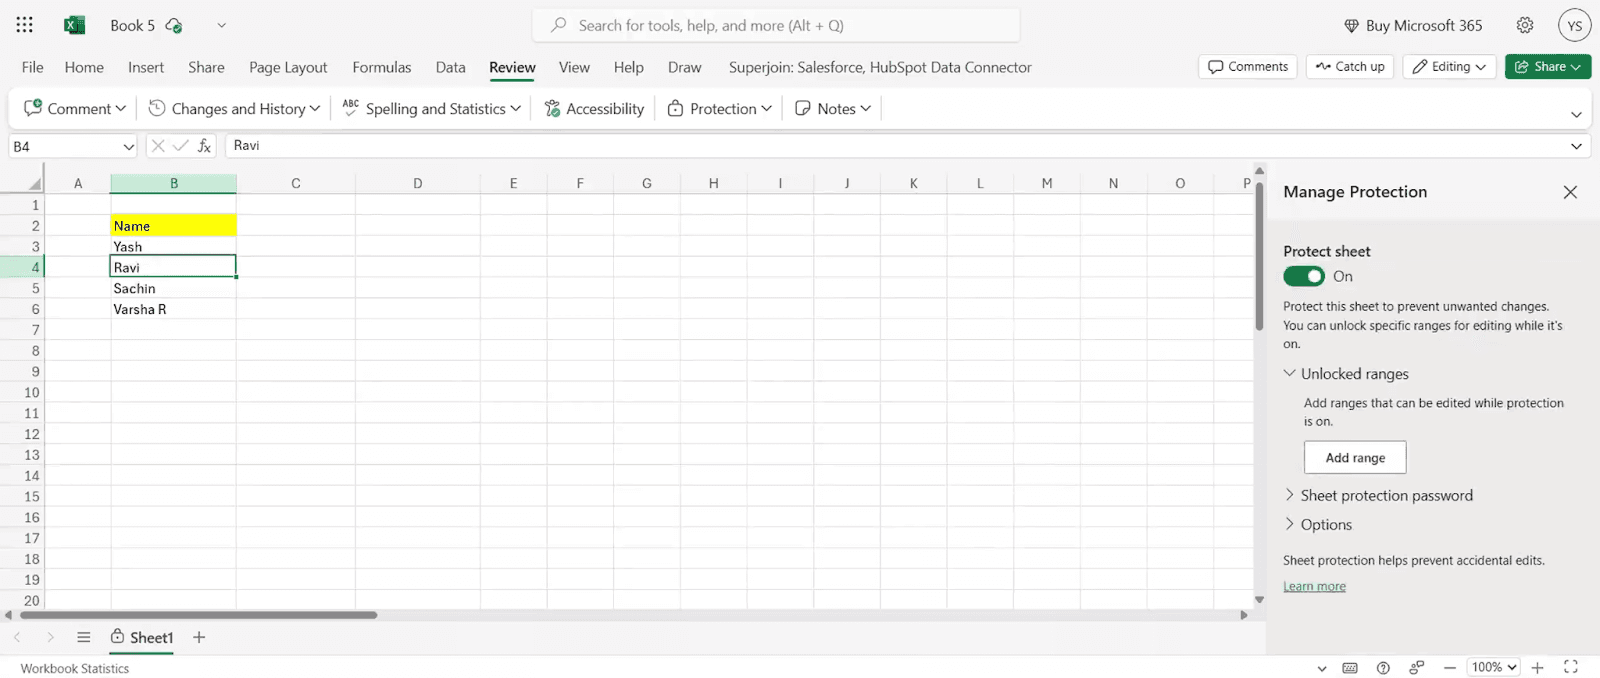
Steps to unlock locked cells in Microsoft Excel
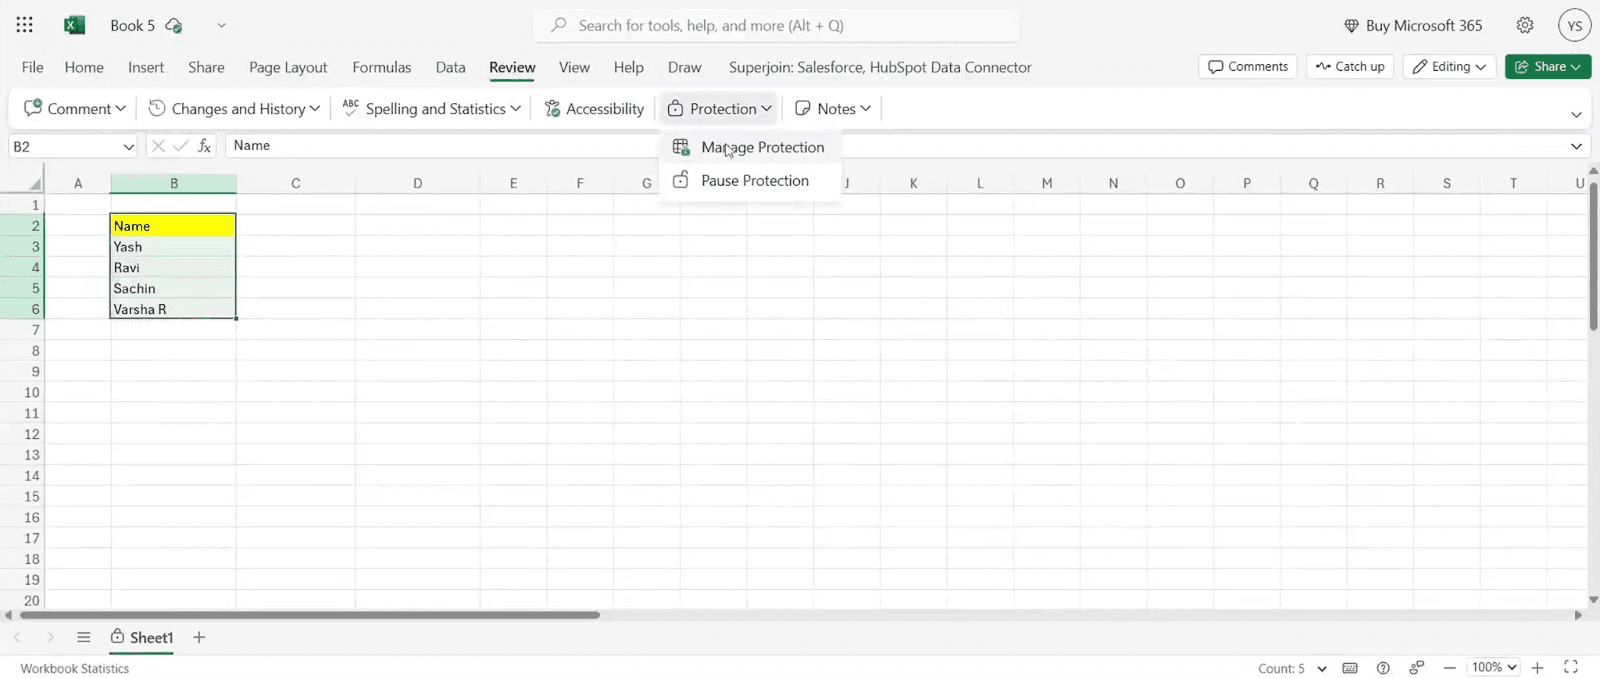
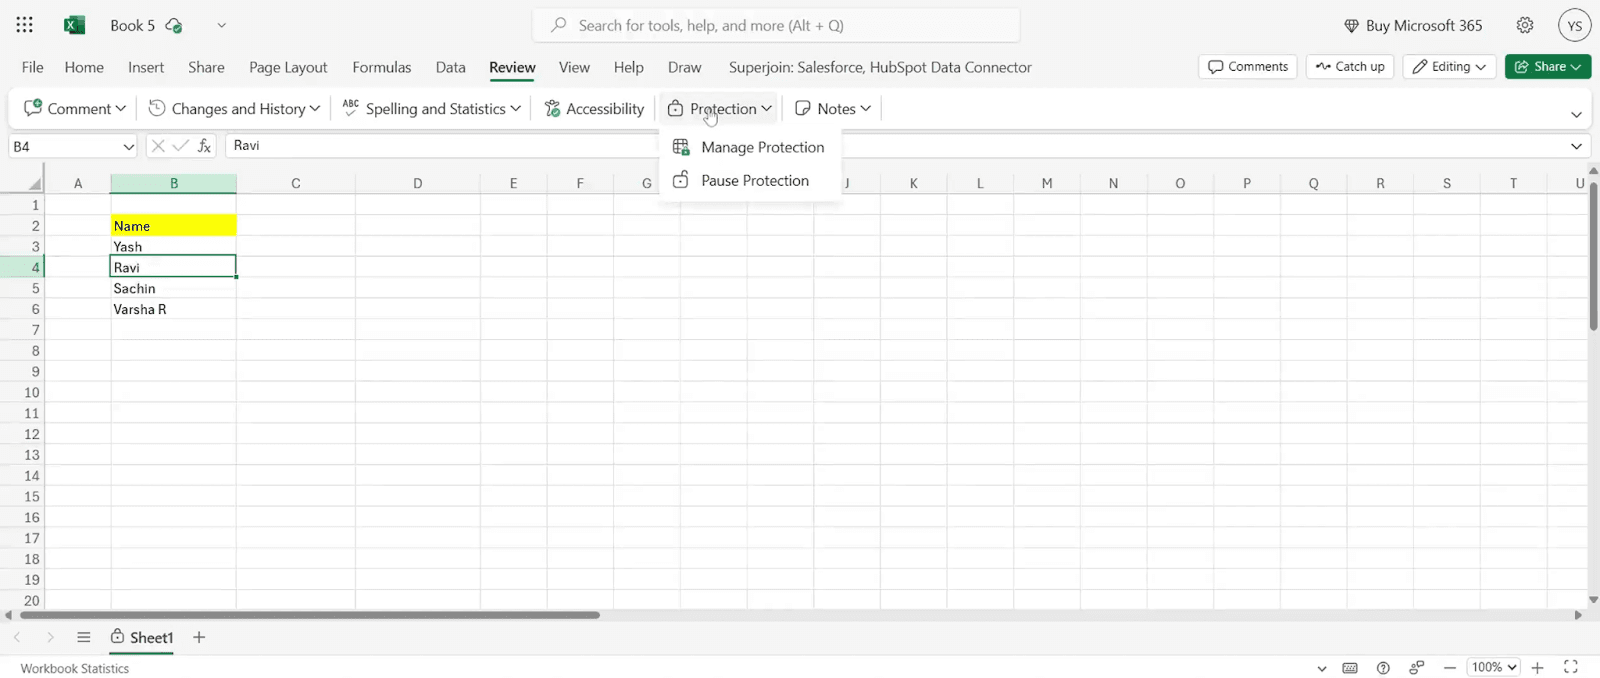
First, navigate to the Review tab and select Protection. Then, choose Manage Protection.
Enter the password you used to enable protection, then click OK.
Next, switch off the protection.
Conclusion
Locking cells in Excel is a powerful tool for safeguarding your data and fostering effective collaboration. By understanding the concepts, following the step-by-step guides, and considering the valuable tips provided, you can confidently implement cell locking to keep your spreadsheets secure and organized.
This comprehensive guide empowers you to leverage the full potential of cell locking in Excel, ensuring the integrity of your data and fostering a productive collaborative environment for all involved.
Say Goodbye To Tedious Data Exports! 🚀
Are you tired of spending hours manually exporting CSVs from different tools and importing them into Excel?
Superjoin is an Excel add-in that automatically connects your favorite SaaS tools to your spreadsheets. It pulls data directly into Excel, allowing you to create reports that update themselves without any manual work on your part.
Bid farewell to tedious exports and repetitive tasks. With Superjoin, you can add one additional day to your week. Try Superjoin for free or schedule a demo.
Maintaining the integrity of your data is essential in the collaborative world of Excel. To avoid unintentional or unauthorized alterations, formulas, computations, and important data must be protected. Locking cells are useful in this situation. With the help of this thorough tutorial, you will be able to lock cells in Excel efficiently, protecting your spreadsheet and expediting teamwork.
Understanding Cell Locking
Excel cells are not entirely hidden when they are locked. It keeps colleagues with editing rights from inadvertently changing them. A little lock icon in the corner of locked cells indicates that they are protected.
Here's what gets restricted when you lock cells:
Direct editing: The cell content cannot be directly changed by anyone with editing access unless the cell is unlocked.
Formula deletion: Existing formulas within locked cells cannot be deleted.
Formatting changes: Formatting applied to locked cells, such as font styles or cell borders, cannot be modified.
Important to note:
When you lock cells in Excel, it only restricts editing, not viewing. Anyone with access to the spreadsheet can still see the content of locked cells.
Data validation rules and conditional formatting can still be applied to locked cells.
Step-by-Step Guide to Locking Cells in Microsoft Excel
First, select the columns that you wish to lock.
Then, right-click to open the context menu and navigate to Format Cells.
Once there, select the Protection tab and check the box labeled Locked. Finally, click OK to save your changes.
Next, go to the Review tab and select Protect Sheet. Make sure to check the option for Select locked cells, then click OK. You will be prompted to enter a password to protect the sheet.
Enter your desired Password to protect the sheet. This password will safeguard the sheet from unauthorized edits.
Once the sheet is protected, you will notice that the locked cells cannot be edited, and an error message will prompt you to enter the password if you attempt to do so.
Considerations When Locking Cells in Microsoft Excel
Granular Locking: Although entire sheets can be locked, it's frequently more effective to lock particular cell ranges that contain formulas or important information.
Collaboration in Balance: Data integrity is guaranteed by locking cells, but it's crucial to find a balance. Collaboration may be hampered by overlocking.
Communicate Changes: Let your partners know when you lock cells, particularly if it will interfere with their ability to edit.
Regularly Review Permissions: Make sure the permissions you've set on locked cells are still suitable as your team or project develops.
Advanced Techniques for Locking Cells in Microsoft Excel
Formula Locking: Although locking cells prevents the formula from being deleted, it does not stop someone from altering the formula's cell references. Consider combining formula locking and hiding (available via the Format menu) to stop unintentional formula alteration.
Locking by Sheet: You can lock the entire sheet if it contains formulas or really sensitive data that you want to keep completely private. It's advisable to use this sparingly, though, as it fully limits editing on the sheet.
Using Named Ranges: You may make locking ranges easier by giving them names that you use often. Rather than manually highlighting cells, you can lock a named range by referring to its name in the "Protected sheets and ranges" panel.
Locking with Scripts: For more experienced users, Excel lets you write your own scripts that can automatically lock cells according to certain parameters. For elaborate spreadsheets with extensive protection requirements, this can be useful.
Guidelines for securing cells effectively in Microsoft Excel
Although it's crucial to understand the technical facets of cell locking, following best practices guarantees that your data is safe and available. The following advice will help you use cell locking in Excel:
Give Access Permissions a Clear Definition:
Prior to implementing cell locking, clearly define who is allowed to see, edit, and comment on the spreadsheet. To prevent misunderstandings and facilitate cooperation, let partners know about these permissions.
Employ Named Ranges:
Consider using designated ranges for particular data sets or spreadsheet sections rather than locking individual cells. Named range protection makes management simpler and makes it simpler to alter protection settings.
Review and update permissions on a regular basis:
Review and update your Excel's access and protection settings on a regular basis when project requirements or team makeup change. Make sure that access is still suitable and in line with present requirements.
Instruct Colleagues:
Educate collaborators on the value of data security and the correct ways to work with locked cells in Excel by offering training or documentation. To preserve data integrity, promote adherence to established processes.
Advantages of Cell Locking
Prevents Accidental updates: By locking cells, collaborators are less likely to inadvertently change formulas or important data when making updates.
Preserves Data Integrity: You may guarantee the precision and dependability of your spreadsheet by safeguarding formulas and important data.
Improves Collaboration: Controlled locking makes it easier to work together in a collaborative setting where some users can make changes to particular regions while others can examine the data without worrying about unintentional modifications.
Steps to unlock locked cells in Microsoft Excel
First, navigate to the Review tab and select Protection. Then, choose Manage Protection.
Enter the password you used to enable protection, then click OK.
Next, switch off the protection.
Conclusion
Locking cells in Excel is a powerful tool for safeguarding your data and fostering effective collaboration. By understanding the concepts, following the step-by-step guides, and considering the valuable tips provided, you can confidently implement cell locking to keep your spreadsheets secure and organized.
This comprehensive guide empowers you to leverage the full potential of cell locking in Excel, ensuring the integrity of your data and fostering a productive collaborative environment for all involved.
Say Goodbye To Tedious Data Exports! 🚀
Are you tired of spending hours manually exporting CSVs from different tools and importing them into Excel?
Superjoin is an Excel add-in that automatically connects your favorite SaaS tools to your spreadsheets. It pulls data directly into Excel, allowing you to create reports that update themselves without any manual work on your part.
Bid farewell to tedious exports and repetitive tasks. With Superjoin, you can add one additional day to your week. Try Superjoin for free or schedule a demo.
FAQs
How to lock a sheet tab in Microsoft Excel?
How to lock a sheet tab in Microsoft Excel?
What happens if someone tries to edit a locked cell?
What happens if someone tries to edit a locked cell?
Can I lock cells with formulas to prevent them from being overwritten?
Can I lock cells with formulas to prevent them from being overwritten?
Automatic Data Pulls
Visual Data Preview
Set Alerts
other related blogs

Try it now