Microsoft Excel Tutorial
How to Wrap Text in Microsoft Excel?
This detailed guide provides a deep dive into how to wrap text in Microsoft Excel
Table of Contents
Text wrapping in Microsoft Excel is essential for preventing text overflow, which can disrupt the layout and clarity of your data. Whether you are compiling a large dataset or preparing a report, Understanding how to wrap text in Microsoft Excel ensures that your content fits neatly within each cell, making your spreadsheets cleaner and drastically improving the usability of your document.
As teams increasingly integrate tools like Jira to Microsoft Excel for streamlined project management and reporting, text wrapping becomes even more critical. When importing large datasets, such as task descriptions or comments from Jira, wrapping text ensures that all the relevant information is displayed clearly within each cell, without affecting the overall layout.
Here, we will explore several methods to wrap text in Microsoft Excel, including detailed steps and tips to enhance your ability to manage large quantities of information effectively.
Methods to Wrap Text in Microsoft Excel
Understanding how to wrap text in Excel is essential for anyone working with data-heavy files. Here are some straightforward methods to get started.
Method 1: Wrap Text Using the Wrap Text Button
You can divide the lengthy string into many lines with the aid of this technique. Choose the cells you wish to format and activate the Excel text wrap to make a long text string span several lines.
To use the Ribbon to wrap text in Excel, follow these steps:
Step 1: Open Excel and Select Cell
Select the particular string that you want to change.
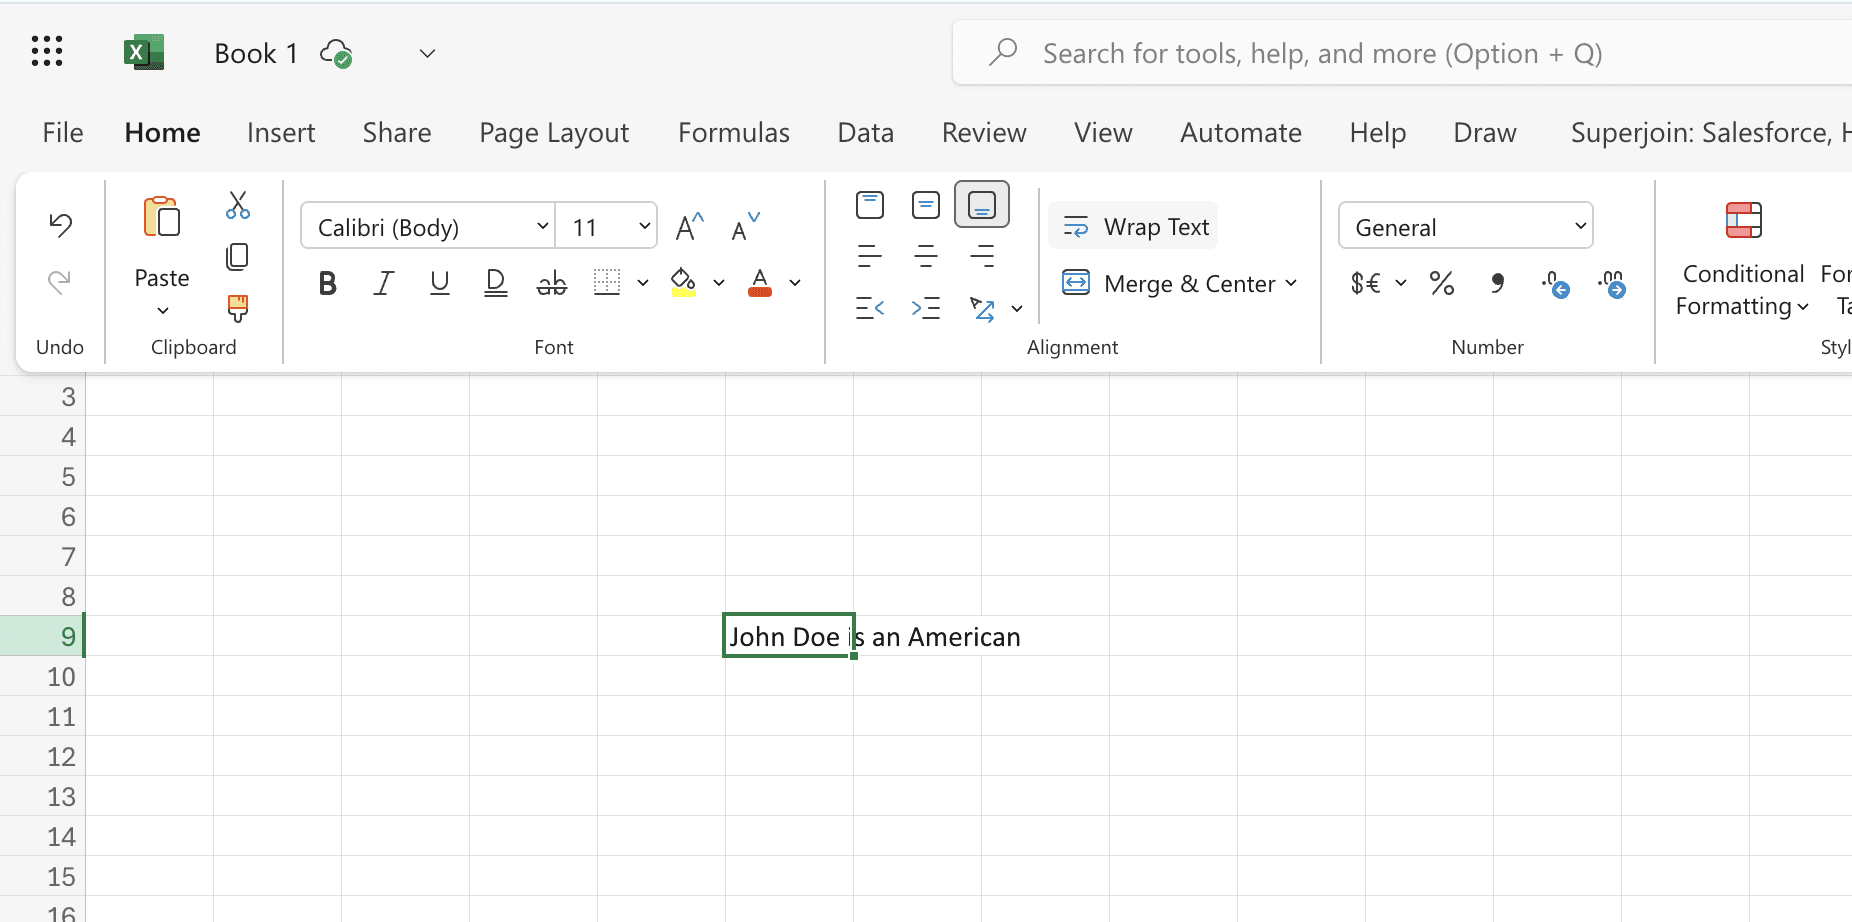
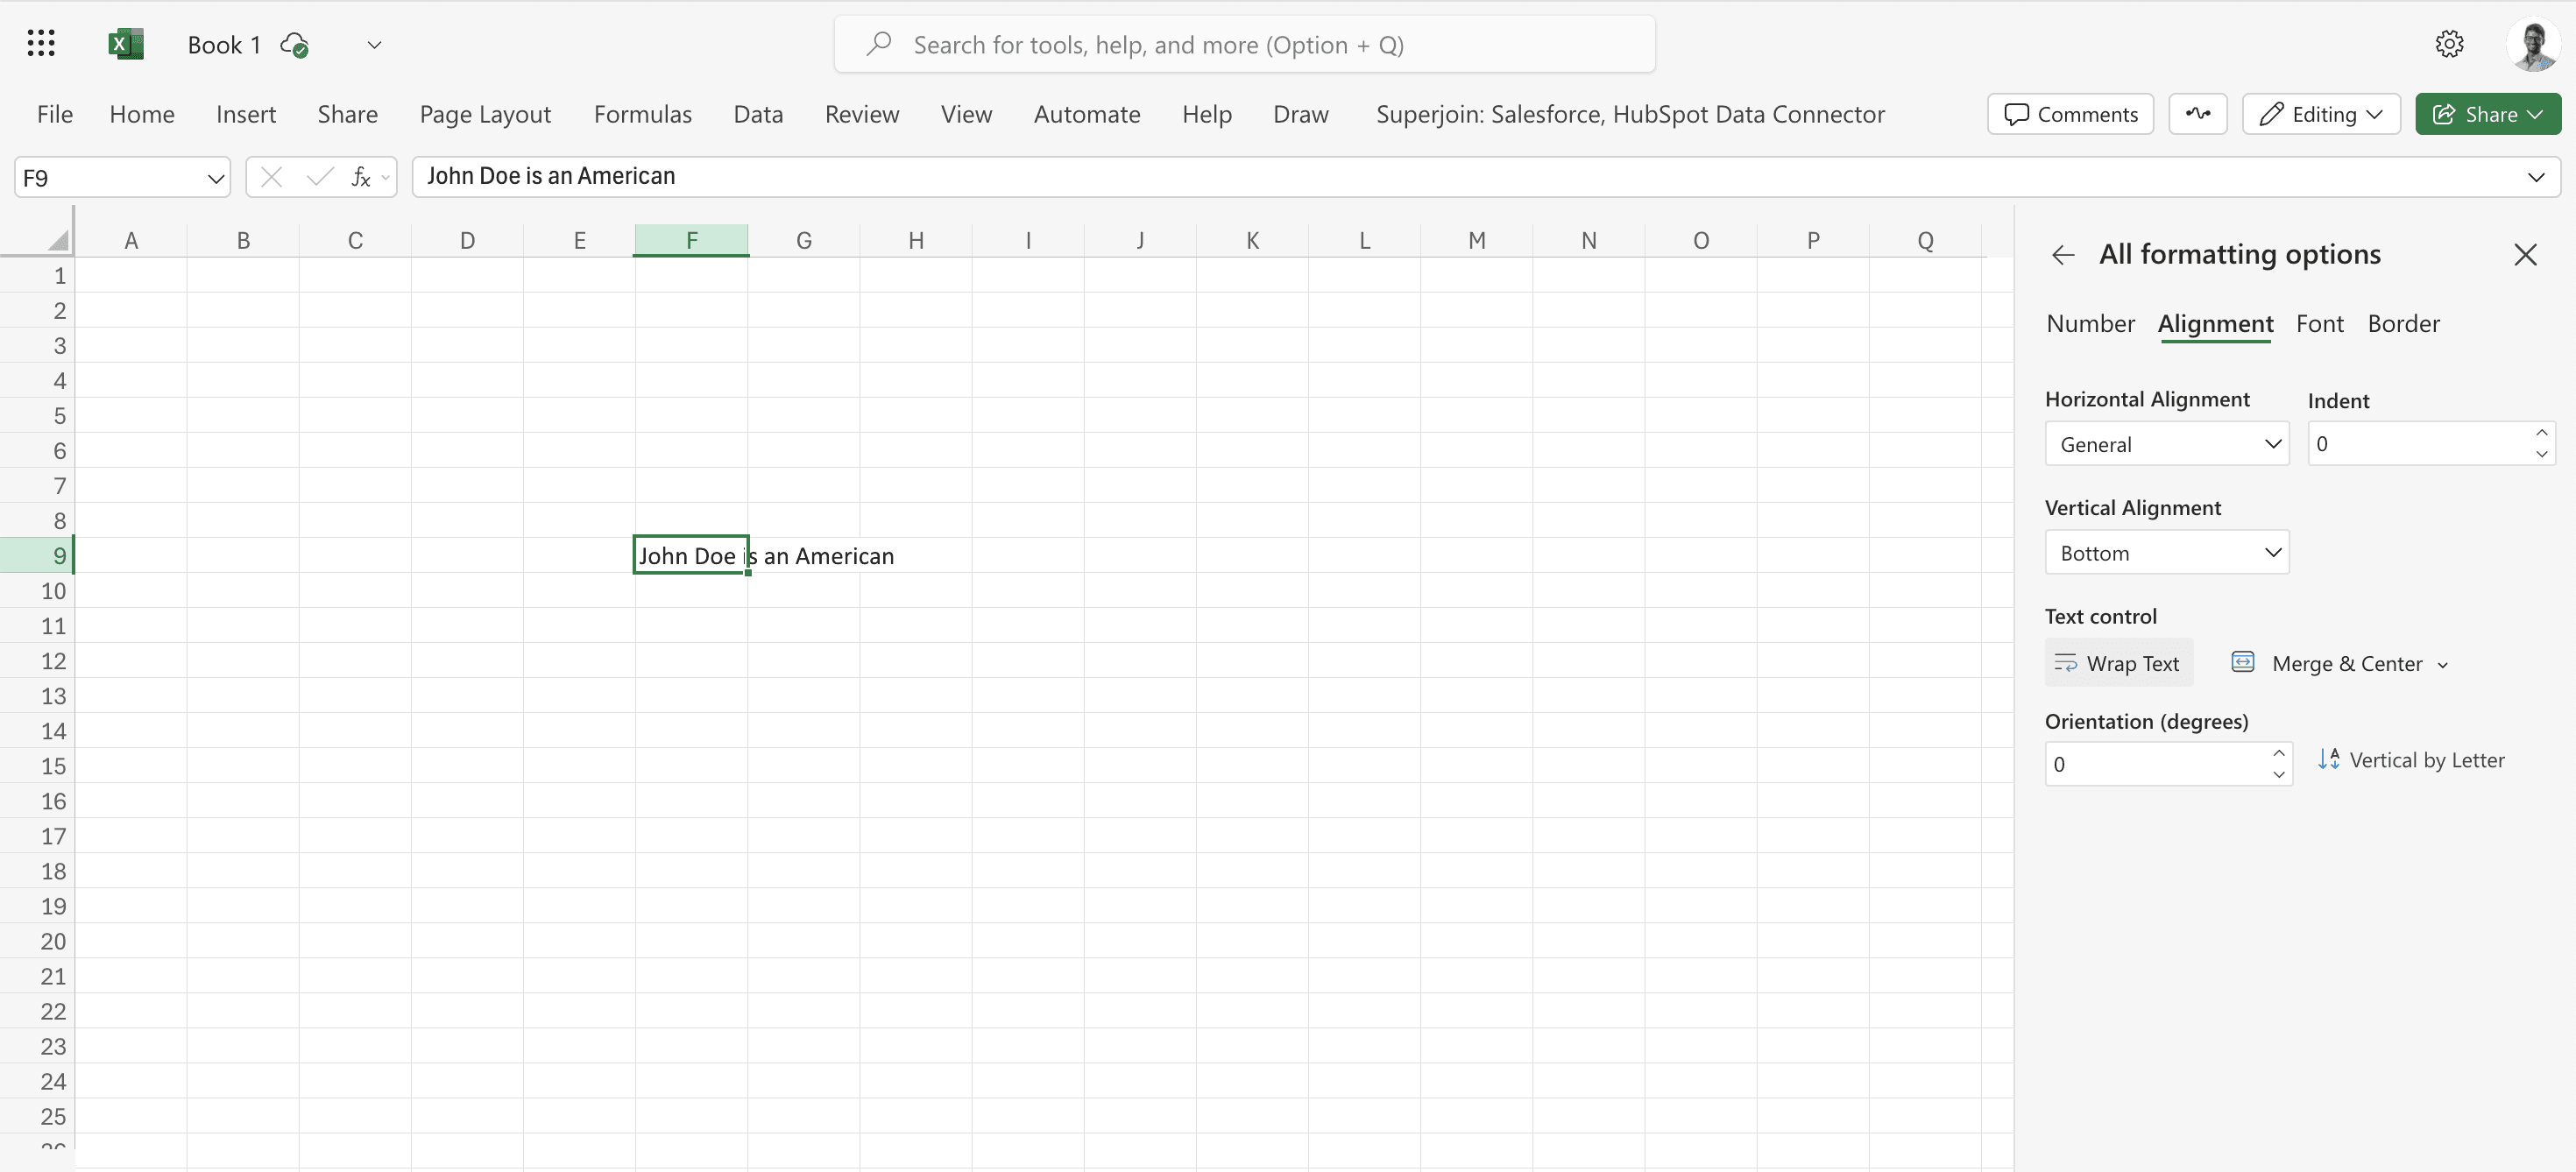
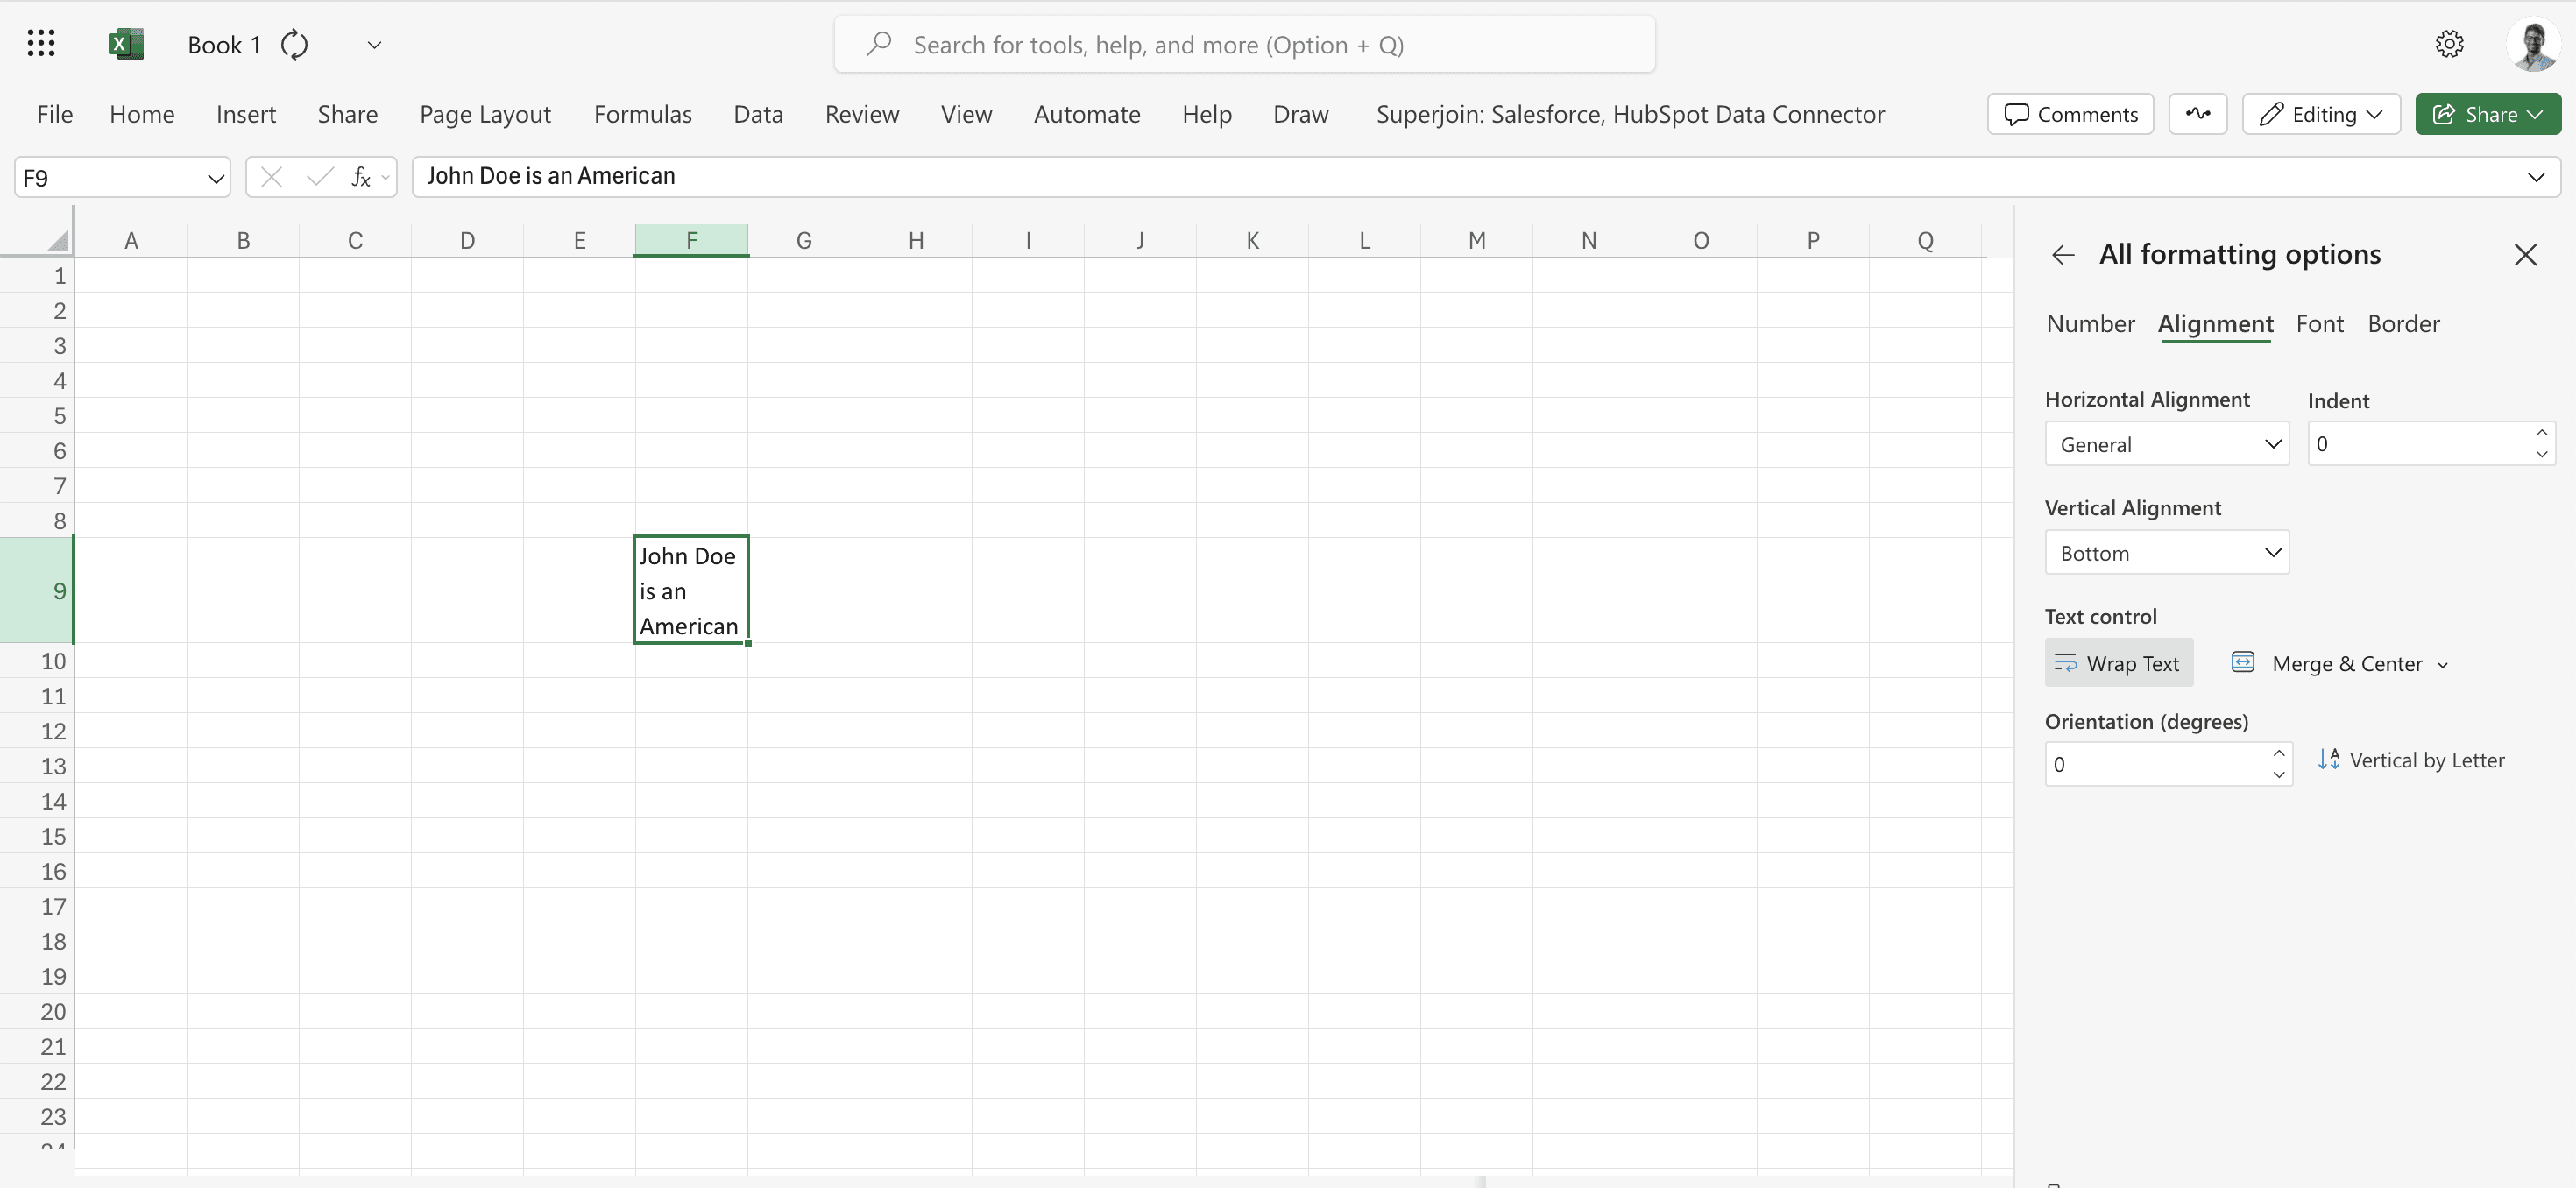
Step 2: Select Wrap Text under the Home Tab.
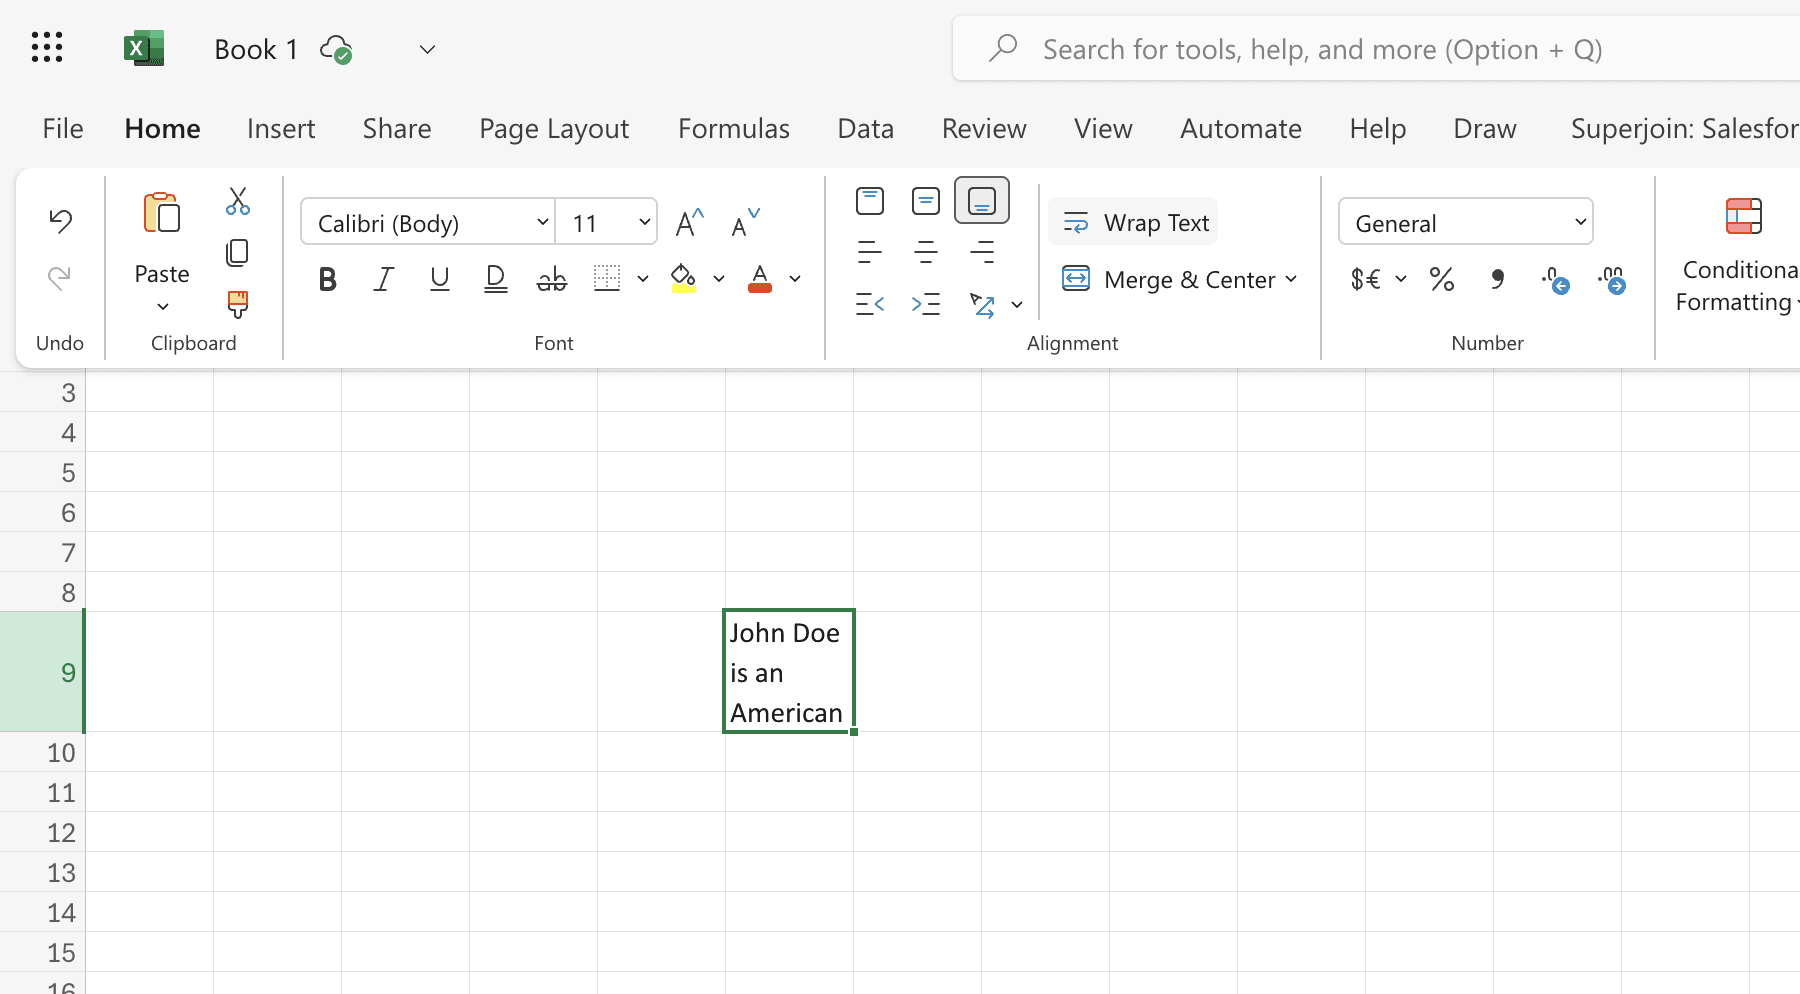
Click Wrap Text under the Alignment category on the Home tab. You'll notice that the text you entered is now automatically wrapped in the cell.
Method 2 : Use Format Cells to Wrap Text
To wrap text using the Format Cells dialog box, follow the below instructions -
Step 1: Select the Cell in which data is present.
Select the cell that you want to change.
Step 2: Right Click and Choose Format Cell
Right-click on it, then select the Format cell from the menu that appears.
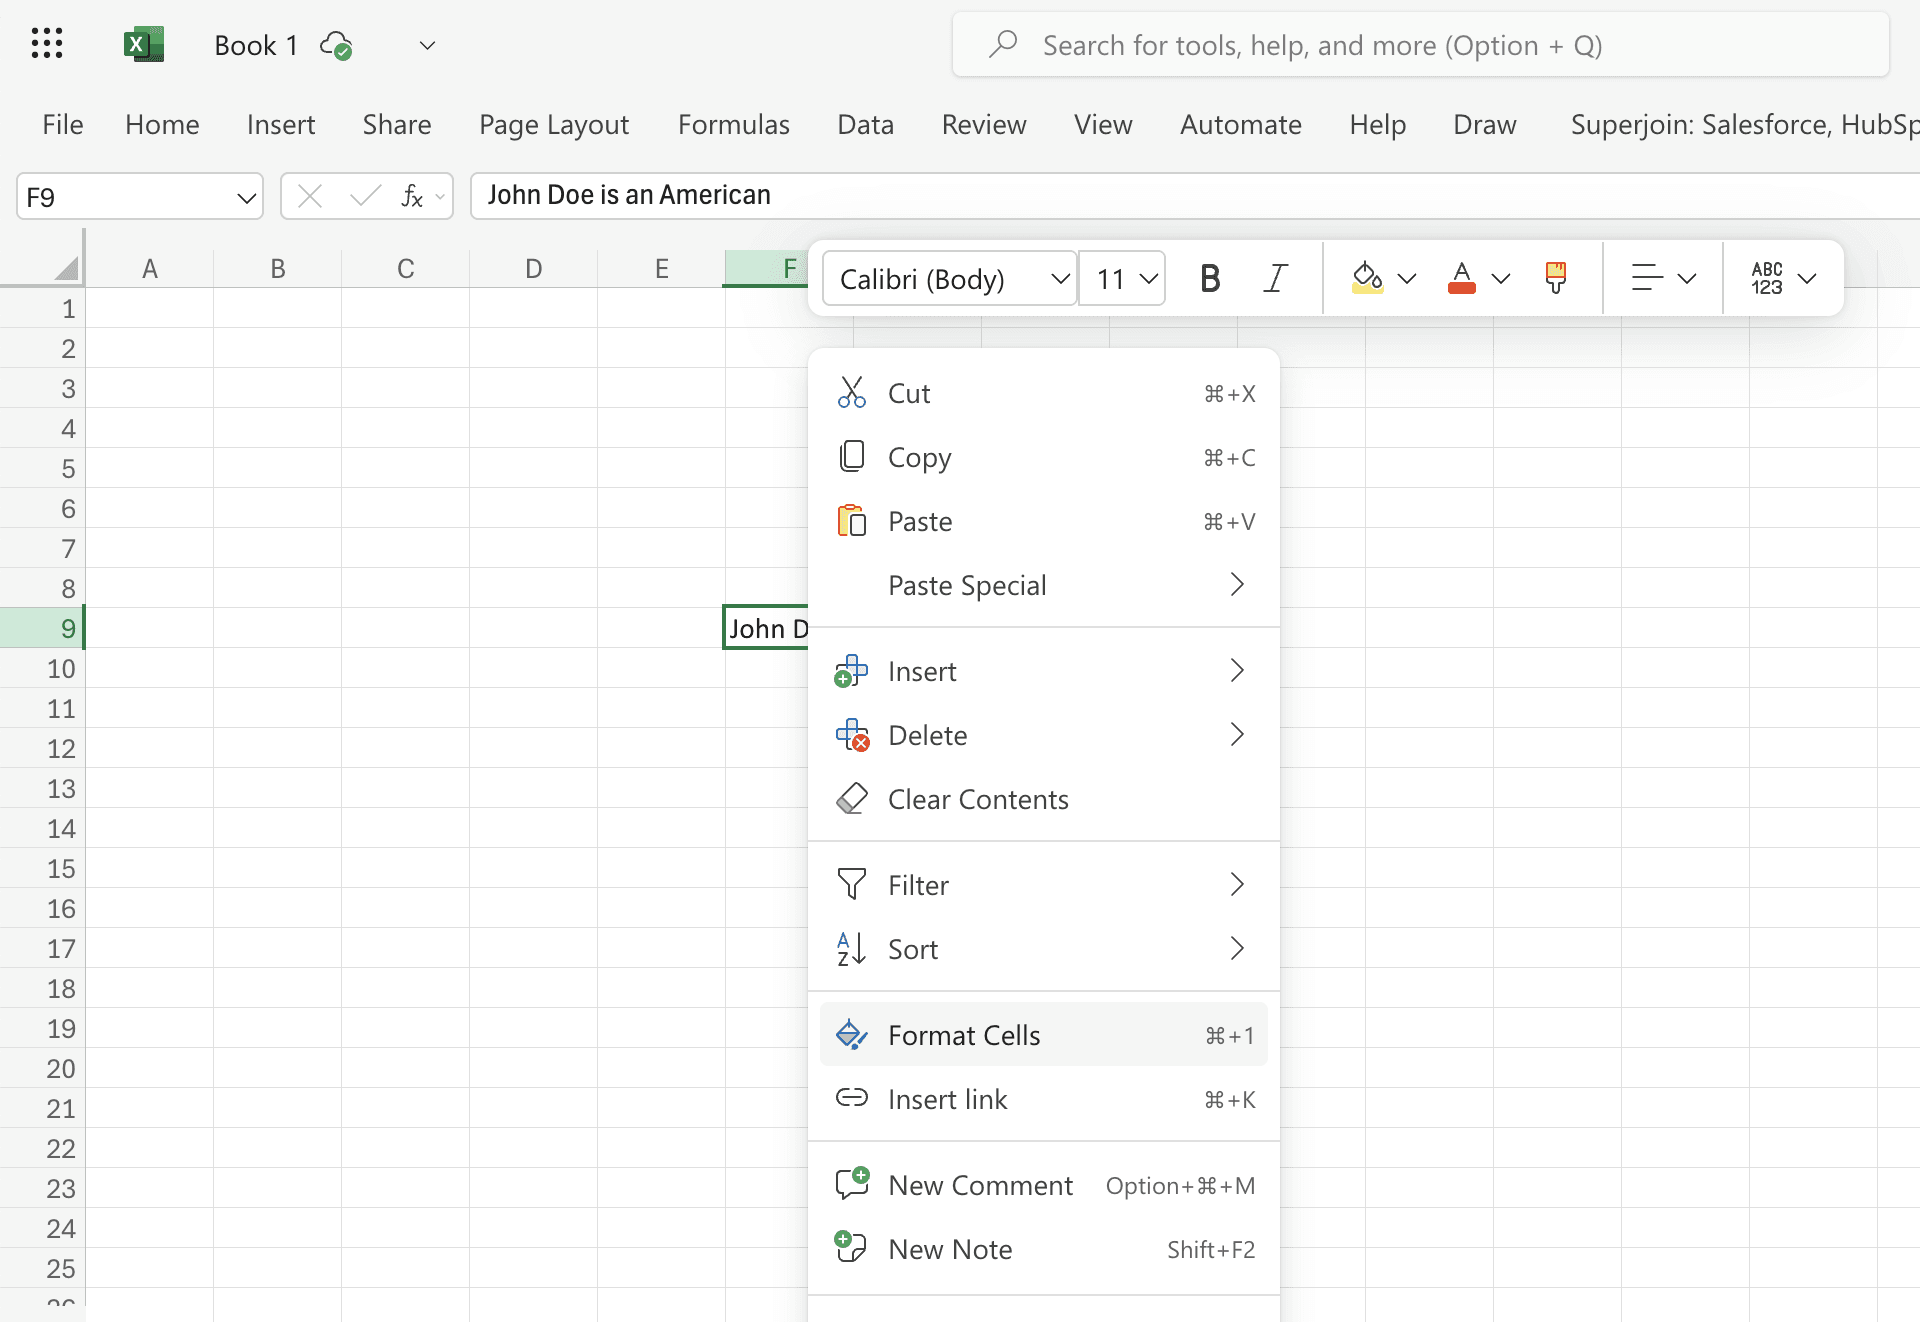
Step 3: In the Format Cells Dialog Box, choose Alignment.
Step 4: Click OK after selecting Wrap Text from the Text Control Option.
Method 3: Making Use of the Keyboard Shortcut
To use a keyboard shortcut to wrap text in Excel, follow these steps:
Step 1: Select Cell in Excel after opening it.
Choose the cell you wish to modify.
Step 2: Hit the ALT, H, and W keys.
Press the keyboard shortcut Alt + H + W.
Optimization Tips for Using Wrap Text in Microsoft Excel
Auto-Adjust Row Height: Excel automatically modifies the row height to match the content when you use Wrap Text. You can manually change the row height if it doesn't change as you would anticipate.
Employ Cell Merging for Headings or Titles: To guarantee that the text stays centered and doesn't overflow into neighboring cells, you can use Wrap Text to merge cells for titles or multi-column headings.
Say Goodbye To Tedious Data Exports! 🚀
Are you tired of spending hours manually exporting CSVs from different tools and importing them into Microsoft Excel?
Superjoin is a data connector for Microsoft Excel that connects your favorite SaaS tools to Microsoft Excel automatically. You can get data from these platforms into Microsoft Excel automatically to build reports that update automatically.
Bid farewell to tedious exports and repetitive tasks. With Superjoin, you can add 1 additional day to your week. Try Superjoin out for free or schedule a demo.
Text wrapping in Microsoft Excel is essential for preventing text overflow, which can disrupt the layout and clarity of your data. Whether you are compiling a large dataset or preparing a report, Understanding how to wrap text in Microsoft Excel ensures that your content fits neatly within each cell, making your spreadsheets cleaner and drastically improving the usability of your document.
As teams increasingly integrate tools like Jira to Microsoft Excel for streamlined project management and reporting, text wrapping becomes even more critical. When importing large datasets, such as task descriptions or comments from Jira, wrapping text ensures that all the relevant information is displayed clearly within each cell, without affecting the overall layout.
Here, we will explore several methods to wrap text in Microsoft Excel, including detailed steps and tips to enhance your ability to manage large quantities of information effectively.
Methods to Wrap Text in Microsoft Excel
Understanding how to wrap text in Excel is essential for anyone working with data-heavy files. Here are some straightforward methods to get started.
Method 1: Wrap Text Using the Wrap Text Button
You can divide the lengthy string into many lines with the aid of this technique. Choose the cells you wish to format and activate the Excel text wrap to make a long text string span several lines.
To use the Ribbon to wrap text in Excel, follow these steps:
Step 1: Open Excel and Select Cell
Select the particular string that you want to change.
Step 2: Select Wrap Text under the Home Tab.
Click Wrap Text under the Alignment category on the Home tab. You'll notice that the text you entered is now automatically wrapped in the cell.
Method 2 : Use Format Cells to Wrap Text
To wrap text using the Format Cells dialog box, follow the below instructions -
Step 1: Select the Cell in which data is present.
Select the cell that you want to change.
Step 2: Right Click and Choose Format Cell
Right-click on it, then select the Format cell from the menu that appears.
Step 3: In the Format Cells Dialog Box, choose Alignment.
Step 4: Click OK after selecting Wrap Text from the Text Control Option.
Method 3: Making Use of the Keyboard Shortcut
To use a keyboard shortcut to wrap text in Excel, follow these steps:
Step 1: Select Cell in Excel after opening it.
Choose the cell you wish to modify.
Step 2: Hit the ALT, H, and W keys.
Press the keyboard shortcut Alt + H + W.
Optimization Tips for Using Wrap Text in Microsoft Excel
Auto-Adjust Row Height: Excel automatically modifies the row height to match the content when you use Wrap Text. You can manually change the row height if it doesn't change as you would anticipate.
Employ Cell Merging for Headings or Titles: To guarantee that the text stays centered and doesn't overflow into neighboring cells, you can use Wrap Text to merge cells for titles or multi-column headings.
Say Goodbye To Tedious Data Exports! 🚀
Are you tired of spending hours manually exporting CSVs from different tools and importing them into Microsoft Excel?
Superjoin is a data connector for Microsoft Excel that connects your favorite SaaS tools to Microsoft Excel automatically. You can get data from these platforms into Microsoft Excel automatically to build reports that update automatically.
Bid farewell to tedious exports and repetitive tasks. With Superjoin, you can add 1 additional day to your week. Try Superjoin out for free or schedule a demo.
FAQs
What are the differences between the Wrap, Overflow, and Clip text options in Microsoft Excel?
What are the differences between the Wrap, Overflow, and Clip text options in Microsoft Excel?
Is there a way to automatically wrap text in all new cells in Microsoft Excel?
Is there a way to automatically wrap text in all new cells in Microsoft Excel?
How can I unwrap text in Microsoft Excel if I change my mind?
How can I unwrap text in Microsoft Excel if I change my mind?
Automatic Data Pulls
Visual Data Preview
Set Alerts
other related blogs

Try it now